Fix VMware Error: Virtual Machine Disks Consolidation Needed
The VMware virtual machine disks consolidation is needed error usually appears when snapshots fail to merge correctly with the main virtual disk. This problem often occurs after incomplete backups, canceled snapshot deletions, or low storage space. Left unresolved, it can slow down your VM or even risk data corruption. Read this blog to learn why the virtual machine consolidation needed status occurs and how to resolve it safely.

What Is VMware Disk Consolidation?
Virtual disk consolidation is the process of merging virtual disk files created after taking VM snapshots. You can initiate disk consolidation on demand to avoid performance degradation and other issues. When you take a snapshot, delta disks are created and changes are written to the appropriate delta disk (the latest delta disk by default, until one of the previous snapshots is selected to restore the virtual machine). As a result, redundant data is present in the virtual machine storage because each delta disk contains all changes made as compared to the previous delta disk state, and the parent disk remains unchanged.
When the chain of snapshots and related virtual disk files becomes large, performance degrades. When you perform VMware disk consolidation, data from delta disks is merged into a single disk, and no redundant data is left on the datastore where this VM’s files are located. Storage space is cleaned after you consolidate virtual machine disk files. Note that VMware recommends using no more than 32 snapshots per VM.
Possible Reasons for the VMware Disk Consolidation Error
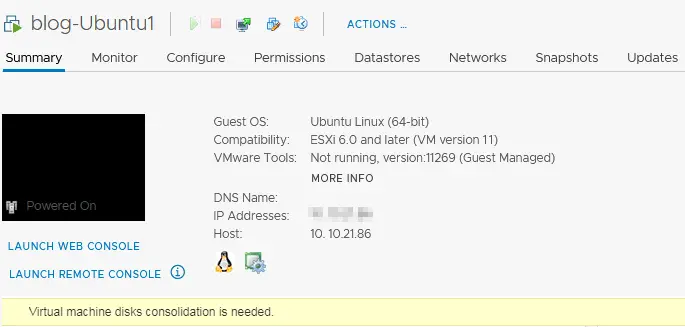
The VMware virtual machine disks consolidation is needed error message is displayed in the VM Summary tab of the VMware vSphere Client (screenshot below). One of the common reasons for this error message is incorrectly deleting a VM snapshot, which can leave VMDK files related to snapshots and log files on the datastore (for example, after you performed the Delete All or Delete operation for VM snapshots).
The most common causes for the virtual machine consolidation needed status:
- Not enough disk space on the VMFS datastore to consolidate VM snapshots and consolidate virtual disk files. If there is less than 1 GB of free space on the datastore, this error may occur.
- Low performance of the storage system attached to the ESXi host on which the VM is running. If the snapshot size is large or times out, snapshot consolidation can fail.
- Connection issues between the ESXi host and vCenter.
- Snapshot files are locked by a third-party application (for example, a backup application). This may occur if the backup application did not finish the backup job and locked the snapshot (backup applications can create a temporary snapshot of a virtual machine when running a backup). Backup applications are unable to quiesce disks without using snapshot techniques to create a consistent backup of a running VM.
Basically, you should restore the consistency of the VM disk files.
How to Fix the VMware Disk Consolidation Error?
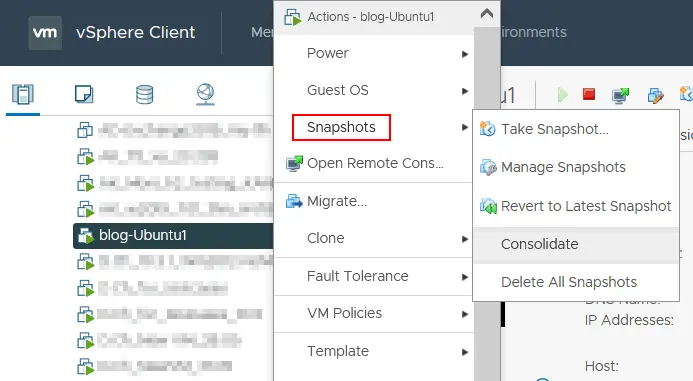
To resolve the virtual machine consolidation needed status, right-click the VM name in the VMware vSphere Client and in the menu that opens, click Snapshots > Consolidate.
A confirmation message is displayed:
This operation consolidates all redundant redo logs on your virtual machine. Are you sure you want to continue?
Click Yes to confirm and consolidate the virtual machine disk files.
Note: If there is a concern that some data may be lost during VMware disk consolidation, create a VMware VM backup by copying all VM files to another folder on a datastore and then performing the VMware disk consolidation.
Wait until the VMware disk consolidation is complete and the logs are cleared. You can see the task progress in the task panel at the bottom of the VMware vSphere Client interface. If the VM is running, VM performance can degrade during this operation. The time needed to finish this operation depends on the VM size, the number of snapshots and VM load.
After the VMware disk consolidation task is finished, the warning should disappear.
Other Errors that May Occur
Sometimes, another error can occur during VMware disk consolidation and the following error message is displayed:
Unable to access file since it is locked. An error occurred while consolidating disks: Failed to lock the file. Consolidation failed for disk node ‘scsi0:0’.
Locks can also be created when backup applications use the hot-add disk option for backups that utilize snapshots. The VM file lock is intended to avoid concurrent writes to the file by multiple ESXi hosts.
Try to perform the following actions to fix this error:
- Restart the management agents on the ESXi server where the VM resides. Open ESXi shell or connect to the ESXi host via SSH and run the command as root:
services.sh restartOr
/etc/init.d/hostd restart/etc/init.d/vpxa restartYou can also open the ESXi direct console, go to Troubleshooting Options and select Restart Management Agents (press Enter to activate the needed option, then press F11 to confirm).
- Check the locked file with the command:
vmfsfilelockinfo -p /vmfs/volumes/vm_datastore/vm_name/vm_name.vmx - Check the hostd log file if you need to identify the path on the datastore where the VM files are located.
cat /var/log/hostd.log |grep -i vm_name - Go to the VM directory on the datastore when you know the VM files’ location:
cd /vmfs/volumes/datastore_name/vm_name - Run the command to list ESXi hosts that are locking the VM files:
for i in `ls`; do vmfsfilelockinfo -p $i ;done|grep 'is locked in\|Host owning the lock\|Total time taken' | sed 's|Host owning the lock on file is||g'|sed 's|Total time|---|g' | awk '{print $1}' |uniq - Restart the ESXi management agents, including hostd and vpxa as explained above, or run these commands on the ESXi host locking the VM files:
/etc/init.d/hostd restart/etc/init.d/vpxa restart
Another method to unlock VM files
As an alternative, you can try these steps to fix an error occurred while consolidating disks: Failed to lock the file.
- Shut down the virtual machine.
- Take a new VM disk snapshot.
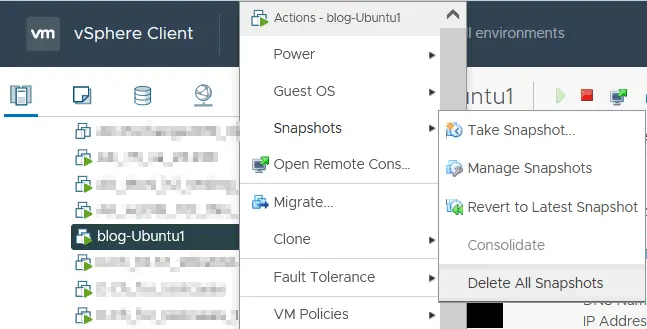
- Delete all existing VM snapshots. Right-click the VM name in vSphere Client, select Snapshots and click Delete All Snapshots.
- Clone the VM or migrate it to another ESXi host with vMotion if the error has not been fixed yet.
- Try to consolidate snapshots once again, as explained above.
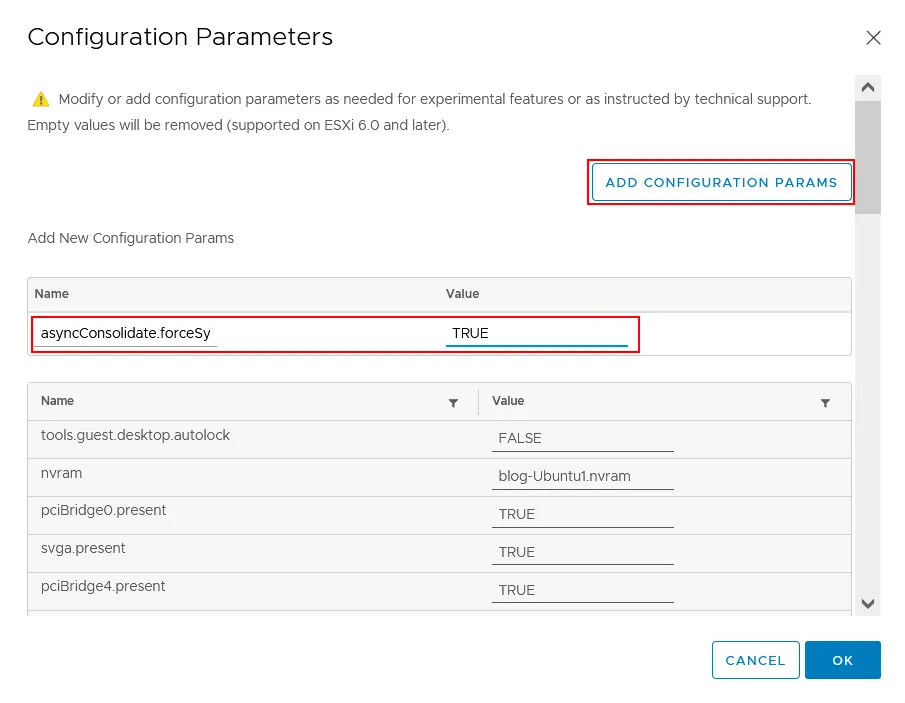
If these actions don’t help, try shutting down the VM, opening VM settings, selecting the VM options tab, then expanding the Advanced section and clicking Edit Configuration. In the Configuration parameters window, click Add Configuration Params. Add the asyncConsolidate.forceSync parameter and set this parameter to TRUE.
Sometimes the virtual machine consolidation needed status can be caused by inconsistent -ctk.vmdk files that are created for changed block tracking (possibly by the VM backup software). Try to delete the CTK files since they are not needed for snapshot consolidation. Don’t forget to back up VM files before deleting the CTK files. Then try to consolidate virtual machine disk files again.
The Consolidate option is inactive
If the VMware consolidate snapshot option is greyed out (inactive), an active task can be running on the VM. If you see the detected an invalid snapshot configuration error, some snapshots may be broken or there may be split chains of snapshots. In this case, try to do the following actions:
- Connect to the ESXi server via SSH and go to the directory where the VM files are located on the datastore.
cd vmfs/volumes/DatastoreName/VMFolderNameYou can check the VM files’ location in the VMware vSphere Client and find the location of virtual disks by viewing the VM settings.
- Identify what disk snapshots are being pointed to:
cat VM-name.vmx | grep scsi*Refer to the output to check the virtual disk files, including virtual disk snapshot files. For example, the name of the virtual disk file is displayed in the line. This is not a snapshot:
scsi 0:0.fileName = “VM-Name.vmdk”
In the output line, the name of the virtual disk snapshot file is displayed, and you are pointing to the snapshot:
scsi 0:0.fileName = “VM-Name-000002.vmdk”
A SCSI virtual disk controller is used in the VM configuration in this example.
- The following command checks what each snapshot is pointing to. Use this command to detect which snapshot is pointing to the following disk file (the snapshot vmdk file or a base disk vmdk file) in the snapshot chain.
cat VM-Name-000002.vmdk | grep parentFileNameHintYou may need to execute this command again for other VMDK files (like VM-Name-000001.vmdk in this example) until you find the needed base disk. This method helps you identify inconsistencies.
- If you have found an inconsistency, for example, VM-Name-000002.vmdk is pointing to VM-Name-000001.vmdk, which in turn points to VM-Name.vmdk, run vmkfstools on the highest point of the disk snapshot chain (VM-Name-000002.vmdk in this case):
vmkfstools -q -v10 VM-Name-000002.vmdkThis command attempts to open and close all VMDK files in the chain, notifying you where failures occur.
Using PowerCLI
As an alternative to executing VMware disk consolidation in the VMware vSphere Client graphical user interface, you can use vSphere PowerCLI with the command line interface.
- Connect to the vCenter Server that manages the ESXi host with the VM that has the virtual machine consolidation needed status. Enter the credentials when prompted.
Connect-VIServer vcenter01.test.com - Get the list of VMs with the virtual machine consolidation needed status:
Get-VM | Where-Object {$ _. Extensiondata.Runtime.ConsolidationNeeded} - Perform VMware disk consolidation.
Get-VM | Where-Object {$ . Extensiondata.Runtime.ConsolidationNeeded} | foreach {$ . ExtensionData.ConsolidateVMDisks_Task ()}
Additional recommendations
In VMware vSphere 7.0, users may encounter an issue when a host is rebooted and the CBT service fails to start. Manually starting the service may be necessary every time. However, this issue was fixed in vSphere 7 U3. If you use vSphere 7.0, you can try this workaround:
- Verify if the CBT module is enabled:
esxcli system module list --enabled=true | grep cbt - Verify if the CBT module is loaded on the ESXi host:
esxcli system module list --loaded=true | grep cbt - Manually load the CBT module:
vmkload_mod cbt
If a backup application has a lock on the VM files, you can restart the vpx process on the ESXi host to help clear the lock. Try also to detach virtual disks from the VM backup application.
Instead of VM migration, you can shut down the VM and reboot the ESXi host. Then, take the host out of maintenance mode to release the lock and fix the problem.
Conclusion
The virtual machine consolidation needed status is a common yet manageable issue in VMware environments. By understanding what causes the error and applying proper snapshot and backup practices, you can maintain a healthy, efficient virtual infrastructure. Always verify snapshot deletions and monitor available storage to prevent recurrence. Regular maintenance and proactive monitoring help ensure smooth VM performance and reliable data protection.