Hyper-V GPU Passthrough: An Essential Guide for Beginners
Hyper-V virtual machines use an emulated graphics adapter by default, which is sufficient for basic display tasks but lacks the performance needed for GPU-accelerated workloads such as 3D rendering, machine learning inference or CUDA-based computation. Hyper-V GPU passthrough solves this by assigning a physical video card directly to a VM, bypassing emulation and giving the guest OS full access to the hardware GPU.
This guide covers the two available methods for GPU assignment in Hyper-V: Direct Device Assignment (DDA) and GPU partitioning (GPU-P). Read this post to learn how to meet the hardware and software requirements, configure each method on Windows Server and client Windows versions and troubleshoot common issues.
What’s New?
This guide has been updated to reflect changes introduced in Windows Server 2025 and recent Windows client releases:
- Windows Server 2025 introduces GPU partitioning (GPU-P) as a fully supported enterprise feature, allowing multiple VMs to share a single physical GPU through SR-IOV-based isolation.
- Live migration is now supported for VMs with GPU partitions in Windows Server 2025, enabling host maintenance without VM downtime.
- Failover clustering support has been expanded: GPU-P VMs can be configured as clustered roles, and DDA-backed VMs can restart on another cluster node if a compatible GPU is available.
- The RemoteFX vGPU component has been fully removed in Windows Server 2025 (deprecated since Windows Server 2019).
- Updated troubleshooting guidance and backup considerations for GPU-enabled VMs.
What Is GPU Passthrough?
When a Hyper-V VM starts, it receives an emulated video adapter that renders graphics through the host CPU. This is adequate for console access and basic desktop use, but it cannot expose the hardware features that GPU-dependent workloads rely on: Compute shaders, hardware video encoding, CUDA cores or DirectX 12 support.
GPU passthrough eliminates this layer of emulation. Instead of routing graphics through a virtual adapter, Hyper-V assigns a physical video card to the VM at the PCI Express (PCIe) level. The guest OS communicates with the GPU directly, using the vendor’s native driver rather than a Hyper-V abstraction. From the perspective of applications running inside the VM, the GPU behaves as if it were installed in a physical machine.
Hyper-V supports two mechanisms for this. Direct Device Assignment (DDA) hands the entire physical GPU to a single VM. GPU partitioning (GPU-P) divides one card into isolated fractions so that multiple VMs can share it. Both are covered in detail later in this guide.
Note: A GPU can be integrated into the CPU die (common in recent Intel and AMD processors) or mounted on a discrete video card connected to the motherboard via PCIe. GPU passthrough and partitioning typically target discrete GPUs, though GPU-P on client Windows versions can also work with integrated graphics.
Key Benefits of GPU Passthrough in Hyper-V
A physical graphics card connected via GPU passthrough can serve home users, developers, designers and others who need hardware-accelerated graphics in a VM. Common scenarios include:
- Running graphics-intensive applications such as 3D modeling, AutoCAD drafting, engineering simulations, game development and hardware-accelerated rendering;
- Running games that require hardware acceleration features; some titles may not function without a physical video card;
- Running machine learning (ML) and artificial intelligence (AI) workloads that leverage GPU compute capabilities.
The benefits of GPU passthrough include:
- Better graphics performance. VMs gain direct access to the graphics card for demanding applications or games. Video playback is smoother and hardware-accelerated rendering with the latest graphics APIs becomes available.
- Flexible hardware utilization. A single Hyper-V host can run multiple VMs with varying graphics workloads in cases where dedicated workstations would be impractical.
- Cost efficiency. GPU passthrough can reduce hardware costs by consolidating workloads. This feature is also applicable to virtual desktop infrastructure (VDI) deployments.
GPU Passthrough vs. GPU Partitioning (GPU-P)
Hyper-V offers two approaches for assigning GPU resources to virtual machines:
- Direct Device Assignment (DDA) assigns an entire physical GPU exclusively to a single VM. The VM gets full hardware access and maximum performance but no other VMs can use that GPU. DDA is available on Windows Server 2016 and later (Datacenter editions). DDA-backed VMs cannot be live-migrated.
- GPU partitioning (GPU-P) divides a single physical GPU into multiple isolated fractions using SR-IOV, allowing several VMs to share the same hardware. Each VM receives a dedicated portion of GPU resources (memory, compute and encoders) with hardware-enforced isolation. GPU-P is available as a fully supported enterprise feature in Windows Server 2025 and can also be used on Windows 10/11 client versions through PowerShell.
DDA is preferred when a workload needs the full GPU or when the hardware does not support partitioning. GPU-P is better suited for environments where multiple VMs need GPU acceleration without requiring 100% of the card’s resources. GPU-P also supports live migration and failover clustering in Windows Server 2025, which DDA does not.
A physical GPU can operate in either DDA or GPU-P mode but not both simultaneously.
Requirements
To configure a VM with GPU passthrough on a Hyper-V host, you must meet certain hardware and software requirements. Not all video cards support this feature.
Hardware requirements
- The CPU on the Hyper-V host must support Intel VT-d or AMD-V virtualization features. The appropriate feature must be enabled in UEFI/BIOS settings.
- The Input-Output Memory Management Unit (IOMMU) must be supported by the CPU. This feature is required for PCI Express passthrough, including GPU passthrough.
- For GPU partitioning with live migration in Windows Server 2025, the CPU must support specific DMA (Direct Memory Access) tracking capabilities. Intel Sapphire Rapids (or newer) and AMD EPYC Milan (or newer) processors meet this requirement.
- A video card with a GPU that supports GPU virtualization technologies, such as NVIDIA GRID or AMD MxGPU (Multiuser GPU). These technologies are vendor-specific. Server-class hardware improves success rates. Older devices that use PCI Interrupts (INTx) are not supported.
- For GPU partitioning, the GPU must support SR-IOV (Single Root Input/Output Virtualization). Supported models include NVIDIA A2, A10, A16 and A40 GPUs.
Software requirements
- Windows Server 2016 or later for DDA. Windows Server 2025 Datacenter is recommended for GPU partitioning with clustering and live migration support.
- Windows 10 (build 1903 or later) or Windows 11 for GPU partitioning on client systems. DDA is not supported on client Windows versions.
- The Hyper-V role must be enabled in Windows.
- The latest GPU drivers must be installed on the Hyper-V host and in the VM guest OS.
- Only Generation 2 Hyper-V VMs can be used for GPU passthrough with DDA.
Limitations and Unsupported Configurations
Be aware of the following configurations that are not supported when using GPU passthrough:
- VMs with Hyper-V Dynamic Memory enabled cannot use GPU passthrough. Dynamic Memory must be disabled before assigning a GPU.
- GPU passthrough with DDA is available only on Datacenter editions of Windows Server. GPU partitioning in clustered environments also requires the Datacenter edition.
- If Windows Subsystem for Linux is deployed on the Hyper-V host, a code 43 error can occur on the VM when a GPU is assigned through partitioning.
- In versions before Windows Server 2025, clustering features such as high availability (HA) and VM live migration are not supported for GPU-enabled VMs. Windows Server 2025 adds live migration support for GPU-P VMs and failover restart for DDA VMs.
- VM save/restore and automatic checkpoints are not supported for GPU-assigned VMs. Disable automatic checkpoints before assigning a GPU.
Setting Up GPU Passthrough: What You Need to Know
The method you use to assign a GPU to a Hyper-V VM depends on your Windows version and the level of hardware sharing you need. Microsoft has offered three approaches over time, and only two remain supported.
RemoteFX vGPU (deprecated). Available from Windows Server 2012 R2 through Windows Server 2016, RemoteFX extended the Remote Desktop Protocol (RDP) to share a single host GPU across multiple VMs. It was useful in high-density VDI environments where dedicating a full card to each VM was impractical. However, RemoteFX capped dedicated video memory at 1 GB per VM and limited the frame rate to 30 FPS. Microsoft deprecated it in Windows Server 2019 and Windows 10 build 1809 due to architectural security vulnerabilities in the Hyper-V implementation, and removed it entirely in Windows Server 2025. If you still run a version that shipped with RemoteFX, a dedicated update is available to remove the component.
Direct Device Assignment (DDA). Introduced in Windows Server 2016, DDA replaced RemoteFX for scenarios that require full GPU performance. It passes an entire PCIe device (GPU, NVMe drive or other adapter) directly to a single VM, with no sharing and no emulation layer. The VM loads the vendor’s native driver and gets unrestricted access to video memory and frame rate. DDA is the Hyper-V equivalent of VMware PCI passthrough. The tradeoff is flexibility: Only one VM can use the card, the VM cannot be live migrated (it is bound to a physical PCIe path on the host) and DDA is available only on Windows Server Datacenter editions. In Windows Server 2025, DDA-backed VMs gained failover clustering support, meaning the cluster can restart the VM on another node if a compatible GPU is available, but live migration remains unsupported.
GPU partitioning (GPU-P). GPU-P is the modern successor to RemoteFX. On Windows Server 2025, it divides a single physical GPU into multiple isolated fractions using SR-IOV, giving each VM a dedicated slice of compute, memory and encoder resources with hardware-enforced isolation. Unlike DDA, GPU-P supports live migration and failover clustering in Server 2025 Datacenter, making it viable for production environments that require VM mobility. On client Windows versions (Windows 10 build 1903+ and Windows 11), GPU-P is available through PowerShell but relies on WDDM paravirtualization rather than true SR-IOV partitioning. The host and guest must run the same OS version, and GPU drivers must be manually copied from host to guest.
The practical implication is straightforward: If you need the full GPU for a single VM on Windows Server, use DDA. If multiple VMs need GPU acceleration or you require live migration, use GPU-P on Windows Server 2025. On client Windows, GPU-P through PowerShell is the only supported path.
Configuring GPU Passthrough in Hyper-V
Follow the steps below to prepare the environment and configure Hyper-V GPU passthrough.
Preparing to configure GPU passthrough
- Ensure that your hardware and software meet GPU virtualization requirements.
- Enable Intel VT-d or AMD-V virtualization features for your CPU in UEFI/BIOS on the Hyper-V host.
- Enable IOMMU. The IOMMU setting location varies across motherboards and UEFI/BIOS versions. In some cases, it appears in the North Bridge configuration. IOMMU can also be enabled when you enable Intel VT-d or AMD-V. Check the Memory Remap feature in UEFI/BIOS.
You can verify whether IOMMU is enabled on a Hyper-V host with the following PowerShell command (run as Administrator):
(Get-VMHost).IovSupport; (Get-VMHost).IovSupportReasonsTrue = enabled; False = disabled.
- Remove all checkpoints for the VM that will use GPU passthrough.
To disable automatic checkpoints for a VM, run:
Set-VM -Name VMName -AutomaticStopAction TurnOff
GPU passthrough in Windows Server
The following steps use DDA to assign a physical GPU to a VM on Windows Server.
- Set cache type and the MMIO (Memory-Mapped I/O) space limits for the VM. Run this PowerShell command as Administrator:
Set-VM -Name VMName -GuestControlledCacheTypes $True -LowMemoryMappedIoSpace 3Gb -HighMemoryMappedIoSpace 33280MbYou can also run three separate commands:
Set-VM -GuestControlledCacheTypes $true -VMName YourVMName
Set-VM -LowMemoryMappedIoSpace 3Gb -VMName YourVMName
Set-VM -HighMemoryMappedIoSpace 33280Mb -VMName YourVMName
These limits define the memory window that makes the device accessible to the VM. You can use a machine profile script from Microsoft to calculate the optimal MMIO values. The correct values vary for different video adapters. If you see a message indicating insufficient resources when starting the VM, shut it down and adjust these values. The value 33280 MB is used for the MMIO space above 32-bit (3 GB applies to the 32-bit MMIO window).
- Identify the PCI Express location path of the graphics card you want to pass through.
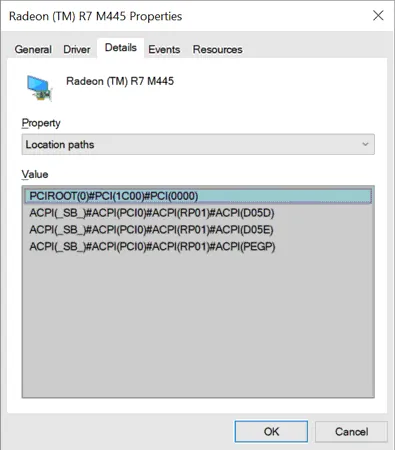
You can find this in Device Manager. Open Device Manager by running the following command:
Devmgmt.mscIn Device Manager:
- Right-click the target display adapter under Display Adapters and click Properties.
- Select the Details tab.
- Select Location paths from the property drop-down menu and copy the value.
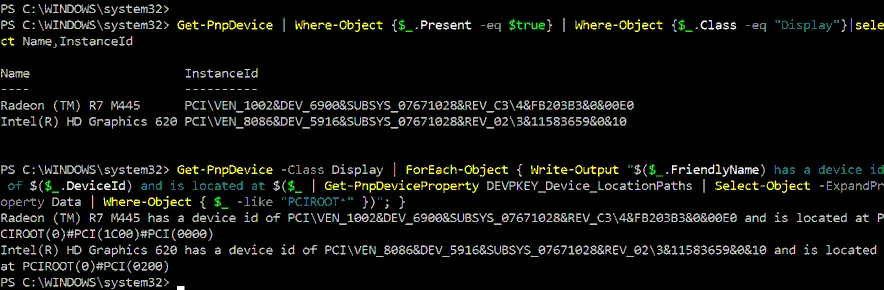
Alternatively, use PowerShell to retrieve the location path:
Get-PnpDevice | Where-Object {$_.Present -eq $true} | Where-Object {$_.Class -eq "Display"}|select Name,InstanceIdand:
Get-PnpDevice -Class Display | ForEach-Object { Write-Output "$($_.FriendlyName) has a device id of $($_.DeviceId) and is located at $($_ | Get-PnpDeviceProperty DEVPKEY_Device_LocationPaths | Select-Object -ExpandProperty Data | Where-Object { $_ -like "PCIROOT*" })"; }The output should contain a string like:
“PCIROOT(0)#PCI(0300)#PCI(0000)”
- Disable the graphics card in Device Manager. Right-click the video adapter and click Disable device.
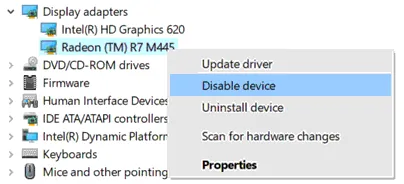
- Dismount the disabled display adapter in PowerShell:
Dismount-VmHostAssignableDevice -LocationPath "PCIROOT(0)#PCI(0300)#PCI(0000)" -ForceThe -Force flag is required when a partition driver is not installed. A device vendor may provide this optional security mitigation driver. If you plan to install it, do so before dismounting the PCIe device from the host.
The location path used above is for illustration purposes; replace it with your specific value.
- Assign the video card to the VM:
Add-VMAssignableDevice -VMName VMName -LocationPath "PCIROOT(0)#PCI(0300)#PCI(0000)" - Power on the VM and verify that the physical video card appears in Device Manager alongside the default Microsoft Hyper-V Video adapter.
- Install drivers for the video card in the VM’s guest OS. Download drivers from the official NVIDIA or AMD website.
- To disconnect the video card from the VM, stop the VM and run:
Remove-VMAssignableDevice -VMName YourVMName -LocationPath $locationPathThen reconnect the GPU to the Hyper-V host:
Mount-VMHostAssignableDevice -LocationPath $locationPath
Configuration in Windows 10 and 11
On client Windows versions (Windows 10 build 1903 and later, Windows 11), DDA is not available. GPU partitioning is the supported method:
- Verify whether your video card supports GPU partitioning. In Windows 10, run:
Get-VMPartitionableGpuIn Windows 11:
Get-VMHostPartitionableGpu - Use the
Add-VMGpuPartitionAdaptercmdlet to assign a GPU partition to the VM. However, you must copy GPU drivers from the Hyper-V host to the virtual machine. The driver version on the host and guest must match. The Easy-GPU-PV script can automate this process. Download the script as a ZIP file and extract it to a folder on the Hyper-V host. This script leverages GPU paravirtualization mechanisms used by Windows Subsystem for Linux (WSL2) and Windows Sandbox. - Open PowerShell as Administrator and allow script execution:
Set-ExecutionPolicy -Scope Process -ExecutionPolicy Bypass -Force Set-ExecutionPolicy -ExecutionPolicy RemoteSigned -Scope CurrentUser - Shut down the VM. Run the script to copy GPU drivers from the host to the VM:
.\Update-VMGpuPartitionDriver.ps1 -VMName YourVMName -GPUName "AUTO" - Configure the VM for GPU partitioning:
Set-VM -VMName VMName -GuestControlledCacheTypes $true -LowMemoryMappedIoSpace 1Gb -HighMemoryMappedIoSpace 32Gb Add-VMGpuPartitionAdapter -VMName YourVMName - After updating GPU drivers on the Hyper-V host, update the drivers in the VM as well. The VM must be powered off:
.\Update-VMGpuPartitionDriver.ps1 -VMName YourVMName -GPUName "AUTO" - To remove the GPU partition from the VM:
Remove-VMGpuPartitionAdapter -VMName "YourVMName"After a successful configuration, the corresponding display adapter should appear in Device Manager within the VM. You will also see visual effects such as desktop transparency in the guest Windows theme.
Be aware that some games and applications may not run even after completing the GPU passthrough configuration. This can occur when an application enforces a hardware compatibility check, and the GPU information reported in the guest OS differs from that on the host. Some applications also detect that they are running inside a VM.
If OpenGL-dependent applications do not work in the VM, installing the OpenGL Compatibility Pack may help.
When using GPU partitioning on Windows 10 or 11, the video adapter listed in Device Manager shows a Microsoft driver rather than the physical GPU model. Vendor-specific tools, such as NVIDIA Control Panel, are not available in the VM.
An additional issue can occur if you close an RDP session without disconnecting first. In this case, the VM may lose access to GPU memory, and applications relying on the GPU will report inaccessible video memory. Reconnecting via RDP does not resolve the issue; you must restart the affected applications.
Troubleshooting GPU Passthrough Issues
If the video card does not work properly after being assigned to a VM, check the following:
- Verify that the latest GPU drivers are installed with no driver-related errors. Open Device Manager and check the device status. Install drivers from the vendor’s website (NVIDIA, AMD, Intel) rather than relying on Windows Update.
- Ensure that sufficient MMIO space has been allocated for the VM.
- Confirm that GPU passthrough is officially supported by the vendor for your specific graphics adapter. Not all consumer-grade video cards support this feature. Some vendors restrict GPU passthrough to higher-tier models.
- Verify that the application running inside the VM supports your video card and its drivers.
- Enable the following group policy to allow GPU usage over Remote Desktop:
Computer ConfigurationTemplatesComponentsDesktop ServicesDesktop Session HostSession Environmenthardware graphics adapters for all Remote Desktop Services sessionsSet this value to Enabled.
- If you see an error such as “The operation failed because the object was not found” or Error 12, add the following registry keys to:
HKEY_LOCAL_MACHINE\SOFTWARE\Policies\Microsoft\Windows\HyperV
Values:
RequireSecureDeviceAssignment = 0 (REG_DWORD)
RequireSupportedDeviceAssignment = 0 (REG_DWORD)
You can set these values with PowerShell:
Set-ItemProperty -Path "HKLM:\SOFTWARE\Policies\Microsoft\Windows\HyperV" -Name "RequireSecureDeviceAssignment" -Type DWORD -Value 0 -Force
Set-ItemProperty -Path "HKLM:\SOFTWARE\Policies\Microsoft\Windows\HyperV" -Name "RequireSupportedDeviceAssignment" -Type DWORD -Value 0 -Force
- To bypass hypervisor driver checks inside the VM, use the Enterprise Windows Driver Kit (WDK):
- Mount the WDK ISO to the VM’s virtual DVD drive.
- Run E:\LaunchBuildEnv.cmd (where E: is the virtual DVD drive) and then run PowerShell.
- Navigate to the directory containing the Remove-HypervisorChecks.ps1 script.
- Run the command to remove hypervisor checks for the video driver (NVIDIA example):
./Remove-HypervisorChecks.ps1 -Nvidia -DriverPath "C:\path-to-driver\package.exe" - Wait for script execution to complete.
- Copy the resulting driver (patched-driver.zip) to the VM, enable test mode and install the driver.
- If you encounter Error 43, ensure that the GPU and its sound controller (NVIDIA cards often include an audio device) are assigned to the VM together.
- If an error appears when running:
Update-VMGpuPartitionDriver.ps1 -VMName “YourVMName” -GPUName “AUTO”This can be caused by multiple partitions (volumes) on the virtual hard disk. Try setting the hidden attribute on non-system partitions or temporarily removing them after backing up the data. Alternatively, specify the system partition explicitly in the PowerShell script or command.
Backup and Recovery Considerations for GPU-Enabled VMs
Standard Hyper-V backup workflows assume that a VM is portable: You can restore it to any compatible host and power it on. GPU-enabled VMs break that assumption. Whether assigned through DDA or GPU-P, the VM is coupled to physical hardware that may not exist, or may not be configured identically, on the recovery target. This makes the backup straightforward but the recovery conditional on hardware availability.
The GPU itself adds a data-consistency consideration. Backup software captures disk state but cannot snapshot the contents of GPU video RAM. For VMs running heavy GPU workloads, this means the backup reflects an offline or crash-consistent view of the hardware state, even when disk data is application-consistent. To minimize the gap, use production checkpoints with Volume Shadow Copy Service (VSS) or a VSS-aware backup tool, which ensures that data flushed from GPU memory to disk is captured in a consistent state.
Choosing between host-level and guest-level backup is less obvious for GPU-enabled VMs than for standard ones:
- Host-level backup captures the VHDX files and VM configuration. This is the standard approach but requires manual GPU re-mapping after restoration.
- Guest-level backup requires a backup agent installed inside the VM. This approach is often more practical for GPU workloads because it treats the VM as a standard server, bypassing the complexity of GPU passthrough during data capture.
For DDA configurations with exclusive passthrough, the VM is bound to a specific PCI Express path on the host. If you restore a DDA-enabled VM to a different host, the VM will likely fail to start because the original PCIe path (such as PciRoot(0x0)/Pci(0x3,0x0)…) may not exist or may be assigned to a different device.
To resolve a hardware mismatch after recovery:
- Remove the missing GPU device from the VM configuration.
- Dismount a compatible GPU on the new host.
- Re-assign the new GPU to the restored VM using PowerShell.
With GPU partitioning in Windows Server 2025 and Windows 11, the configuration is more flexible but introduces its own recovery considerations. GPU-P requires matching host and guest GPU driver versions. If you restore a VM to a host running a different driver version, GPU acceleration may fail to initialize.
During recovery (particularly in a Hyper-V Failover Cluster), the target host must have sufficient GPU partition capacity available. If the host’s GPU is already fully partitioned among other running VMs, the restored VM will fail to start or will fall back to software rendering.
Windows Server 2025 improves mobility for GPU-enabled VMs. GPU-P VMs support live migration in clustered and standalone configurations. In a failover scenario, the cluster can restart the VM on another node, provided that a compatible GPU is configured for DDA or GPU-P on the target.
Follow these recommendations for GPU-enabled VM backup and recovery:
- Document PCI paths and record the PowerShell commands used to assign the GPU. Having a ready-made script reduces downtime during restoration on a different host.
- Standardize hardware by using identical GPU models and driver versions across all cluster nodes. This ensures that a restored VM encounters the same hardware environment regardless of which host it starts on.
- Perform regular test restores of GPU-enabled VMs to different hosts to verify that your recovery team can remap PCI devices.
- Create a post-restore script that detects available GPUs and assigns them to the restored VM automatically.
Conclusion
Using a virtual machine with GPU passthrough on a Hyper-V host can be the optimal solution for certain workloads, but the limitations require careful planning. Server-class hardware and Windows Server are generally recommended for DDA-based passthrough of discrete GPUs. Verify software and hardware compatibility before starting the configuration. Maintain regular backups of Hyper-V VMs to protect against data loss if something goes wrong during GPU setup or ongoing operation.

FAQ
How do I enable GPU passthrough in Hyper-V?
To enable Hyper-V GPU passthrough, disable automatic checkpoints and Dynamic Memory for the VM. In Device Manager or PowerShell, identify the PCI Express location path of the target GPU. Disable the GPU on the host, dismount it using the Dismount-VmHostAssignableDevice cmdlet and then assign it to the VM with Add-VMAssignableDevice. On client Windows versions (Windows 10 and 11), use GPU partitioning through the Add-VMGpuPartitionAdapter cmdlet instead.
What is GPU passthrough in Hyper-V?
GPU passthrough is a Hyper-V feature that allows a physical video card to be assigned directly to a virtual machine. The VM uses the hardware GPU without emulation, delivering significantly better performance for graphics-intensive and compute-heavy workloads compared to the default emulated video adapter. Hyper-V supports two methods: Direct Device Assignment (DDA), which assigns the entire GPU to one VM, and GPU partitioning (GPU-P), which allows multiple VMs to share a single GPU.
What are the requirements for GPU passthrough in Hyper-V?
GPU passthrough requires a discrete PCIe GPU from NVIDIA or AMD with support for GPU virtualization technologies such as NVIDIA GRID or AMD MxGPU. The CPU must support IOMMU (Intel VT-d or AMD-Vi), and this feature must be enabled in UEFI/BIOS. The latest GPU drivers must be installed on both the Hyper-V host and the guest VM. You need at least Windows Server 2016 for DDA or Windows 10 (build 1903+) for GPU partitioning, with the Hyper-V role enabled. Only Generation 2 VMs are supported for DDA.
What are the limitations of GPU passthrough in Hyper-V?
VMs using Hyper-V GPU passthrough cannot use Dynamic Memory or automatic checkpoints. DDA is restricted to Windows Server Datacenter editions and assigns one GPU per VM with no live migration support. GPU partitioning requires matched driver versions between the host and guest OS. In Windows Server versions before 2025, failover clustering and live migration are not available for GPU-enabled VMs. Windows Subsystem for Linux on the host can cause Error 43 in the VM.
How do I troubleshoot GPU passthrough issues in Hyper-V?
Start by verifying that the correct GPU drivers are installed from the vendor’s website (not through Windows Update). Ensure that Dynamic Memory and automatic checkpoints are disabled for the VM. Check that sufficient MMIO space has been allocated. If you see Error 43, confirm that both the GPU and its audio controller are assigned together and try disabling WSL2 on the host. For Error 12 or “object not found” errors, set the RequireSecureDeviceAssignment and RequireSupportedDeviceAssignment registry values to 0 under HKLM.