Proxmox Storage Configuration: Practical Examples
Proxmox storage comes in several forms, and each behaves differently the moment a virtual machine starts writing data. Block-based types such as LVM-Thin, ZFS and iSCSI sit alongside file-based ones like Directory, NFS and SMB, so the right choice depends on your hardware, your workload and how you plan to share capacity. Picking a type is only half the work. Getting the Proxmox storage configuration right is what decides whether thin provisioning reports usage correctly, whether disks give back freed space and whether network shares remount cleanly after a reboot.
If you are still weighing which type suits your environment, the Proxmox storage options comparison breaks down their use cases, strengths and trade-offs. Read this guide to learn how to set up each storage type from the web interface and the command line, with hands-on examples, the common mistakes and the commands that resolve them.
Configuring LVM-Thin Storage in Proxmox
The easiest way to create LVM or LVM-Thin storage is through the Proxmox VE web interface, and the steps are identical for both types. This walkthrough focuses on LVM-Thin because it supports thin provisioning for VM disks (volumes), which standard LVM does not.
You need at least one unused hard disk drive, SSD or RAID volume to create LVM or LVM-Thin storage.
- Go to Datacenter > pve (or the name of your Proxmox host), select LVM-Thin and click Create: Thinpool.
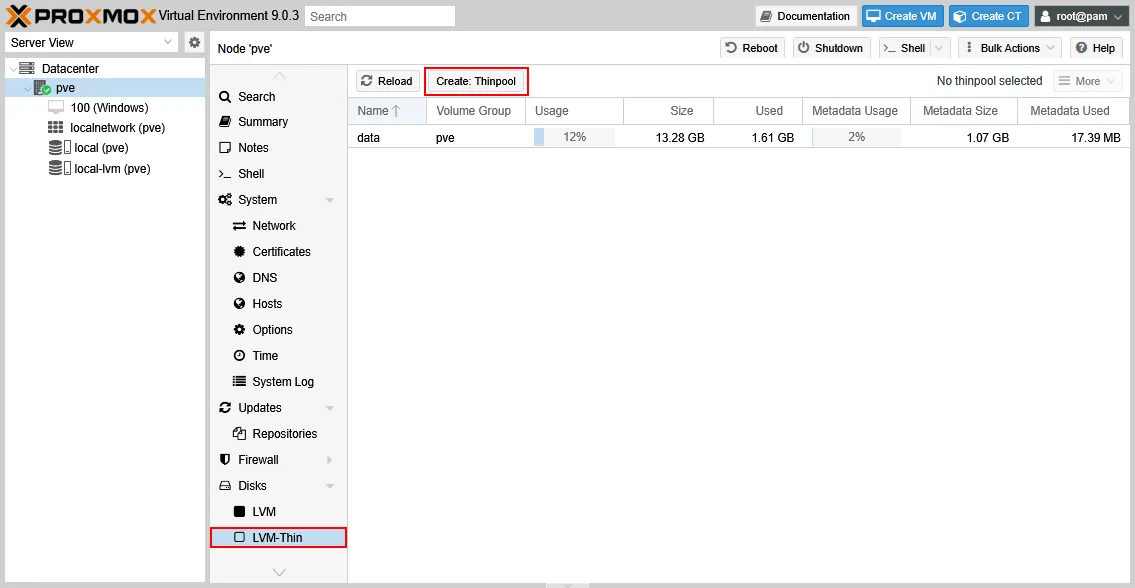
- In the Create: Thinpool window, select the disk device to use for the LVM pool (for example, /dev/sda) and enter a name for the thin pool, such as lvm-thin1.
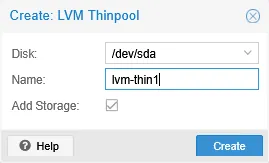
- You can list all configured Proxmox storage with the command
pvesm statusThe screenshot below shows the default local-lvm storage created during installation alongside the new lvm-thin1 storage. Both items use the lvmthin type.

- To find where a VM stores its virtual disks, view the VM configuration file:
/etc/pve/qemu-server/.conf For example, use this command for a VM with ID 100:
cat /etc/pve/qemu-server/100.conf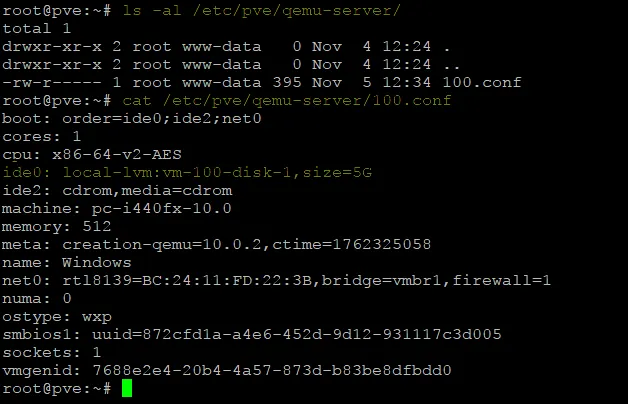
The output shows the VM stores its virtual disk as local-lvm:vm-100-disk-1, with a size of 5 GB.
- Check whether the virtual disk is thick- or thin-provisioned:
pvesm path:vm- -disk- Our exact command is:
pvesm path local-lvm:vm-100-disk-1The output is:
“/dev/pve/vm-100-disk-1”
- Check how much disk space the virtual disk consumes. The
lvs -acommand shows information about the volume groups used for virtual disks, and you can filter the results to a specific volume:
lvs -a | grep vm--disk- Our command for vm-100-disk-1 is:
lvs -a | grep vm-100-disk-1This shows whether the disk is thin-provisioned.
An empty Data% column means the disk is thick-provisioned. As the screenshot below shows, vm-100-disk-1 is thick-provisioned.
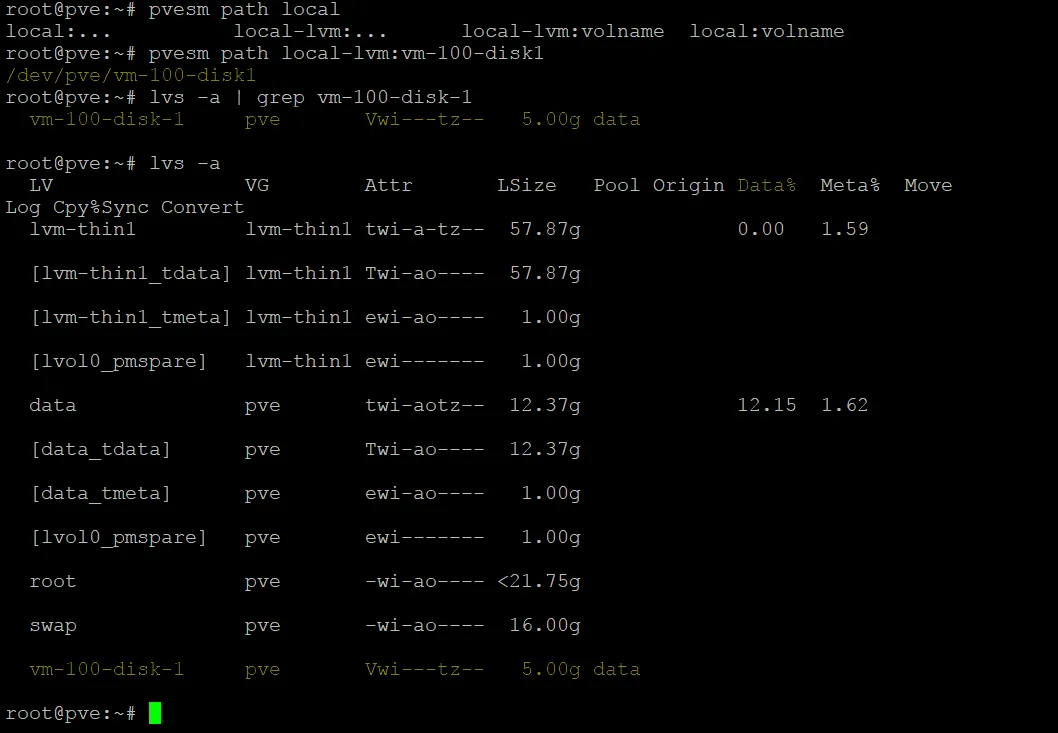
LVM-Thin storage supports thin provisioning, yet the Data% column is empty, which points to a thick-provisioned disk. This usually happens when a disk was converted or migrated to LVM-Thin storage and then attached to the VM as an existing disk. The pvesm status output above confirms that local-lvm is an lvmthin storage type. When you instead create a brand-new disk directly on LVM-Thin storage, thin provisioning normally works and the Data% column reports usage correctly.
One way to make a disk thin-provisioned is to migrate it to storage that supports thin provisioning. But if the disk already lives on thin-capable storage, you can often enable thin behavior with a few commands and no migration. The next steps show how to do this on LVM datastores.
Reconfiguring a thick disk to a thin disk
- Stop the virtual machine if it is still running:
qm stop 100Identify the thick-provisioned disk to convert with the
lvs -acommand. Our disk is vm-100-disk-1. - Create a new logical volume of the same size as the original VM disk:
lvcreate -n vm-100-disk-NEW -V-T pve/data Where:
-n vm-100-disk-NEWnames the new logical volume.-V> sets the virtual size (the maximum size the VM sees).-T pve/datatargets the thin pool named data in the pve volume group (VG).
In this example, the exact command is:
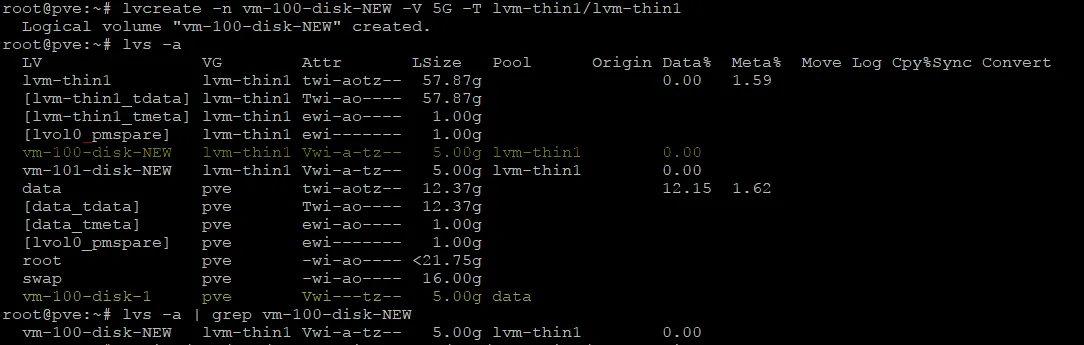
lvcreate -n vm-100-disk-NEW -V 5G -T lvm-thin1/lvm-thin1 - Check the new volume’s status to confirm it is thin-provisioned (it should now show a value in the Data% column):
lvs -aor
lvs -a | grep vm-100-disk-NEWThe screenshot below shows 0.00% in the Data% column for the new volume, which confirms it is thin-provisioned.
- Use the
ddutility to copy the data block by block from the old thick volume to the new thin volume:dd if=/dev/pve/vm-100-disk-1 of=/dev/lvm-thin1/vm-100-disk-NEW bs=1M status=progressWhere:
ddis a low-level copy utility in Linux.if=is the input file, the source logical volume (virtual disk) in this case.of=is the output file, the destination logical volume.bs=1Msets a block size of 1 MB.status=progressdisplays progress in the console.
Caution: CAUTION: Double-check that if (input) points to the old thick disk and of (output) points to the new thin disk. Reversing them overwrites the original disk. The copy takes time proportional to the disk size.
- If the
ddcommand returns this error:“dd: failed to open '/dev/pve/vm-100-disk-1': No such file or directory”
Reactivate the volume. This helps when the logical volume (LV) exists but its path is not accessible. Activate the volume:
lvchange -ay /dev/pve/vm-100-disk-1This command activates the logical volume, which makes the /dev/pve/vm-100-disk-1 path accessible to the operating system (OS).
- After running lvchange, check the disk path again and verify its status:
lvs -o lv_name,lv_health_status | grep vm-100-disk-1 - Now the
ddcommand should work and copy the VM’s virtual disk from the original thick-provisioned logical volume to the new thin-provisioned one:dd if=/dev/pve/vm-100-disk-1 of=/dev/lvm-thin1/vm-100-disk-NEW bs=1M status=progress - After the copy completes, check the volume status with the
lvs -acommand.
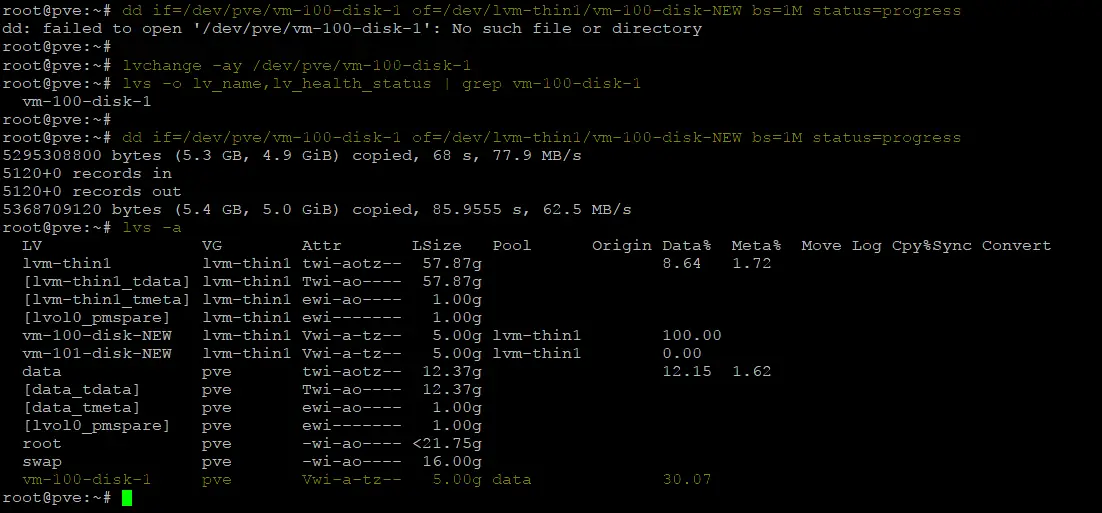
After these commands, the Data% column reports 30.07% usage for the original logical volume, which means thin provisioning is now active. The new copy, meanwhile, shows 100%. Reactivating the volume with lvchange -ay corrected its metadata, so Proxmox reports provisioning properly and dd could read it. During the rescan, LVM recognized that the disk already belonged to the data thin pool. At this point, the original disk is already working as thin-provisioned, so the new copy is not strictly necessary. Even so, the steps below show how to shrink the new thin-provisioned disk and attach it to a VM.
The new volume (vm-100-disk-NEW) shows 100% usage because dd copies every block, including empty ones filled with zeros. Although the volume is thin-provisioned, it currently occupies its full allocated size. You can clean it up so it consumes only the space that holds real data, as a thin-provisioned volume should.
How to attach a new VM disk to a VM
Once you have copied or converted a disk, you need to add it to the VM configuration before the virtual machine can use it. Following the workflow above, update the VM’s configuration once the copy is complete.
- Create a mount point for the new logical volume vm-100-disk-NEW:
mkdir /mnt/newdisk - For disks with a Linux file system such as ext4, mount it directly:
mount /dev/lvm-thin1/vm-100-disk-NEW /mnt/newdisk - If the volume holds an NTFS file system from a Windows guest, you need the NTFS driver to mount it; otherwise, you get this error:
“mount: /mnt/newdisk: wrong fs type, bad option, bad superblock on /dev/mapper/lvm--thin1-vm--100--disk--NEW, missing codepage or helper program, or other error.dmesg(1) may have more information after failed mount system call.”
- Because our volume contains an NTFS partition with Windows OS files, install ntfs-3g:
apt install ntfs-3g - Check the partitions inside the virtual disk:
fdisk -l /dev/lvm-thin1/vm-100-disk-NEWThere is one partition on the volume. The 1 at the end of the device name marks that single partition.
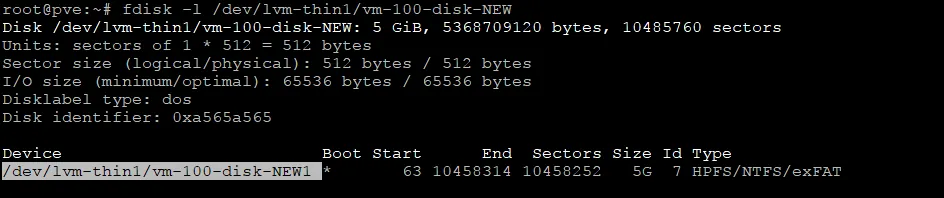
- If you try to mount the volume with ntfs-3g:
mount -t ntfs-3g /dev/lvm-thin1/vm-100-disk-NEW1 /mnt/newdiskor
mount -t ntfs-3g /dev/mapper/lvm--thin1-vm--100--disk--NEWp1 /mnt/newdiskYou may get the error:
“Failed to access volume: No such file or directory.”
In this case, you need to find the correct mount path, which is not always obvious.
On Proxmox with LVM, you normally reference a partition inside a logical volume (LV) through the /dev/mapper/ path, which includes the partition number (p1). Here, though, LVM treats the LV as a single unpartitioned disk, so it does not expose the partition under /dev/mapper/.
The reliable way to find the right path is kpartx, which creates device-mapper entries for the partitions inside a block device (the logical volume) and makes them visible to the OS.
- Install kpartx:
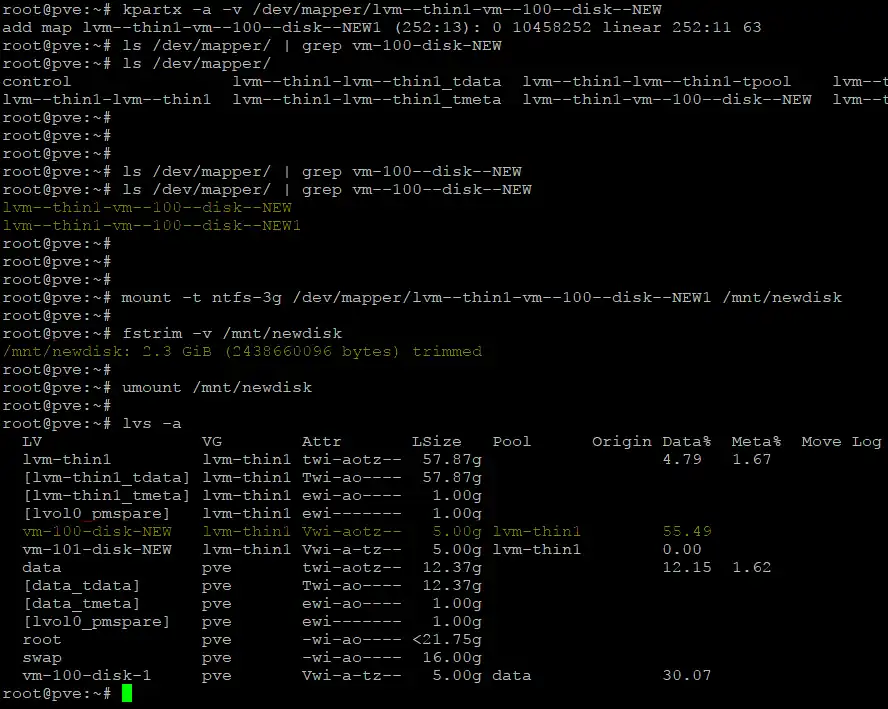
apt install kpartx - Run kpartx against the logical volume to scan it and create the partition device paths. The command prints the new device names, which appear under /dev/mapper/. Note that LVM doubles the hyphens (--) in volume group and logical volume names when it builds these block-device paths.
kpartx -a -v /dev/mapper/lvm--thin1-vm--100--disk--NEWThe resulting path should look like /dev/mapper/lvm--thin1-vm--100--disk--NEW1.
- Check whether the new path exists:
ls /dev/mapper/ | grep vm--100--disk--NEW - Once the path exists (see the screenshot below), mount the volume with ntfs-3g:
mount -t ntfs-3g /dev/mapper/lvm--thin1-vm--100--disk--NEW1 /mnt/newdiskNote: NOTE: The hyphen before the partition number (-p1) is often dropped when mapped this way, so the number is appended directly as 1.
- Run
fstrimto tell the underlying LVM-Thin pool which blocks the file system no longer uses, so LVM can release them:fstrim -v /mnt/newdisk - Unmount the volume and remove the mount point directory if you no longer need it:
umount /mnt/newdisk rmdir /mnt/newdisk - Check the logical volume status after these changes:
lvs -aThe Data% column now shows a lower value (55.49%) for vm-100-disk-NEW, and the volume behaves as a normal thin-provisioned volume. You can attach it to a second VM, which is effectively one way to clone a machine.
To point a VM at a different virtual disk instead of the original logical volume, use the following steps.
- Open the VM configuration file:
nano /etc/pve/qemu-server/100.conf - Edit the relevant line and change the logical volume name from the old one to the new one.
- Old line: scsi0: local-lvm:vm-100-disk-0,size=
- New line: scsi0: local-lvm:vm-100-disk-NEW,size=
- Old line: scsi0: local-lvm:vm-100-disk-0,size=
- Save the changes.
- Start the VM and confirm it boots correctly.
- Clean up data and delete the original disk if you no longer need it.
lvremove /dev/pve/vm-100-disk-1Configuring ZFS Storage in Proxmox
Proxmox can create ZFS storage on top of software RAID, including a single-disk (RAID 0) pool. The common layouts are:
- Single disk: A RAID 0 pool that uses one disk device
- Mirror: RAID 1
You need at least one unused disk to create ZFS storage in Proxmox. For better reliability and performance, you can use two, four or more disks in a RAID1 or RAID10 layout. Note that ZFS is not designed to run on top of a hardware RAID controller, so hardware RAID volumes are not a supported configuration.
This example creates ZFS storage that stores VM disks as ZFS volumes (zvols), which are raw block devices.
- In the Proxmox web interface, select your Proxmox host (pve), open the ZFS tab and click Create ZFS.
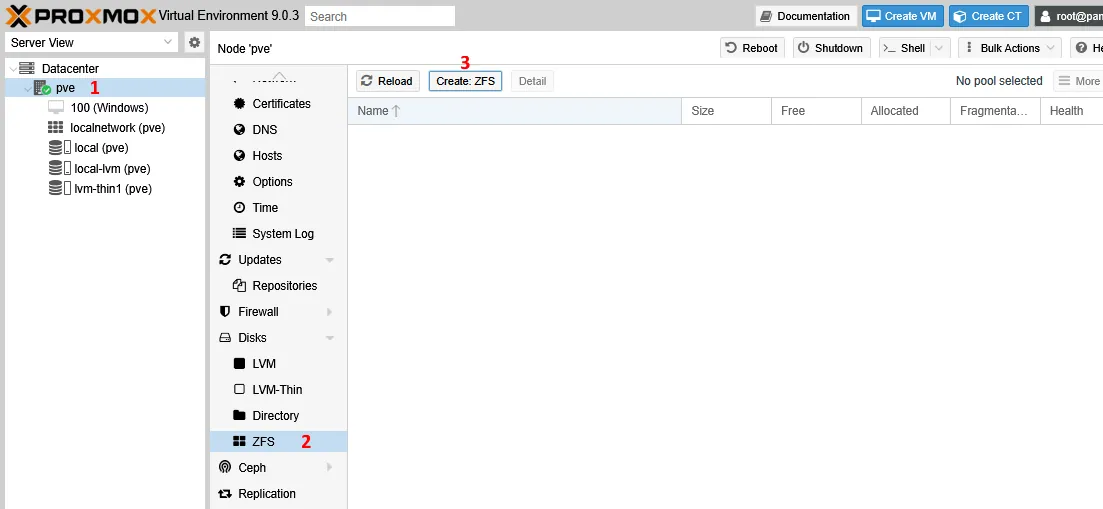
- In the Create: ZFS window, set the parameters:
- Enter a name for the ZFS storage, for example zfs1.
- In the RAID Level list, choose Mirror for RAID1, or Single Disk for a one-disk RAID0 (enough for a lab or test setup). Pick another level if you need it.
- Select the physical devices for the ZFS pool.
- Leave the remaining options at their defaults and click Create.
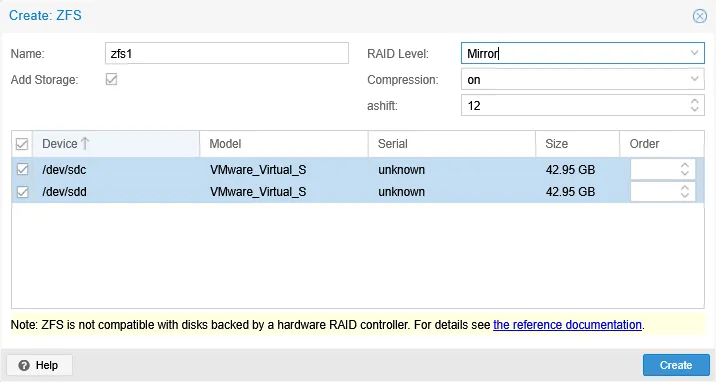
- A ZFS pool is created and can store VM disks. It appears under Datacenter > Storage.
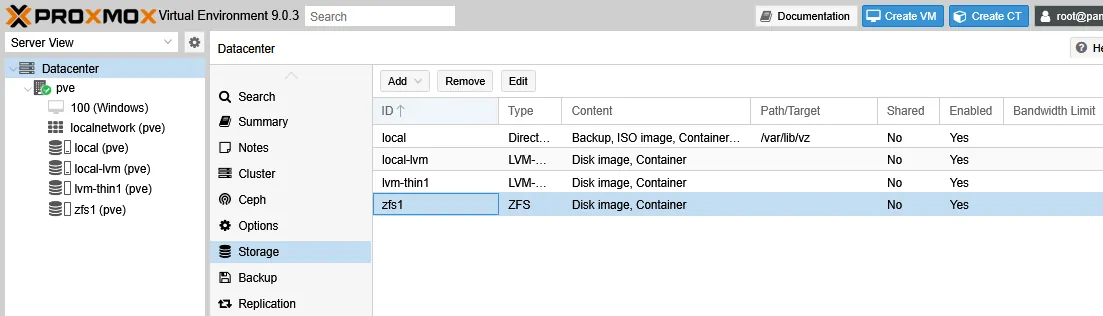
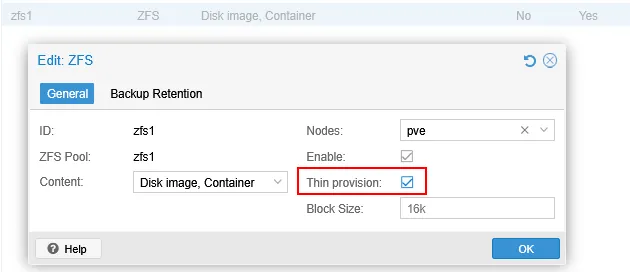
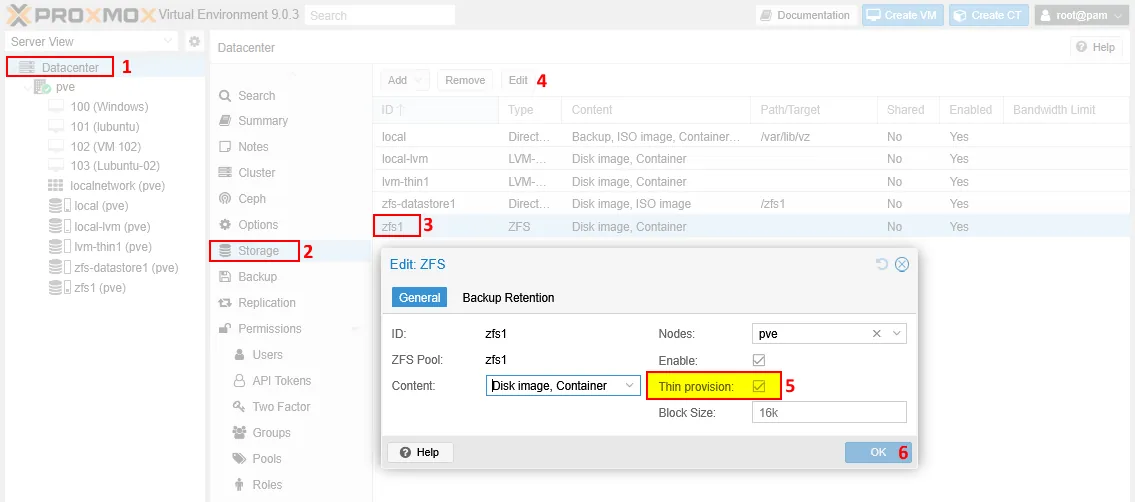
- It is recommended to double-click the new ZFS storage (zfs1) right away and, in the Edit: ZFS window, select the Thin provision checkbox. This option is easy to miss because it does not appear in the creation window. The section below explains how to resolve cases where you have already created ZFS storage and its VM disks do not behave as expected in thin-provisioned mode.
- You can review the Proxmox storage settings in the /etc/pve/storage.cfg file:
cat /etc/pve/storage.cfgTo store virtual disks as QCOW2 files rather than zvols, create a Directory-type datastore on the underlying ZFS file system.
For convenience, this example creates a Directory datastore on the existing ZFS pool, which suits a test or lab environment. In production, it is often cleaner to use separate datastores: One for zvols and another for QCOW2 disk files (or other supported formats such as VMDK and RAW).
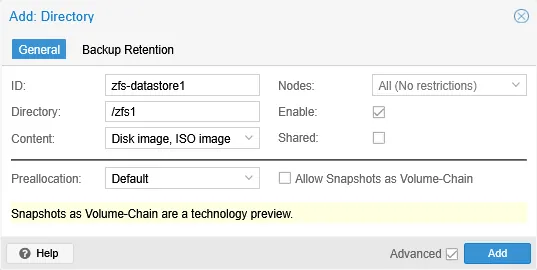
- Go to Datacenter > Storage and click Add > Directory in the Proxmox VE web interface.
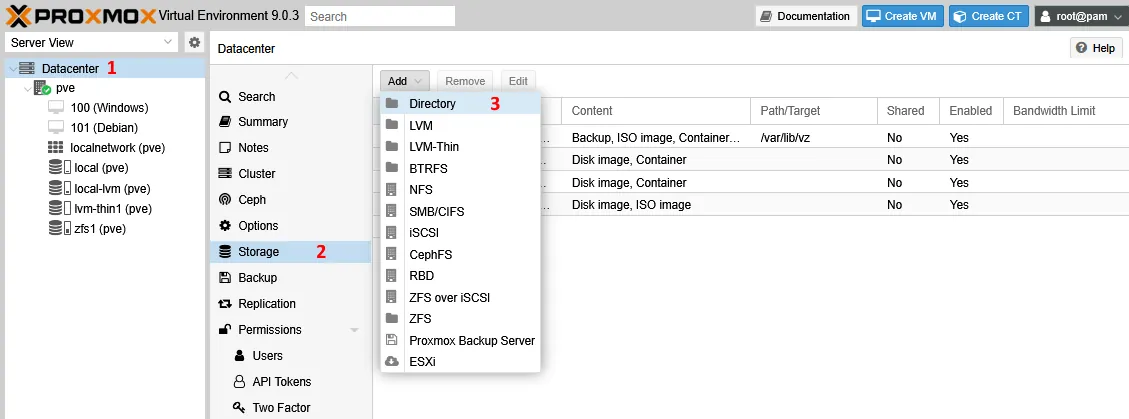
- Set the datastore parameters:
- ID: A datastore name, for example zfs-datastore1.
- Directory: The ZFS directory, /zfs1 in this case.
- Content: The content types to allow, such as Disk image and ISO image.
- Preallocation: Leave it at Default, which behaves like Off (sparse/thin provisioning). ZFS handles thin provisioning and often compression itself, so sparse files are the most efficient choice for QCOW2 images.
Then click Add.
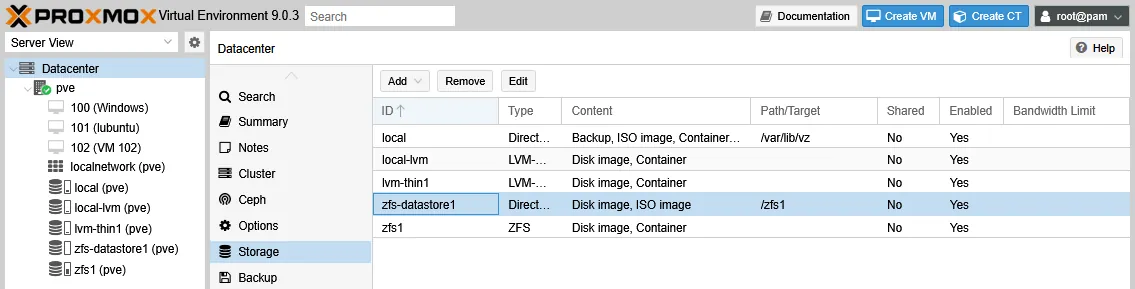
- The new datastore (zfs-datastore1) now appears under Datacenter > Storage.
- Check the Proxmox datastores after the change:
pvesm status
cat /etc/pve/storage.cfg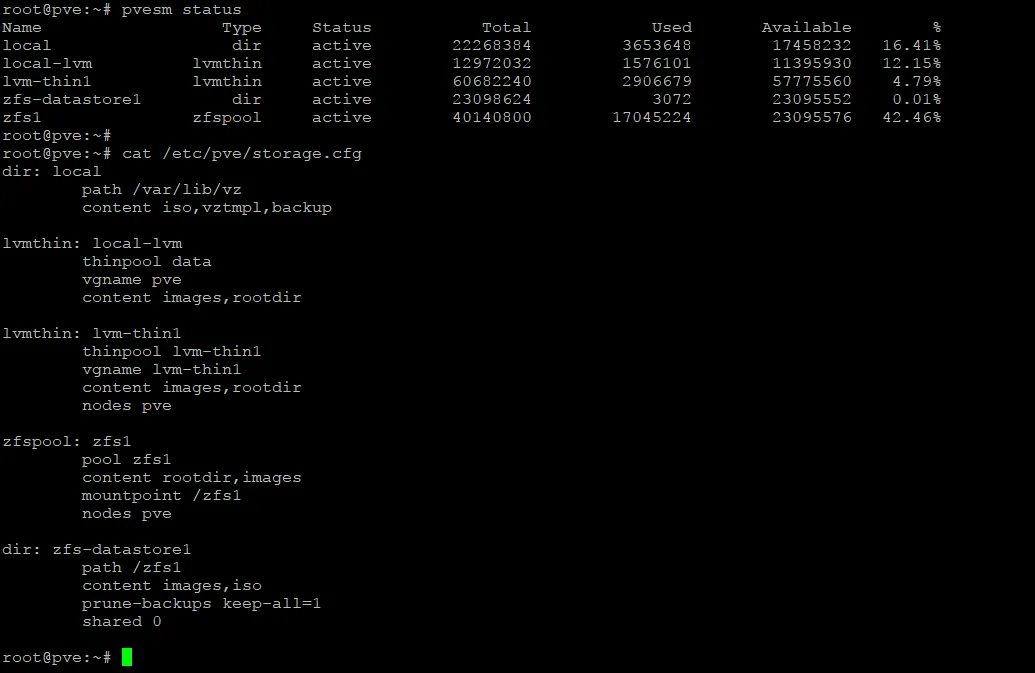
- Now, create two VMs. VM 101 uses a zvol on zfs1 as its disk, while VM 102 stores its disk as a QCOW2 file on zfs-datastore1. Both run Lubuntu 24 as the guest OS. The next steps compare how each VM’s disk data is stored.
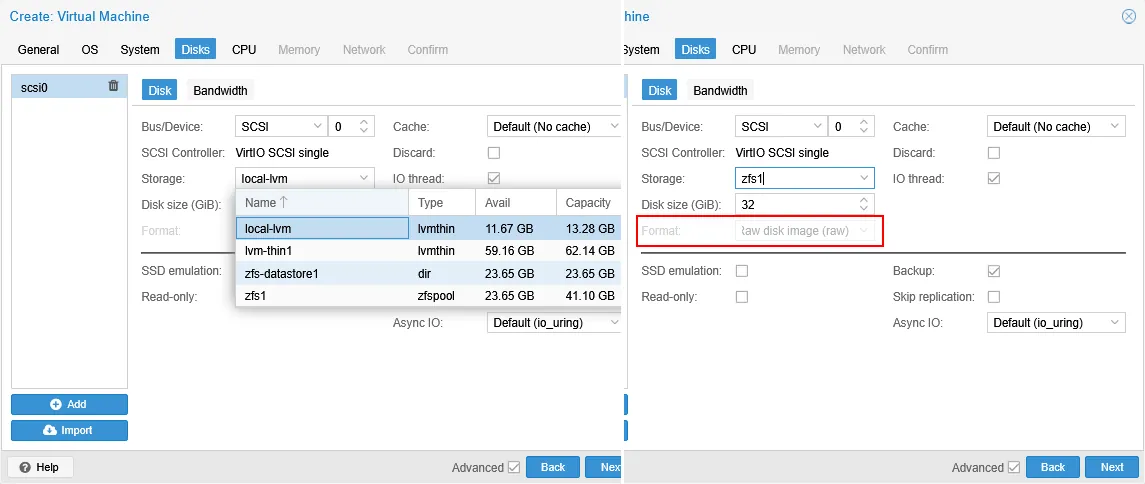
When you choose where to store a VM disk, zfs1 and zfs-datastore1 report the same free space, because the zfs-datastore1 directory sits on the underlying zfs1 pool.
When you create a disk directly on the ZFS pool (zfs1), only the Raw disk image format is available; you cannot store QCOW2 or VMDK files on this storage type.
Select the Discard checkbox to enable discard/TRIM support for the disk. It is left unselected in this example.
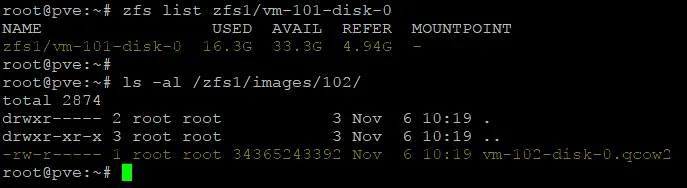
- Check the disk of VM 101, a zvol on the zfs1 pool:
zfs list zfs1/vm-101-disk-0Note: Note: The path for ZFS volumes is PoolName/VolumeName. Proxmox typically names zvols after the VM ID and disk number.
The output table (see the screenshot below) shows the following:
- NAME: zfs1/vm-101-disk-0: The zvol name.
- USED: 16.3G: The physical space the volume currently consumes, which equals its full provisioned size here. ZFS may still hold blocks it has not released.
- AVAIL: 33.3G: The free space left in the pool for other VM disks.
- REFER: 4.94G: The amount of real data the volume holds. This disk uses 4.94 GB out of a 16 GB provisioned size, which points to thin provisioning, though the unused space has not been reclaimed yet.
- MOUNTPOINT: Not applicable to zvols.
- Next, find out why USED is 16.3 GB when the guest (Lubuntu) was only just installed and the disk is mostly empty, then reduce that figure so the zvol behaves as thin-provisioned.
Several factors can make a ZFS-backed disk consume more space than expected:
- Snapshots or an older cloning method.
- ZFS’s internal metadata and block-allocation structure. Built for data integrity and performance, ZFS does not instantly zero out or release blocks just because the guest OS marks them free through TRIM.
- Check for VM snapshots:
zfs list -t snapshot | grep zfs1/vm-101-disk-0With no snapshots, the command returns “no datasets available”.
- Check for cloned volumes:
zfs get origin zfs1/vm-101-disk-0In this example, no clone origin is reported.
ZFS volumes can be created with (or inherit) a reservation property, which sets aside a fixed amount of space regardless of how much data is written.
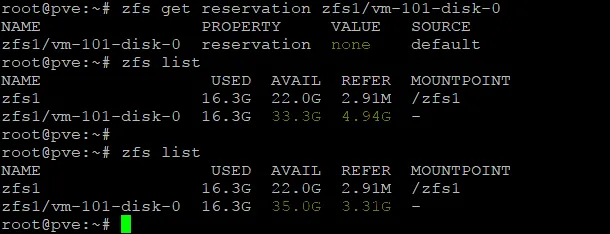
- Check the reservation property of your zvol:
zfs get reservation zfs1/vm-101-disk-0 - If a non-zero reservation is returned, set it to none. This metadata change should free the reserved space immediately.
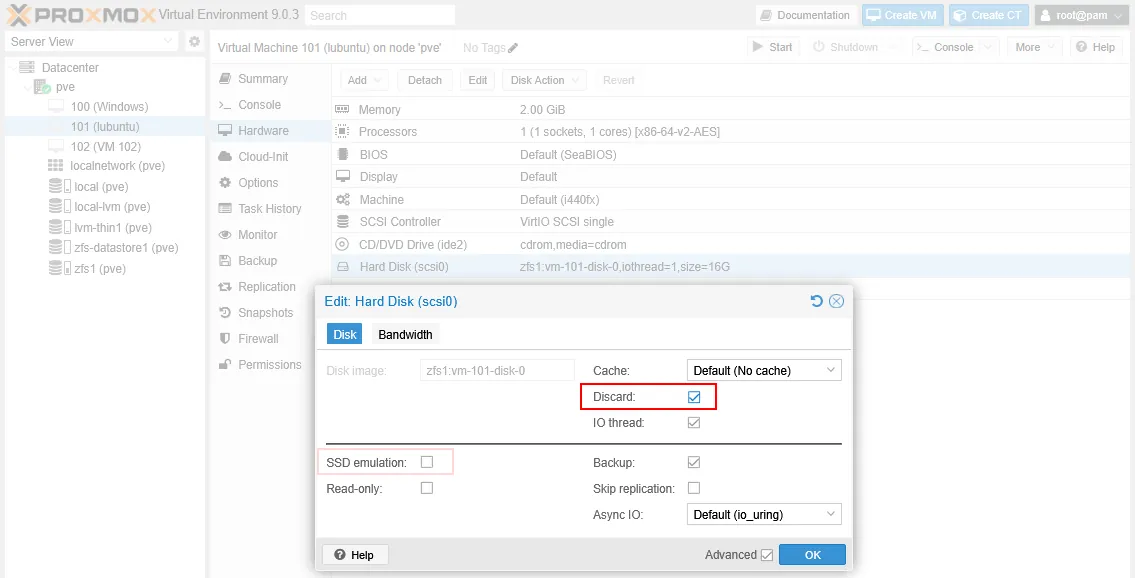
zfs set reservation=none zfs1/vm-101-disk-0 - Trim unused blocks (if applicable). The guest OS may have written to blocks earlier and only marked them deleted rather than overwriting them, and ZFS will not reclaim that space until the OS asks it to. The VM must be running with discard/TRIM enabled on its disk.
In the Proxmox web graphical user interface (GUI), open the settings for VM 101, go to the Hardware tab and double-click the disk. In the disk settings, select Discard so the guest OS can send TRIM commands to the zvol. If the underlying storage is SSD, also select SSD emulation. Click OK to save.
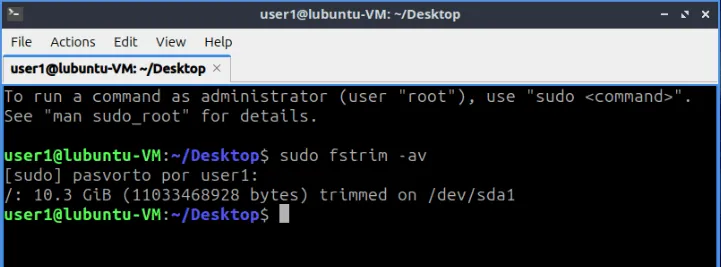
- In the guest OS (Lubuntu 24 here), open a console and run this command as root to trim the root (/) file system:
sudo fstrim -avThis command tells the ZFS layer that the empty blocks are no longer needed, so ZFS can reduce its reported USED space.
- After the trim, REFER drops slightly and AVAIL rises, but USED stays the same.
- The most reliable way to resolve this is to copy the data fresh into a new zvol. Create a temporary zvol (for example, 5 GB):
zfs create -V 5G zfs1/vm-101-disk-TEMP - Copy the data from the old volume (the data shown in REFER) to the new one. Use zfs send | zfs receive, which copies only the active data and resets the USED count on the new volume. Send only the current file system data (excluding snapshots):
zfs send zfs1/vm-101-disk-0 | zfs recv zfs1/vm-101-disk-TEMPIf the destination already exists, add the -F key to overwrite.
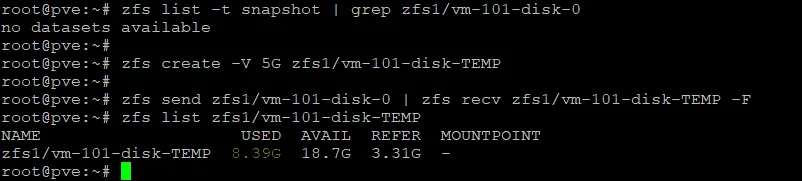
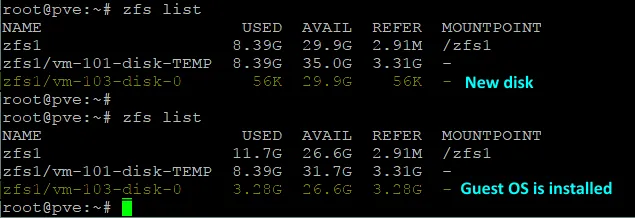
- Check the new volume’s usage. Its USED value should now be close to its REFER (around 3.31 GB):
zfs list
zfs list zfs1/vm-101-disk-TEMP
The new volume’s USED value (8.39G) is far below the 16.3 GB maximum provisioned size, which shows thin provisioning now working for this VM (see the screenshot above).
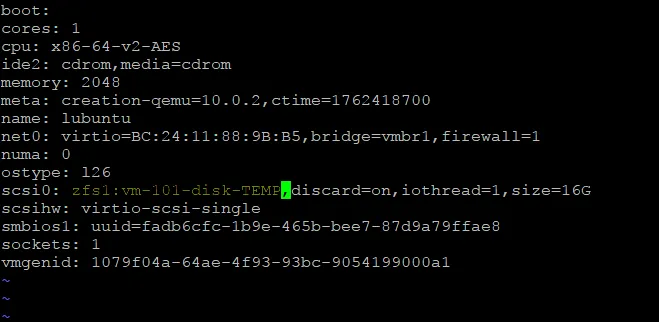
- Update the Proxmox configuration for VM 101 to point to the new disk (zfs1/vm-101-disk-TEMP):
nano /etc/pve/qemu-server/101.conf - On the disk line, change the disk name from the old one:
scsi0: zfs1:vm-101-disk-0,discard=on,iothread=1,size=16G
to the new one:
scsi0: zfs1:vm-101-disk-TEMP,discard=on,iothread=1,size=16G
- Once you confirm the VM works with the new disk, delete the original (zfs1/vm-101-disk-0) to reclaim the full 16.3 GB:
zfs destroy zfs1/vm-101-disk-0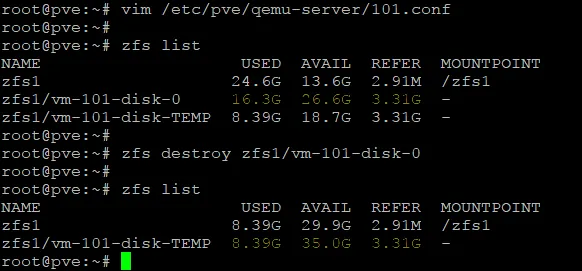
- Confirm that you enabled thin provisioning at the ZFS-pool level (recall the note at the start of this ZFS workflow). In the Proxmox web interface, go to Datacenter > Storage, select the ZFS storage, click Edit and, in the Edit: ZFS window, select the Thin provision checkbox if it is not already set. New disks created on this storage will then be thin-provisioned.
- Now create VM 103, similar to VM 101, with Lubuntu on a zvol. When the disk is first created, it uses only 56 KB (USED), which is normal for thin provisioning. After installing the guest OS, USED rises to 3.28 GB and REFER shows the same 3.28 GB of real data, well below the provisioned size. Thin provisioning now works correctly on this ZFS pool.
Now return to the directory datastore on ZFS (zfs-datastore1), which stores VM disks in QCOW2 format.
- Check VM 102’s disk, a QCOW2 file on zfs-datastore1:
ls -al /zfs1/images/102/ - Use
ls -lh(list, human-readable, long format) to see the file size, ordu -h(disk usage) to see the space consumed on the ZFS file system. Check the sparse file size:ls -lh /zfs1/images/102/vm-102-disk-0.qcow2The output shows the provisioned size (the size the VM sees).
- Check the actual disk usage on the ZFS file system:
du -h /zfs1/images/102/vm-102-disk-0.qcow2The output shows the actual physical space used on the ZFS file system (the thin-provisioned footprint). The 32 GB QCOW2 disk occupies only 2.9 MB because it was just created and is empty, which confirms it is thin-provisioned.

Configuring Directory Storage in Proxmox
The Directory storage type is one of the simplest and most flexible options in Proxmox. It lets you keep VM disks on any file system that Linux can mount. This example builds a Directory datastore from scratch, starting with an unpartitioned disk that holds no data.
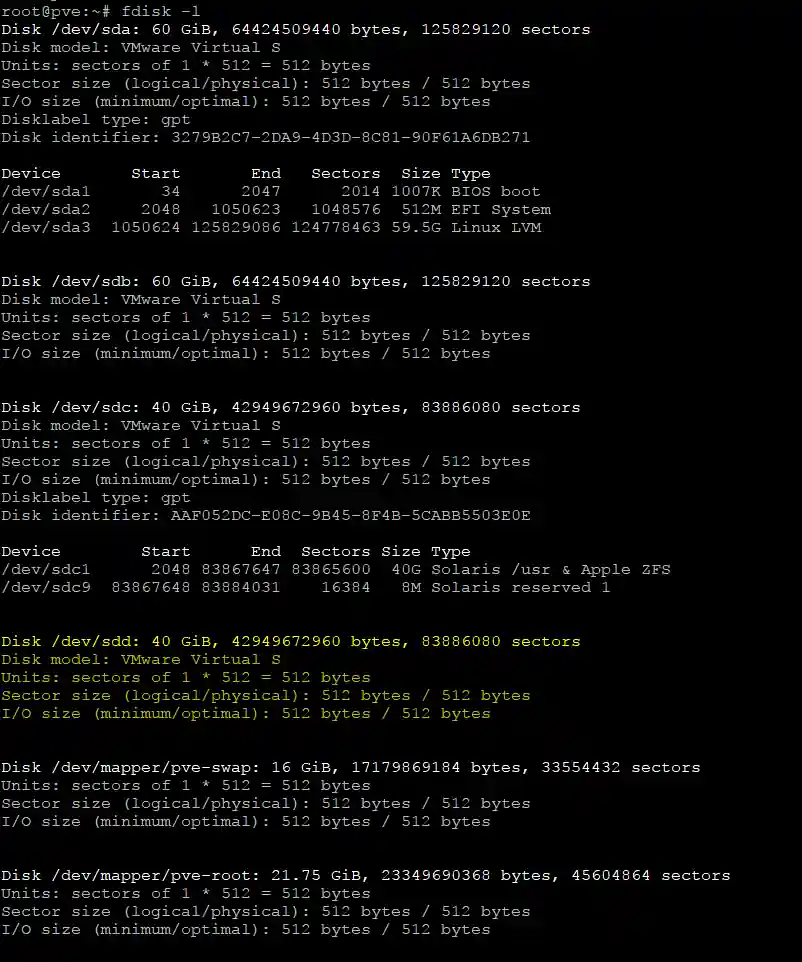
- Identify the unused disk drive attached to the Proxmox server:
fdisk -lHere, the target disk is /dev/sdd.
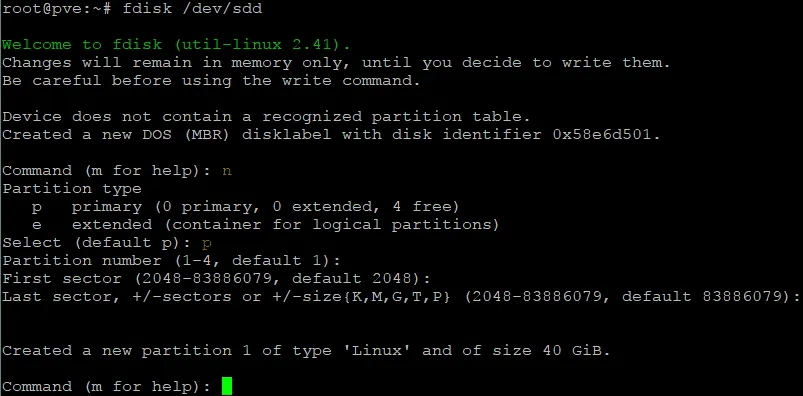
- Select the target disk to create a partition in fdisk:
fdisk /dev/sdd- Type n and press Enter to create a new partition.
- Type p and press Enter to create a primary partition.
- Press Enter to use the default partition number 1.
- Press Enter to use the default first sector.
- Press Enter to use the default last sector.
A partition has been created.
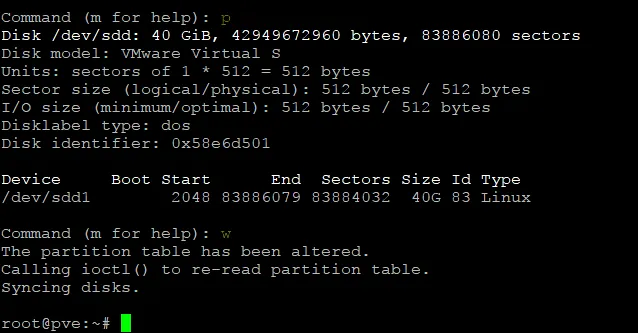
- Type p and press Enter to print the partition properties.
- Type w and press Enter to write the changes and quit fdisk.
- Next, create a file system on the partition. This example uses ext4 on /dev/sdd1:
mkfs.ext4 /dev/sdd1 - Create the directory that will hold the Proxmox datastore on the new partition:
mkdir -p /mnt/datastore4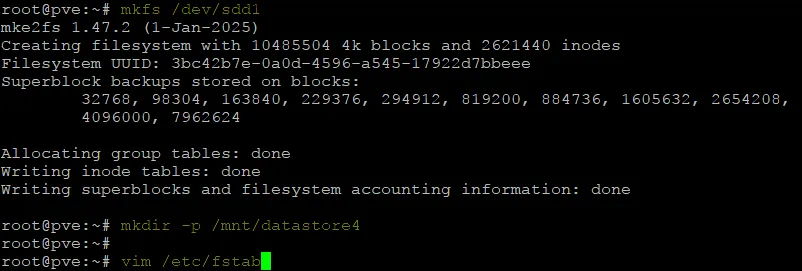
- Edit /etc/fstab so the partition mounts to the directory automatically at boot:
vim /etc/fstab - Add this line to /etc/fstab:
/dev/sdd1 /mnt/datastore4 ext4 defaults 0 2 - Save and quit the editor:
:wq
- You can reboot the Proxmox host to confirm the partition mounts automatically.
- Check whether the partition is mounted:
mount | grep sddThe partition sdd1 is mounted:
“/dev/sdd1 on /mnt/datastore4 type ext”
You can also check the free disk space on the mounted partition.
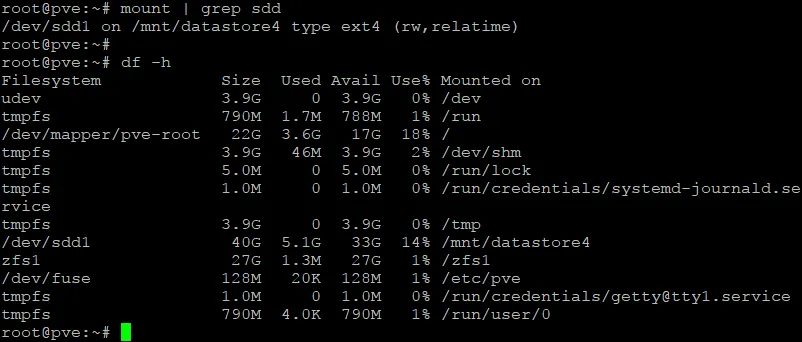
Now you can create the Proxmox datastore in this directory.
- In the Proxmox web interface, go to Datacenter > Storage, click Add and select Directory.
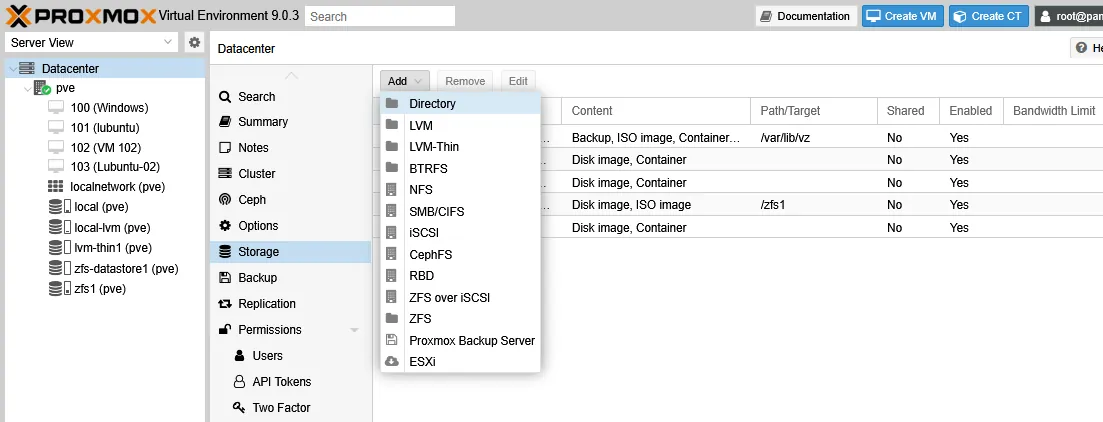
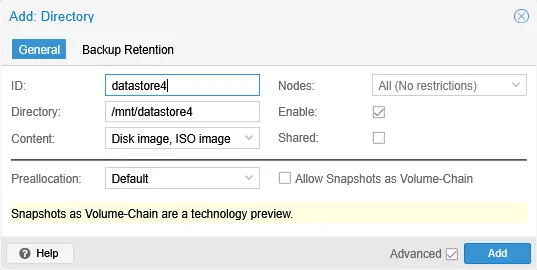
- Set the datastore parameters:
- ID: The datastore name shown in the Proxmox interface, for example datastore4.
- Directory: The path to the datastore directory, which must already exist with the right permissions (/mnt/datastore4).
- Content: The content types to allow.
- Preallocation: Leave it at Default, which supports thin-provisioned disks.
Then click Add to create the datastore.
- You can now store disks on this datastore in QCOW2, VMDK and RAW formats. When creating a disk, choose this datastore and select the Discard option so thin provisioning works correctly. If the datastore is on an SSD, also enable SSD emulation.
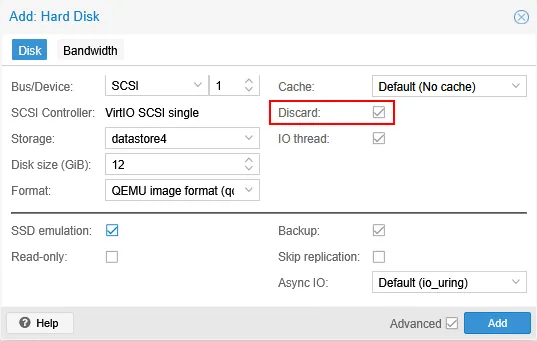
- Here, a new VM was created with a 12 GB QCOW2 disk. After installing the guest OS, the disk file is 5.1 GB rather than the full provisioned size, as expected for a thin-provisioned disk. Check the size with:
ls -lh /mnt/datastore4/images/104
du -h /mnt/datastore4/images/104
Configuring an NFS Share as Proxmox Storage
After you configure a Network File System (NFS) share on a server, such as a Linux server, a network-attached storage (NAS) device or even Windows Server 2025, you can attach it to a Proxmox host and store virtual disk files on this file-based shared storage. Set the right permissions so the Proxmox host can reach the share.
- In the Proxmox web interface, go to Datacenter > Storage, click Add and click NFS.
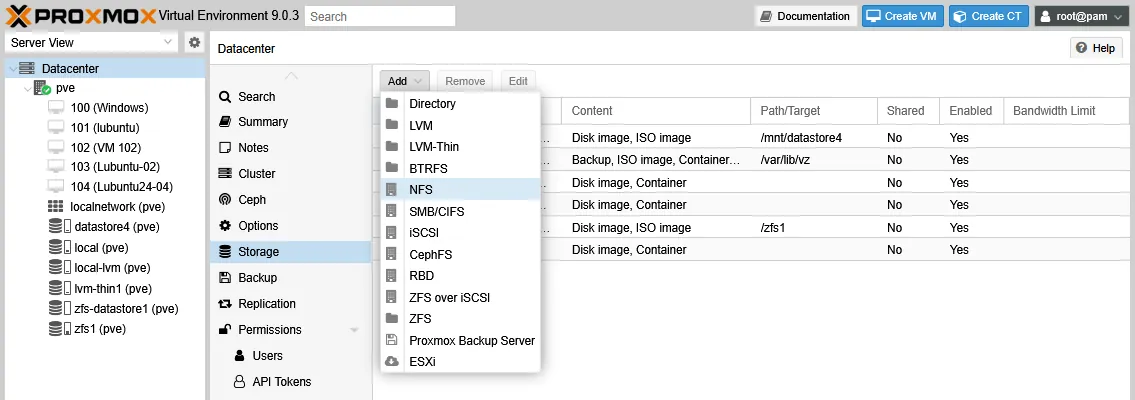
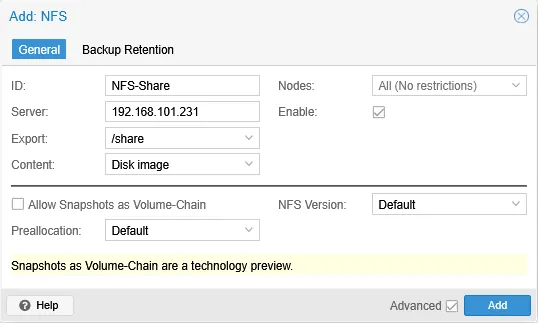
- In the Add: NFS window, set the parameters:
- ID: A name shown in the Proxmox configuration, for example NFS-Share.
- Server: The IP address of the server hosting the NFS share.
- Export: The path to the exported share on the NFS server.
- Content: The content types allowed on this storage.
- Preallocation: Leave Default, which supports thin provisioning on NFS storage.
Then click Add to attach the NFS share.
Configuring an SMB Share as Proxmox Storage
Server Message Block (SMB) is another file-level shared storage option that Proxmox supports, and the setup mirrors the NFS process. First, share a directory and configure a file share on a machine acting as the SMB server, such as a Windows Server system, a NAS device or a Linux host. Set permissions so the right users can reach that directory, then attach the share to Proxmox as shared storage.
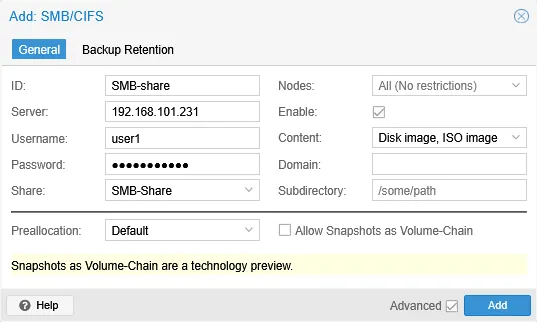
- In the Proxmox web interface, go to Datacenter > Storage, click Add > SMB/CIFS.
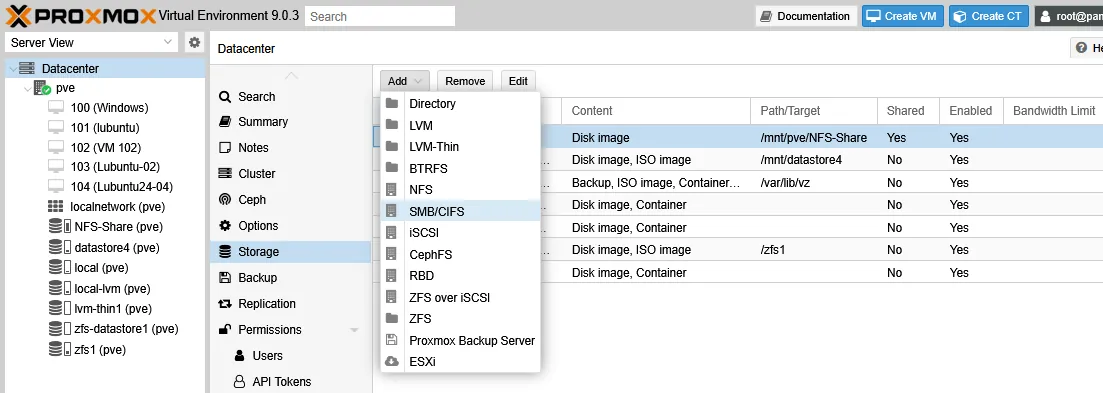
- In the Add: SMB/CIFS window, set the parameters:
- ID: A name shown in the Proxmox configuration, for example SMB-share.
- Server: The IP address of the SMB server (the host with the file share).
- Username: A user with write permissions to the share.
- Password: That user’s password.
- Share: The name of the share configured on the SMB server (SMB-Share here).
- Content: The content types allowed on this storage.
- Preallocation: Leave the default, which supports thin provisioning on SMB storage.
Then click Add to attach the SMB share to Proxmox.
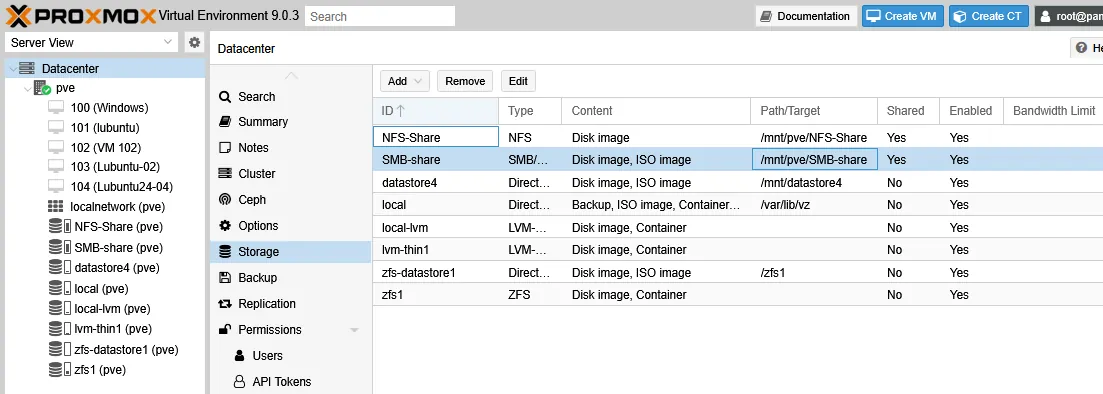
- Once added, the SMB storage appears on the Storage page of your Proxmox datacenter. Proxmox mounts both NFS and SMB shares under /mnt/pve/, as the screenshot below shows.
- To test it, create an identical Lubuntu VM with a thin-provisioned 12 GB QCOW2 disk and a guest OS installed, then check the file size:
ls -lh /mnt/pve/SMB-share/images/105/vm-105-disk-0.qcow2
du -h /mnt/pve/SMB-share/images/105/vm-105-disk-0.qcow2
The QCOW2 file uses 5.1 GB against a 12 GB provisioned size, so thin provisioning works on SMB storage as expected.
Configuring iSCSI Storage in Proxmox
You must configure an Internet Small Computer Systems Interface (iSCSI) target on the server side (Linux, a NAS device, Windows Server 2025 and so on). See how to configure an iSCSI target on TrueNAS CORE (formerly FreeNAS). Once the target is ready, you can add this storage type in Proxmox and configure it in the web interface and the command line.
- Go to Datacenter > Storage, click Add > iSCSI.
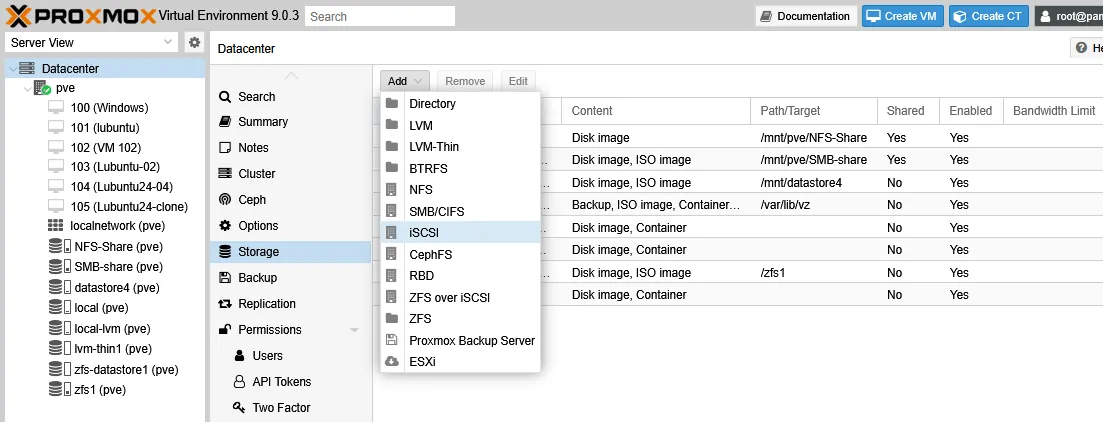
- In the Add: iSCSI window, set the parameters:
- ID: A display name.
- Portal: The IP address of the server acting as the iSCSI target.
- Target: Once you enter the portal IP, Proxmox lists the available targets. Select the one to use as Proxmox iSCSI storage.
Then click Add to connect the iSCSI target to the Proxmox host.
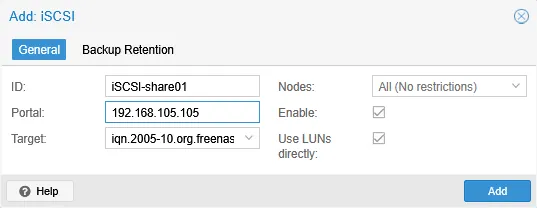
- The target now connects to the Proxmox host as a block device. At this stage, though, the iSCSI storage cannot yet hold disks in QCOW2 (Proxmox’s default disk image format) or other formats such as VMDK and RAW. Because an iSCSI logical unit number (LUN) behaves like a local SCSI block device, you first need to partition and format it to store files.
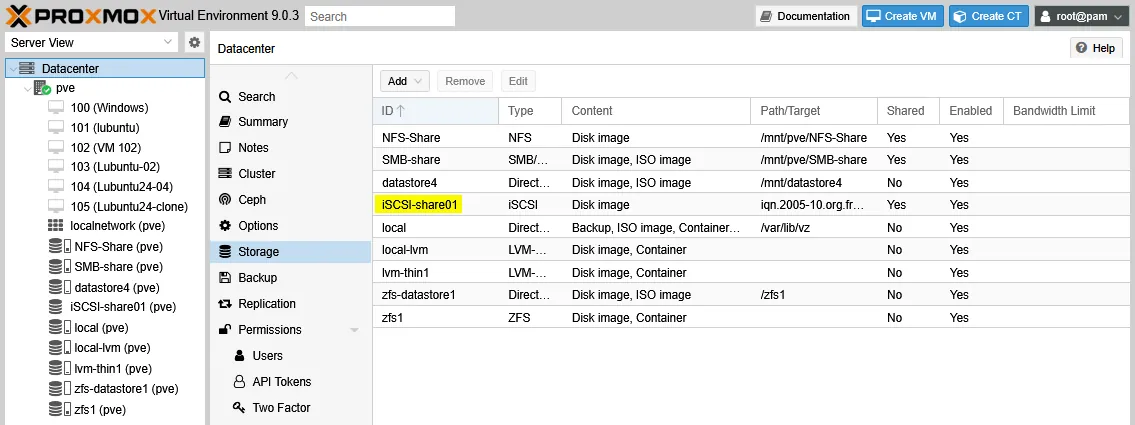
- Identify the iSCSI block device:
ls -l /dev/disk/by-path/ | grep iscsiFind the symbolic link that points to the real device (/dev/sdb, /dev/sdc or a unique path under /dev/disk/by-path/). In this example it is /dev/sde. If no block device appears, rescan the iSCSI bus:
rescan-scsi-bus.shYou may need to install the scsitools package first:
apt install scsitools - If the iSCSI block device (the LUN) has no partitions, create one with fdisk as shown earlier. Then format it with ext4:
mkfs.ext4 /dev/sde1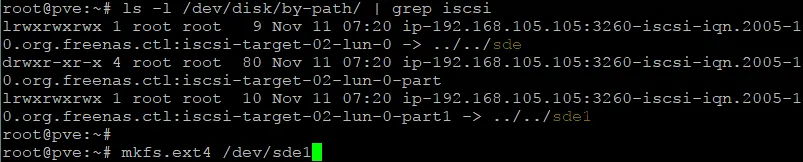
- Create a directory to serve as the mount point for the new file system on the iSCSI LUN:
mkdir /mnt/iscsi-qcow2 - Mount the partition to the directory:
mount /dev/sde1 /mnt/iscsi-qcow2 - Edit /etc/fstab so the disk mounts automatically after a reboot. Use the device’s universally unique identifier (UUID) instead of /dev/sde for reliability (find it with lsblk -f):
vim /etc/fstab - Add a line in this format:
UUID=/mnt/iscsi-qcow2 ext4 defaults,_netdev 0 2 In our case, the iSCSI UUID for /dev/sde1 is 10bce587-06e9-4547-a096-caebfcfe5135, so the line in /etc/fstab is:
UUID=10bce587-06e9-4547-a096-caebfcfe5135 /mnt/iscsi-qcow2 ext4 defaults,_netdev 0 2The _netdev option matters for network storage: It tells the system to wait for the network before mounting.

- Next, create a directory-type storage in the Proxmox web interface. Go to Datacenter > Storage, click Add > Directory.
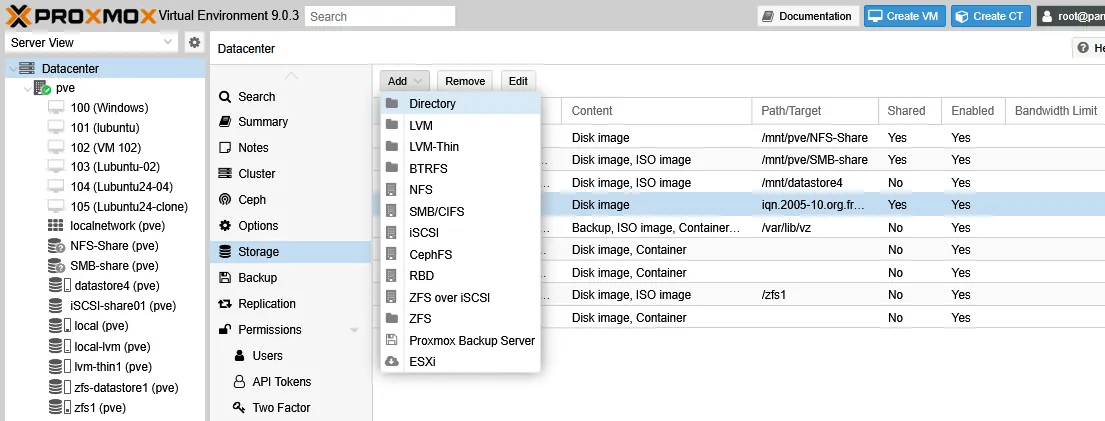
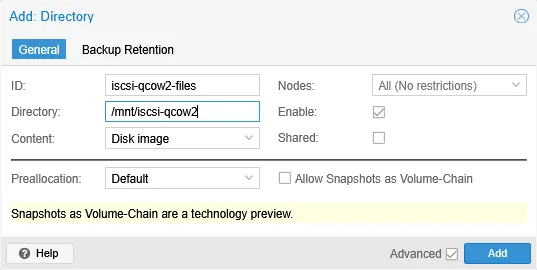
- In the Add: Directory window, set the parameters:
- ID: A display name, for example iscsi-qcow2-files.
- Directory: The path where the iSCSI partition is mounted.
- Content: The content types to allow, including at least Disk image.
Then click Add to create the datastore.
- Clone a VM to the new iSCSI datastore and check the files stored there:
ls -lh /mnt/iscsi-qcow2/images/106/
du -h /mnt/iscsi-qcow2/images/106/
The iSCSI storage works as expected.
Conclusion
Proxmox VE offers a flexible set of storage types, and the best choice depends on your workload, hardware and reliability needs. Most of the configuration happens at the Linux command line, which gives you precise control over how VM disks are stored and provisioned. When you rely on external storage over iSCSI or NFS, set up and secure that remote storage before connecting it to Proxmox. For production virtual machines, use redundant storage and keep regular backups so you can recover your data if hardware fails.
FAQ
What storage types does Proxmox VE support?
Proxmox VE supports both block-level and file-level storage. Block-level types include LVM, LVM-Thin, ZFS and iSCSI, which store raw disk images. File-level types include Directory, NFS and SMB/CIFS, which can also hold ISO images, container templates and backups. The right type depends on your hardware and whether the storage must be shared.
Which Proxmox storage type is best?
The best Proxmox storage type is the one that fits your workload. ZFS suits setups that need snapshots, compression and strong data integrity. LVM-Thin works well for simple local thin provisioning. NFS and SMB provide shared storage that supports live migration between nodes, while iSCSI offers block-level network storage.
What is the difference between LVM and LVM-Thin in Proxmox?
LVM-Thin supports thin provisioning, while standard LVM does not. On LVM-Thin, a virtual disk consumes only the space its data actually uses, so a 100 GB disk holding 4 GB occupies 4 GB. Standard LVM reserves the full disk size up front. LVM-Thin also supports snapshots, which thick LVM lacks.
Which Proxmox storage types support thin provisioning?
LVM-Thin, ZFS, Directory, NFS and SMB storage can all be thin-provisioned in Proxmox VE. For Directory, NFS and SMB, thin provisioning requires the QCOW2 disk format. In Proxmox, any storage type that offers snapshots also allows thin provisioning, so the two capabilities usually appear together.
Can Proxmox use NFS or SMB shared storage?
Yes. Proxmox VE can attach both NFS and SMB/CIFS shares as shared storage. After you configure the share on a Linux server, a NAS device or Windows Server, add it under Datacenter then Storage with the server address and export or share name. Proxmox then mounts it and can store virtual disks, ISOs and backups.
Where does Proxmox store its storage configuration?
Proxmox VE stores all storage configuration in a single file at /etc/pve/storage.cfg. Each entry defines a storage pool with its type, ID and properties. Because the file lives in /etc/pve, Proxmox distributes it automatically to every node in a cluster, so all nodes share the same definitions. You can view it with the cat command.