How to Install and Run ESXi from a USB Flash Drive
VMware ESXi can be booted and run from a USB flash drive or SD card, allowing administrators to reserve local storage for virtual machines. This approach is commonly used in environments where minimizing hardware costs and maximizing datastore capacity are priorities.
This blog post covers the pros and cons of this approach, the requirements for installing ESXi on a USB flash drive, and the key features of the installation process.
Advantages and Disadvantages of Running ESXi from a USB Flash Drive
There are several advantages and disadvantages to consider before deciding to run ESXi from a USB flash drive.
Advantages
- Cost savings. SAS disks and dedicated boot devices can increase hardware costs. Installing ESXi on a USB flash drive eliminates the need to allocate additional disks for the hypervisor.
- Simplified maintenance. If ESXi is installed on a USB flash drive or SD card, datastore disks can be replaced without reinstalling the hypervisor. When ESXi and the datastore reside on the same disk, disk replacement may require reinstallation or system cloning.
- Faster upgrades and recovery. You can clone the USB flash drive before upgrading ESXi. If the upgrade fails, simply replace the device with the previous working version. Reinstalling ESXi on a USB device does not require copying datastore data, which reduces downtime and administrative effort.
Disadvantages
- Longer boot time. Booting ESXi from a USB device or SD card can take longer compared to SSD or HDD storage. While ESXi loads into RAM during operation and does not rely heavily on the boot device for runtime performance, boot delays can be significant in production environments, especially in High Availability clusters.
NOTE: Starting with ESXi 7.0, VMware introduced partition layout changes, including the ESX-OSData partition, which is write-intensive. USB flash drives and SD cards may not provide sufficient endurance for this workload. VMware no longer recommends or certifies USB drives or SD cards as standalone boot devices for newer ESXi versions (Broadcom KB article 317631). Persistent storage, such as SSD or HDD, is recommended instead.
If upgrading from ESXi 6.7 to later versions, the ESX-OSData partition must reside on persistent storage. Placing this partition on a USB flash drive or SD card can lead to premature device failure and potential host instability. Running ESXi from a USB flash drive remains suitable for lab environments and for supported older versions where write intensity is lower.
Requirements
Before installing ESXi on a USB flash drive or SD card, review the system requirements. The example below is based on ESXi 6.7, which operates reliably when booted from USB storage.
- Minimum 1 GB USB flash drive or SD card. 8 GB or larger is recommended.
- The USB flash drive or SD card should be compatible with ESXi.
- Host with at least 4 GB of RAM. 8 GB or more is recommended for running ESXi and virtual machines.
Other hardware requirements remain the same as for a standard ESXi installation.
NOTE: Starting with ESXi 7.0 and later versions, VMware introduced changes that require persistent storage for certain system partitions. Newer versions require a minimum amount of persistent storage for installation, and using only a USB flash drive or SD card may result in an unsupported configuration warning during setup.
Installing recent ESXi versions on USB storage alone is deprecated. An SSD or HDD is required to provide persistent storage for write-intensive partitions and to ensure host stability.
Storing Log Files
Log files are essential for diagnostics when issues or failures occur. When ESXi is installed on a diskless server and booted from a USB flash drive or SD card, logs are not stored persistently by default and may be lost after a reboot.
These logs are required when generating and sending a support bundle to VMware. The different types of ESXi logs and configuration methods are explained below.
The Process of Installing ESXi on a USB Flash Drive
Before installing ESXi on a USB flash drive on a physical server, you can practice the process in a VMware Workstation VM by using USB passthrough. Create a new VM as shown in the VMware Home Lab blog post. You can also check the ESXi installation steps.
This guide focuses on installing ESXi on USB devices. The example below uses ESXi 6.7 installed to a USB flash drive in a VM running on VMware Workstation. The workflow is similar on a physical server, so you can skip the VMware Workstation-specific steps.
General workflow to run ESXi from a USB flash drive on a physical server:
- Insert an empty USB flash drive or SD card.
- Insert an ESXi installation media (CD or bootable USB flash drive).
- Boot from the ESXi installation media.
- Partition the empty USB flash drive, format the partitions and install ESXi
- Reboot the server and, in UEFI/BIOS, set the USB flash drive or SD card as the first boot device.
- Start using the ESXi server.
Let’s install and run ESXi on a USB flash drive step by step:
- Insert a USB flash drive into a USB port on your physical server or on a computer running VMware Workstation. Some server motherboards include an internal USB port or an SD card slot. Certain SD cards support a physical read-only switch, which can help prevent unintended writes.
- Create a VM in VMware Workstation (File > New virtual machine). Ensure that the VM has a USB controller and a virtual CD/DVD drive, which are configured by default. In the new VM creation wizard, define the necessary parameters.
- Select the installer ISO disk image of your VMware ESXi distribution.
- Select VMware ESXi 6.x as the guest operating system.
- Set the virtual machine name.
- Set two processors in the processor configuration.
- Allocate 8192 MB (8 GB) or more of memory in the VM settings.
- Select the necessary network mode (for example, NAT).
- Use the recommended value for the I/O controller type.
- Select the recommended disk type.
- Create a new virtual disk (for example, 20 GB). This step is required in the New Virtual Machine Wizard and cannot be skipped.
- After the VM is created, remove the virtual disk if you plan to install ESXi only on the USB flash drive. To do this, open VM Settings, select the virtual disk and click Remove.
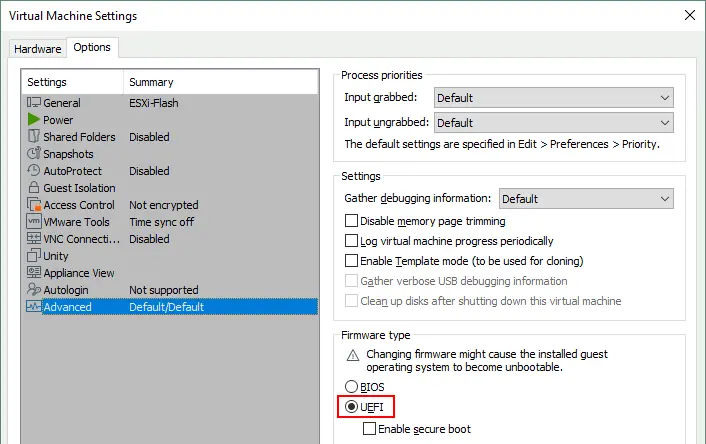
- Make sure that UEFI is selected as the firmware type in the advanced VM options (VM > Settings > Options > Advanced).
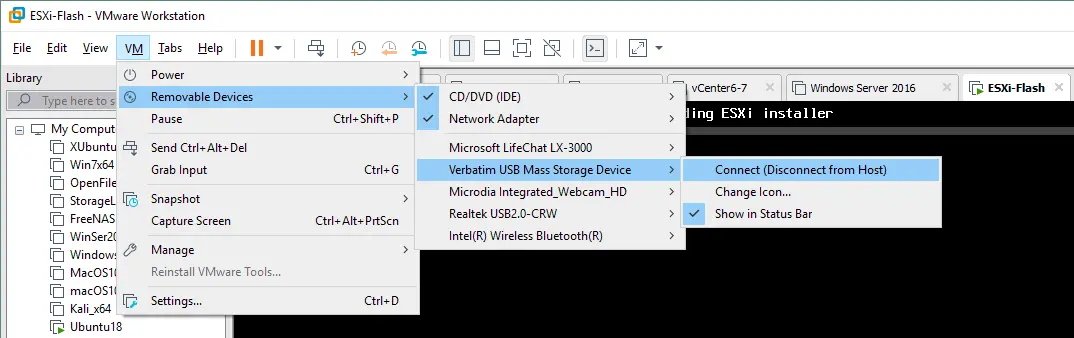
- Power on the VM and boot from the ESXi installer ISO image. Immediately after startup, press F2 to enter the VM’s virtual UEFI/BIOS and select the appropriate boot device. Confirm that the USB flash drive is connected to the VM. To connect it, navigate to VM > Removable devices > [Your Flash Drive Name] > Connect (Disconnect from Host).
- Install ESXi.
- Press Enter on the welcome screen to continue.
- Press F11 to accept the license agreement.
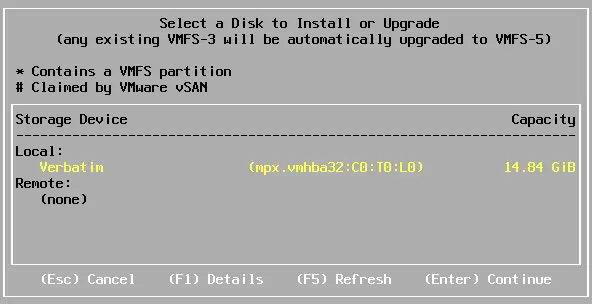
- Select a disk to install or upgrade ESXi. If the USB flash drive is recognized, choose it as the installation target and press Enter to continue.
In some cases, the ESXi 6.7 installer may not recognize the USB flash drive.
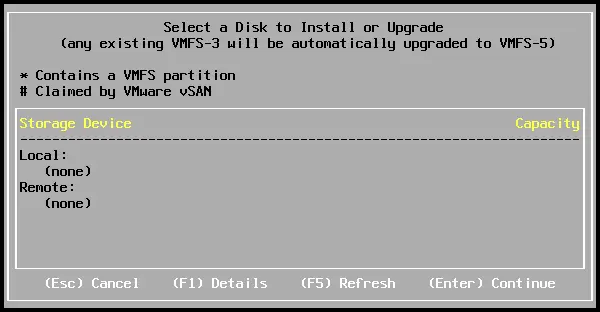
In some cases, the ESXi 6.7 installer may not recognize the USB flash drive. This issue is related to changes in USB drivers introduced in ESXi 6.5. VMware replaced legacy USB drivers (xhci, ehci-hcd, usb-uhci, usb, usb-storage) with the vmkusb driver, which is used by default for USB host controllers and devices.
If the USB device is not displayed, perform the following steps to enable legacy USB driver support:
- Reboot the virtual machine or physical server where the USB flash drive is connected.
- During the 5-second boot delay when starting from the ESXi installation media, press Shift+O to edit boot options.

- The default boot string is:
cdromBoot runweaselYou should add the preferVMklinux=TRUE parameter to this string and press Enter.

After modifying the boot parameter, repeat the installation steps until you reach the disk selection screen. The USB flash drive should now be visible. Select it and press Enter to proceed.
NOTE: In ESXi 8.0 and later, the installer automatically relocates the ESX-OSData partition to the best available persistent storage during installation or upgrade. As a result, the preferVMklinux=TRUE kernel parameter is not required.
- Select a keyboard layout (for example, US Default).
- Enter the root password.
- Hit F11 to confirm the ESXi installation and wait until it completes.
- Remove the installation media, then press Enter to reboot the ESXi machine (VM) after installation finishes. You can clear the Connect at power on checkbox for the virtual CD/DVD drive in VM Settings
- After ESXi boots from the USB flash drive, enable the ESXi console (Troubleshooting > Enable ESXi Shell) only if you manually selected a legacy USB driver during installation. Otherwise, skip this step.
- Press Alt+F1 to access the ESXi console, then enter the root username and password.
- Run the commands below to make the USB driver configuration persistent:
esxcli system settings kernel set -s preferVmklinux -v FALSEesxcli system module set --enabled=false -m vmkusbrebootOnce done, the ESXi host should correctly recognize USB devices.
Features of Installing ESXi on a USB Flash Drive
When ESXi is installed on a standalone hard disk drive (HDD), solid state drive (SSD) or RAID (Redundant Array of Independent Disks) storage, the installer creates a standard set of disk partitions on the destination device. Starting with ESXi 4.x, the GPT (GUID Partition Table) is used instead of the MBR (Master Boot Record) partition scheme.
When ESXi detects that a USB flash drive or SD card is selected as the installation target, it does not create a dedicated log partition on that device. Log data is written frequently, and USB flash storage does not provide the same endurance as HDD or SSD storage.
During boot, ESXi creates a RAM disk in system memory and loads the required system files into it. If ESXi is running from a USB flash drive, log files are written to a temporary directory on the RAM disk. After a reboot or shutdown, these logs are deleted. System configuration data is saved to the installation device when required.
The following examples show how ESXi creates partitions in different scenarios. ESXi 6.7 is used in this example, as this version operates normally when installed on a USB flash drive.
Installing ESXi on a 1 GB drive
If you install ESXi on a 1 GB USB flash drive, the following partitions are created.

No1. The smallest partition with the boot loader.
No5. This partition contains the main hypervisor operating system image. All files required for ESXi to function are stored in this fixed-size partition.
No6. This partition stores an alternative hypervisor image. It is used if an ESXi update or upgrade fails, allowing you to roll back to a previously working version. After an update or upgrade, ESXi preserves the previous operating system image in partition #6. During boot, you can press Shift+R to select the version to load.
No7. The partition to store a core dump in case of PSOD (Purple Screen of Death).
No8. The partition that contains disk images with VMware Tools and floppy images.
Partitions #5 and #6 contain the compressed hypervisor image file (s.v00), which is decompressed during ESXi boot. The root (/) directory, along with /etc, /lib and other system directories, exists only in RAM during operation. When ESXi is shut down or rebooted, configuration changes are saved to the state.tgz file. The process of editing this file is described in the blog post about changing the ESXi root password.
Installing ESXi on an 8 GB drive (or bigger)
If the destination hard disk drive used for installing ESXi has a capacity equal to 8 GB or more, then additional partitions are created.

No2. The scratch partition for storing log files.
No3. All remaining disk space is used to store VM files and other data.
No9. The second partition is used to store a core dump in case of a PSOD. This partition was added in ESXi 5.5 because modern servers often have larger memory configurations, and a 110 MB partition may not be sufficient to store a complete core dump.
If ESXi is installed on a USB flash drive or SD card with a capacity of 8 GB or more, partitions #2 and #3 are not created. In this case, the Scratch directory used to store logs is linked to the /tmp/scratch directory located on the RAM drive.
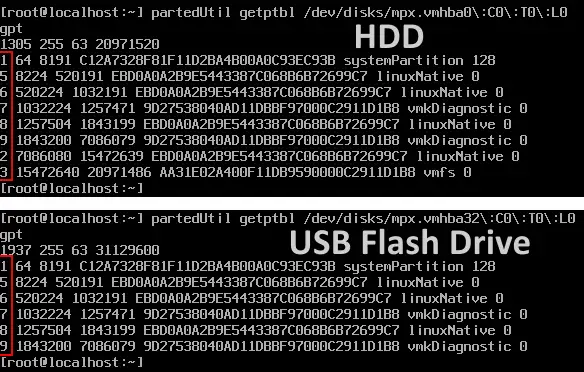
Let’s check the partitions on the ESXi servers installed on a 10 GB hard disk drive and a 16 GB USB flash drive. Both of our ESXi VMs are running on VMware Workstation.
- Press Alt+F1 to open the console in ESXi and run the command:
partedUtil getptbl /dev/disks/mpx.vmhba0\ :C0\ :T0\ :L0The partition layout is shown in the screenshots below. The top image displays all eight partitions created by ESXi on the 10 GB virtual hard disk. The bottom image shows six partitions created by the ESXi installer on the 16 GB USB flash drive.
- You can also check the size of each partition.
ls -lh /dev/disks/mpx*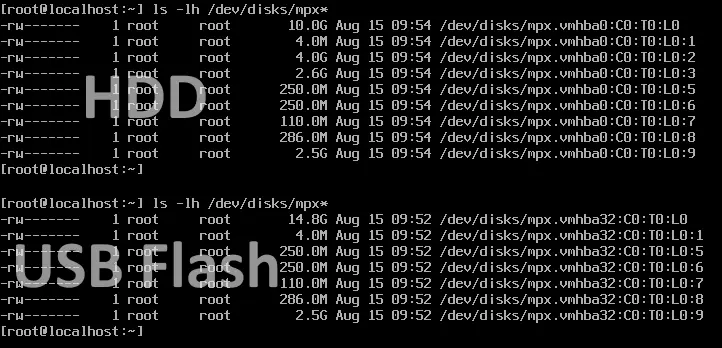
- If you list the contents of the root (/) directory on each ESXi host, you will see that the scratch directory on the installation stored on the HDD is linked to a dedicated disk partition. In contrast, when ESXi is installed on a USB flash drive, the scratch directory is linked to the temporary /tmp/scratch location on the RAM disk, as typically occurs in diskless deployments.
ls -lh /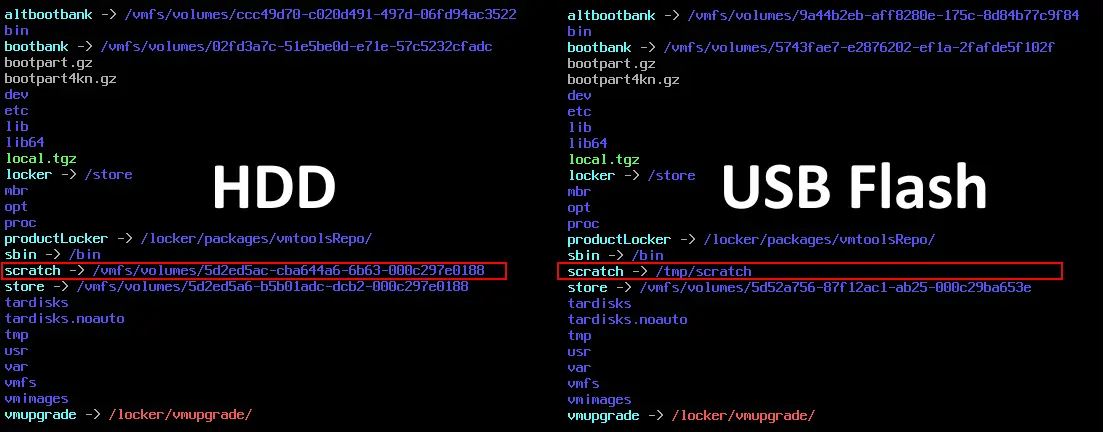
If you attach a new HDD, SSD or RAID storage device to an ESXi host installed on a USB flash drive, the scratch directory will automatically be redirected to the newly available persistent storage.
To demonstrate this, consider a virtual machine running ESXi from a USB flash drive without any additional disks attached.
- Go to VM > Settings and click Add in the Hardware tab, then select Hard Disk. Add a 20 GB virtual hard disk.
- Open the web interface of VMware Host Client, initialize the disk and create a new VMFS datastore on that disk.
- Reboot the ESXi host for the changes to take effect, then check the contents of the root (/) directory in the console:
ls -lh /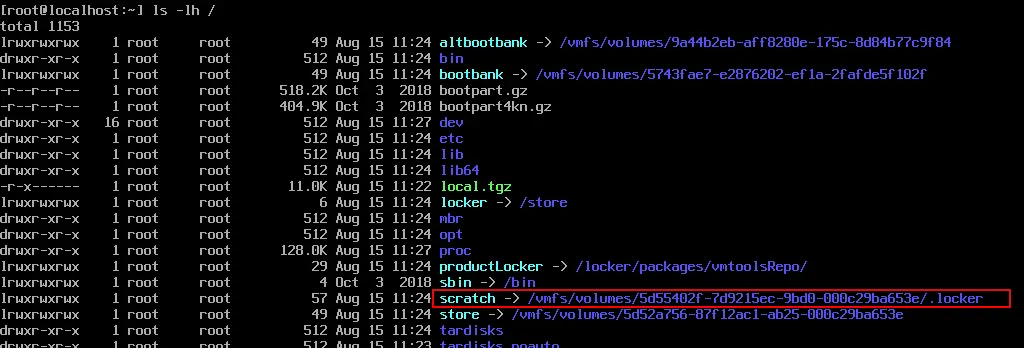
- The logs are now saved to the persistent storage.
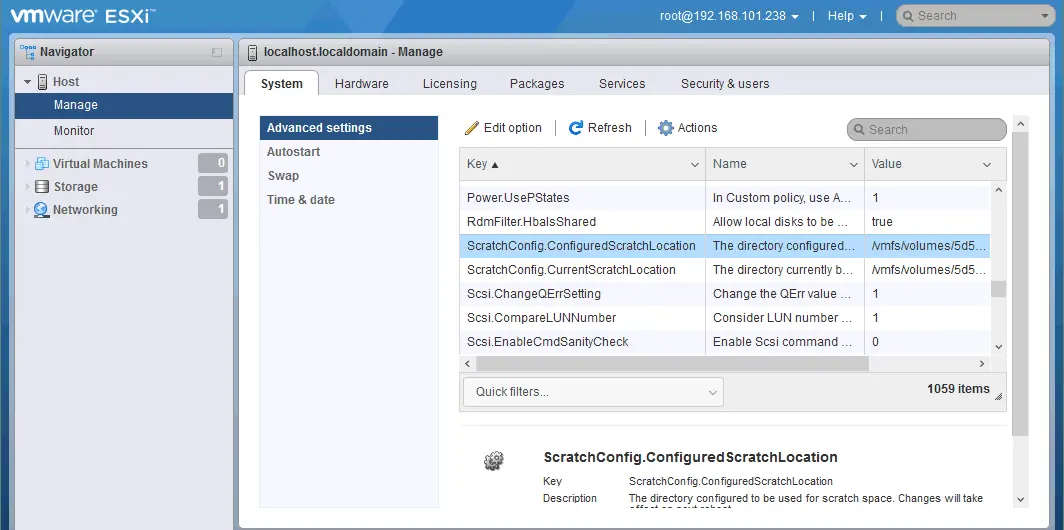
- You can edit the syslog settings manually in VMware Host Client. To do this, go to Host > Manage > System > Advanced settings and select:
ScratchConfig.CurrentScratchLocation - Click Edit and set the path to the directory used for storing log files, for example:
/vmfs/volumes/5d55402f-7d9215ec-9bd0-000c29ba653e/.lockerThe hash in the address is the partition (volume) identifier (ID).
If a diskless ESXi host is booted from a USB flash drive and no local disks are installed (for example, when using shared storage such as SAN or NAS connected via iSCSI), you can configure a Syslog server to store system logs on persistent storage. You can use VMware vSphere Syslog Collector for this purpose.
NOTE: In ESXi 7.0.3 and 8.0, log files are stored on a RAM disk by default.
Core dump
A core dump, like ESXi system logs, contains critical information required for troubleshooting and can be provided to support teams when resolving complex issues.
For an ESXi host running without vSAN enabled, the core dump partition should provide approximately 2.5 GB of space for every 1 TB of DRAM (dynamic random access memory). On hosts with large memory configurations, especially those exceeding 512 GB of RAM and configured as vSAN nodes, the default 2.5 GB core dump partition (partition #9) may be insufficient. In such cases, the core dump may not fit in the default partition.
To address this issue, you can increase the size of the core dump partition, configure the ESXi host to use a core dump partition on another disk or use ESXi Dump Collector to store vmkernel core dumps on a separate host over the network.
NOTE: Starting with ESXi 7.0, VMware introduced a new storage layout that consolidates several smaller partitions, including scratch, core dump and locker, into a single write-intensive partition called ESX-OSData. This partition also stores VM Tools and scratch data required for normal ESXi operation. Because ESX-OSData handles write-intensive workloads, USB flash media is not suitable for this partition in newer ESXi versions. Persistent storage, such as an HDD or SSD, is required.
vSAN traces
If vSAN is enabled on an ESXi host, an additional type of log file called vSAN traces is generated. These logs are separate from standard syslogs.
When ESXi is installed on a USB flash drive or SD card in a diskless configuration, vSAN trace logs are written to a temporary directory on the RAM disk. As with syslogs, these traces are deleted after the ESXi host is rebooted or shut down.
You can check the directory where vSAN trace logs are stored by running the following command:
esxcli vsan trace get
How to Back up ESXi Installed on a USB Flash Drive
As mentioned earlier in this blog post, one advantage of installing ESXi on a USB flash drive or SD card, for supported versions, is the ease of cloning the boot device.
The following example demonstrates how to clone a USB flash drive that contains an ESXi installation. Before starting the cloning process, shut down the ESXi host to ensure data consistency.
Cloning a USB flash drive with ESXi to an image
- Connect the USB flash drive with the ESXi installation to a Linux machine. In this example, an Ubuntu VM is used.
- Verify the device name assigned to the USB drive in Linux by running one of the following commands:
dmesg | grep -i usbdmesg | grep -i 'attached'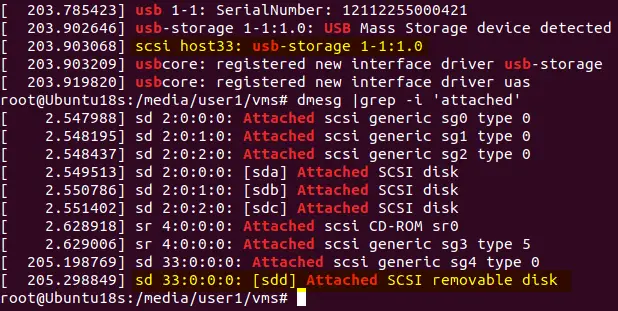
/dev/sdd/ is the name assigned to this USB flash drive.
- You can list attached block devices by using the lsblk command. To ensure that the correct device is selected before cloning, review the partitions on the USB flash drive:
lsblk | grep sdd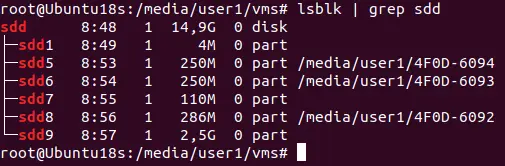
It is also possible to use fdisk for this purpose:
fdisk -l /dev/sdd - After identifying the correct device, clone the USB flash drive to an image file by using the low-level dd utility. In this example, the image file is named esxi-flash.img and is saved in the current directory.
Warning! Be careful when working with the dd utility because a mistake can cause irreversible data loss.
dd if=/dev/sdd of=./esxi-flash.img bs=4M status=progressWhere:
if – input file
of – output file
bs=4M – block size (4 MB)
status=progress – status used to display the progress bar
Erasing a USB flash drive
You can erase the USB flash drive and then restore the ESXi installation from the image file. To completely remove all data from the USB device, overwrite its entire capacity with zeros. This can be done by using the dd utility together with the /dev/zero pseudo-device, which generates a continuous stream of zeros. This method can also be used when you no longer plan to use the USB flash drive for ESXi.
If you are using a different USB flash device for testing, you can skip this step.
dd if=/dev/zero of=/dev/sdd status=progress
Wait until the process completes. After erasure, no partitions should remain on the USB flash drive. You can verify this with:
fdisk -l /dev/sdd
Recovering/Cloning ESXi on a USB flash drive from an image
Restore ESXi to an empty USB flash drive from the previously created image file by using the dd utility. Specify the image file as the input and the USB device as the output (/dev/sdd is used in this example):
dd if=./esxi-flash.img of=/dev/sdd bs=4M status=progress
After the write operation completes, verify the partition layout:
fdisk -l /dev/sdd
Once the image has been successfully written, connect the USB flash drive to the target machine where ESXi will run and power on the system.
You have now completed the backup and restoration process for ESXi installed on a USB flash drive.
Conclusion
Running ESXi from a USB flash drive or SD card can be a practical deployment option for supported legacy versions, particularly in lab environments or scenarios where preserving local storage for virtual machines is a priority. This approach offers flexibility and simplified recovery through device cloning, but it also introduces limitations related to boot performance and flash media endurance.
With the architectural changes introduced in ESXi 7.0 and later, including write-intensive system partitions, persistent storage such as an HDD or SSD is required for stable production operation. As a result, USB-based installations are no longer suitable for modern ESXi deployments in most enterprise environments.
Before choosing this installation method, evaluate version support, storage requirements and workload characteristics to ensure the configuration aligns with operational and reliability expectations.