VMware VM Templates A to Z
Deploying many similar VMs manually in large virtual environments is tedious and error-prone. VMware vSphere offers several cloning methods to streamline the process, and VM templates are one of the most efficient. This blog post explores how VM templates work, how to prepare and customize them, when to use them and what advantages they offer. It also compares VM templates with VM clones to clarify when each approach fits best.
What’s New
The blog reflects the current workflow for VM templates in VMware vSphere 9.0, released in June 2025. Updated material covers guest OS customization, template versioning through vSphere Content Libraries and image-based management with vSphere Lifecycle Manager (vLCM). Configuration steps and screenshots have been revised to match the current VMware vSphere Client interface.
What Is a VM Template?
A VM template is a master image of a virtual machine that includes VM disks, virtual devices and settings. It can be cloned repeatedly to create new VMs. After creation, a template cannot be powered on or edited — this is by design, preventing accidental modifications to the source image.
This approach provides greater security for VM cloning. After cloning, VMs are independent of the template and not linked to it. To edit a template, convert it back to a VM, make the necessary changes and then convert the modified VM into a new template.
When to Use VM Templates
VM templates are useful for deploying large numbers of similar VMs while preserving consistency across them. For example, consider a QA team that needs to test a new build of an internal software product on multiple VMs. A system administrator can create a single VM template and clone an identical VM for each tester from that template.
If something goes wrong during testing or a new test scenario is needed, a fresh VM can be cloned from the template with minimal effort. You can create multiple templates from Linux and Windows virtual machines for different use cases (testing, development, education, etc.). Different templates can include different software stacks: One template for the financial team, another for the development team, and so on.
The Difference Between a VM Clone and a VM Template
A regular VM clone is an exact copy of the source VM at the time of cloning. Periodic clones of a running VM will differ from one another, since the source VM keeps changing during operation. Cloning a powered-off VM is preferable, but standard cloning still lacks the consistency benefits of using a template.
When a VM is cloned, all settings — including static IP address, computer name and identifiers — remain identical across all clones. As a result, network conflicts and identity collisions can occur. A VM template helps avoid these issues because it cannot be edited or powered on. VMware also provides tools that simplify guest OS customization for cloned VMs.
The Difference Between a VM Template and an OVA/OVF Template
OVA and OVF templates are used for distributing pre-configured software as virtual appliances. They are compressed file formats. They can contain multiple VMs, which is useful for cases where software consists of multiple components that must be deployed on different machines.
The OVF (Open Virtualization Format) package can contain certificate files, ISO optical disk image files and other supporting files. The OVA (Open Virtual Appliance) file is similar to a TAR archive and can contain multiple OVF files.
Deploying VMs from OVA/OVF templates is similar to deploying from VM templates. OVA/OVF files can be deployed directly from the vCenter inventory, from local storage on the user’s computer, from mounted USB devices or from remote web servers reachable by the vSphere Client.
VMware VM templates, by contrast, are not compressed. They can be accessed only from locations available to vCenter (a local ESXi datastore or a shared datastore) and are not intended for external distribution.
VM Guest OS Customization
Guest OS customization is a vSphere feature that lets you change the settings of a cloned VM’s Linux or Windows guest OS. Without this feature, you would have to start each cloned VM, log into the guest OS and manually update the configuration through the GUI or command line.
This method is cumbersome and time-consuming. With VMware’s Guest OS customization, you can create a customization specification once and apply it to every VM cloned from the template. You can change the IP network settings, hostname, username, password, time zone, license settings, SID (security identifier) and Domain/Workgroup for the guest OS.
Note: The customization parameters for Linux and Windows differ slightly.
You can create multiple customization specifications for Linux and Windows VMs to ensure each cloned VM is ready for use immediately after deployment. If you plan to use a guest OS customization specification, prepare your VMs so that they meet the requirements.
The following components must be installed on a guest VM for this purpose:
- VMware Tools
- Sysprep tool (Windows)
- Perl (Linux)
- net-tools or iproute2 (Linux)
The guest OS must be installed on a virtual disk connected to the SCSI 0:0 node.
Check whether your guest OS is supported by your version of vSphere in the VMware Guest OS Customization Support Matrix.
Preparing a VM for Template Creation
Before creating a template, you should prepare the source VM. The main steps of this preparation are summarized below.
Creating a new VM. Create a new VM with sufficient CPU, disk and memory resources. Select the appropriate VM compatibility options. For example, if you have hosts with ESXi 8.0 and ESXi 9.0, your VM should be compatible with ESXi 8.0 or later (virtual hardware version 20), so that option should be selected. Optionally, you can enable CPU Hot Plug and Memory Hot Plug to add processor and memory resources while a VM is running.
Disconnecting unused devices. When repurposing an existing VM, disconnect unnecessary hardware such as virtual floppy disk drives, virtual COM controllers and LPT controllers. USB devices and CD-ROMs that will not be used after software installation can also be removed. This reduces the attack surface and improves overall security. You can also enter the VM’s virtual BIOS and disable any unnecessary devices there.
Installing the required software. Install the operating system, then apply all necessary updates, security patches, antivirus protection and any role-specific software for your use case. Configure OS settings such as environment variables and remote access. Set passwords for all user and administrator accounts. For accounts that will exist on every cloned VM, configuring passwords to never expire prevents lockouts before the customization specification or post-deployment automation can update them. You can also configure a default user profile.
Installing VMware Tools. VMware Tools is a set of drivers and utilities that improve guest OS performance and simplify VM management. It is essential for VM template workflows because customization specifications rely on it to apply IP configuration, hostname, time zone and other guest OS settings during deployment. Install VMware Tools on the guest OS.
Removing unwanted software components. You can make your VM template more lightweight by optimizing the guest OS. The following are general recommendations for Windows-based VMs:
- Disable unnecessary system services such as wireless services and Windows Search.
- Disable visual effects and animations to free up CPU resources.
- Disable the screensaver to save additional CPU cycles.
- Remove unused Windows roles and features.
- Disable unneeded startup applications and services.
- Delete temporary files, including software installation caches.
- Disable System Restore. VM snapshots and backups offer a more reliable equivalent for virtualized workloads.
You can perform a deeper cleanup of your guest OS to optimize VM performance based on your environment.
The sections below explain preparing a Linux VM as a template, including how to create a customization specification for cloning. This walkthrough uses Lubuntu 24.04 x64, a lightweight Linux distribution.
To prepare Lubuntu Linux for guest OS customization, open the Linux console (Terminal) and run the following commands with root privileges.
- Install the SSH server for remote access.
apt-get install openssh-server - Restart the SSH server after installation.
service ssh restart - Install VMware Tools for Linux from the package repositories. (Alternatively, you can install VMware Tools by mounting an ISO image to the VM’s virtual CD drive.)
apt-get install open-vm-tools - Install the networking toolkit.
apt-get install net-tools - Install Perl (if not installed).
apt-get install perl
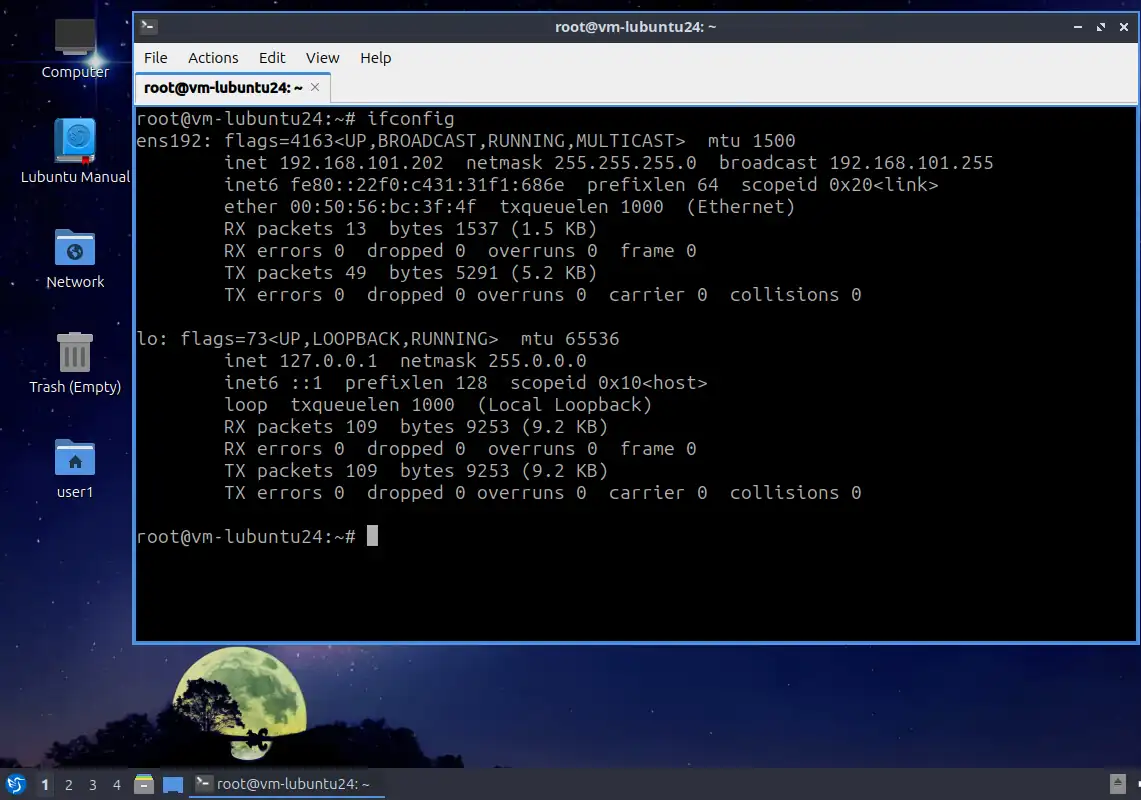
Once the packages are installed, check the hostname and network configuration. Run ifconfig to view the network interface details.
In this example, the virtual network interface used by the source VM has an IP address of 192.168.101.202.
Creating a VM Template
Once the source VM is prepared, you can create a VM template. You must have access to vCenter Server to manage your ESXi hosts, virtual machines, storage, networks and other vSphere components. The examples below use a VM running Lubuntu Linux. Two methods can be used to create a VMware VM template: Converting a VM to a template and cloning a VM to a template.
Converting to a template
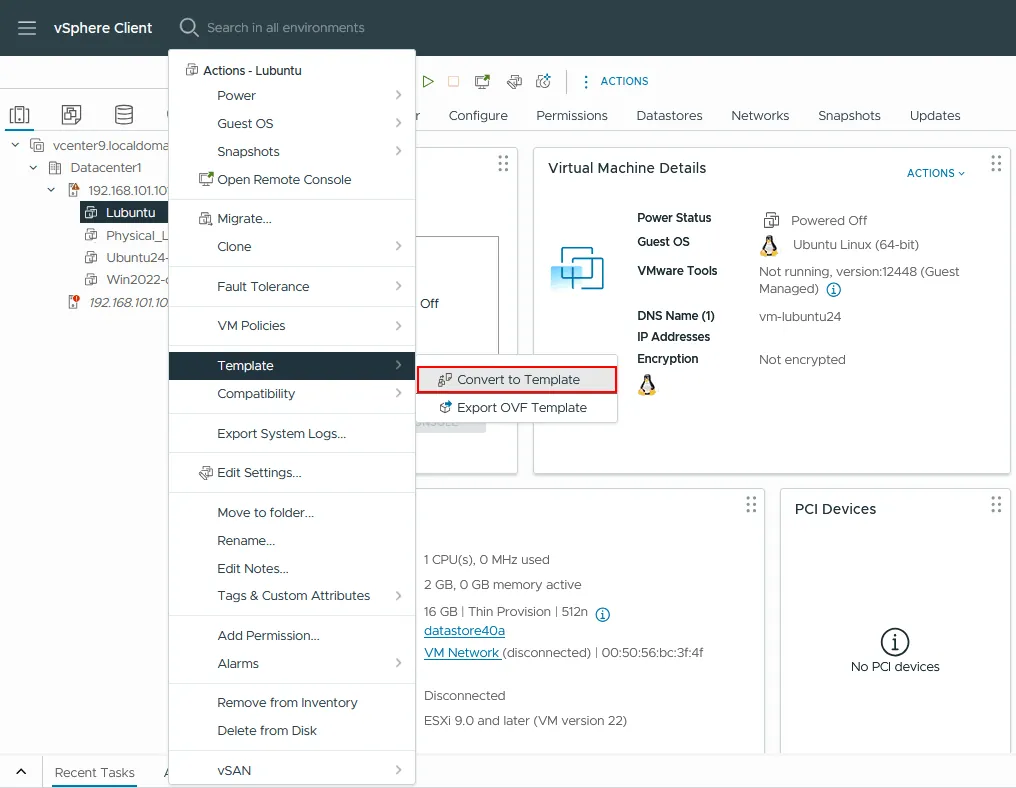
When you convert a VM to a template, the source VM is replaced by the template and is no longer available as a VM. To convert a VM to a template, take the following steps:
- Log in to vCenter using VMware vSphere Client. Go to Hosts and Clusters or VMs and Templates, then select the VM you have prepared for conversion.
- Ensure the VM is powered off before conversion.
- Right-click the VM and, in the context menu, select Template > Convert to Template.
- A confirmation message is displayed: Convert the virtual machine “VMname” to a template? Click Yes to proceed.
Cloning to a template
This option preserves the original VM and copies its data into a new template. The source VM can be powered on or off during cloning. Similar to the previous method, navigate to your VM in the vSphere Client. Right-click the VM and, in the context menu, click Clone > Clone to Template.
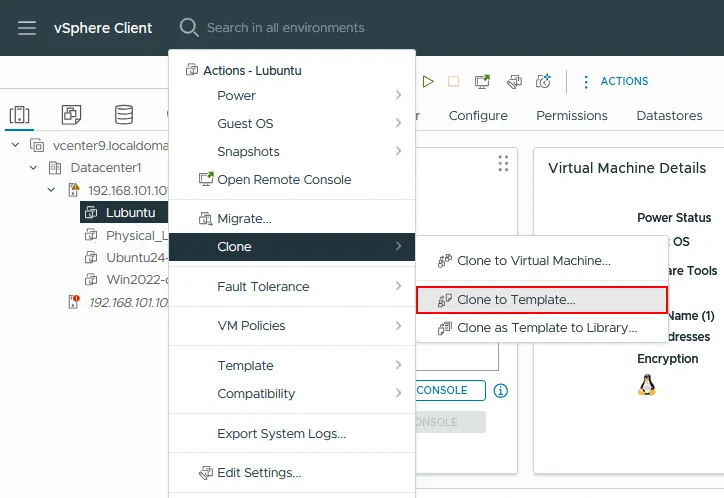
The cloning wizard launches. Proceed through the steps as follows:
- Select a name and folder. Define a name for your VMware VM template and select a target location. In this example, Lubuntu24-test is the template name, since it is going to be used for testing. Click Next.
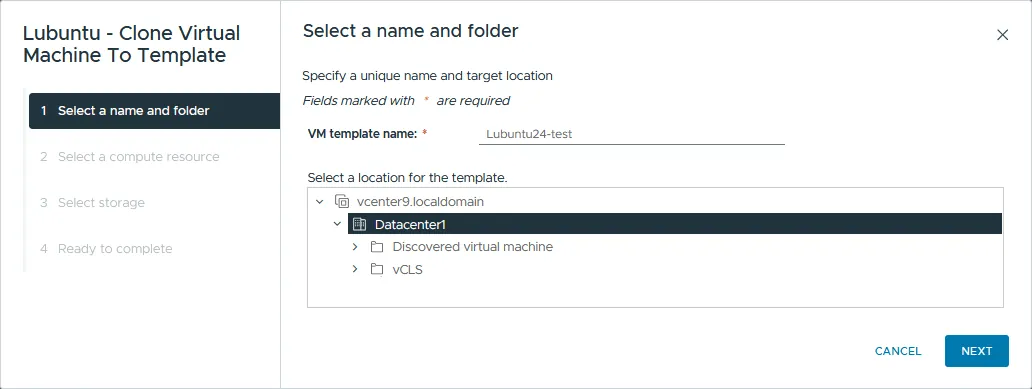
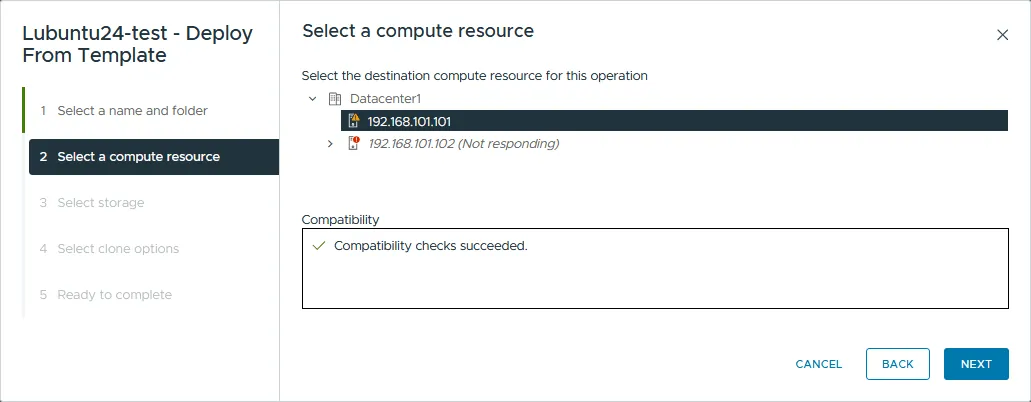
- Select a compute resource. You can select an ESXi host or a cluster as your resource. Click Next.
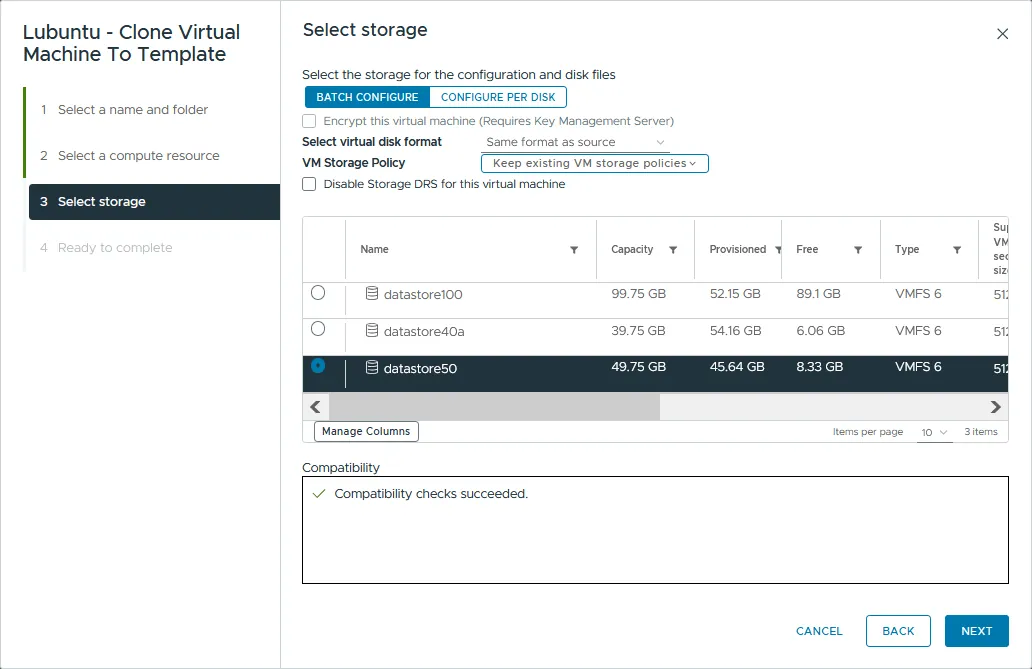
- Select the storage location for the template. You can choose a virtual disk format (thin-provisioned, lazy zero thick-provisioned or eager zero thick-provisioned) or simply inherit the format from the source. You can also define a custom VM storage policy if needed. Click Next.
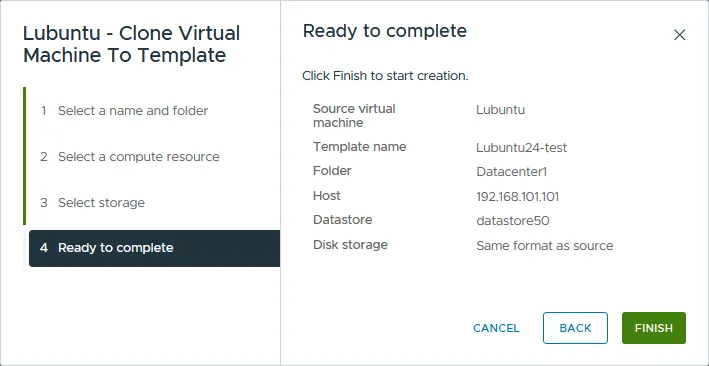
- Ready to complete. Review the summary and click Finish to create the template.
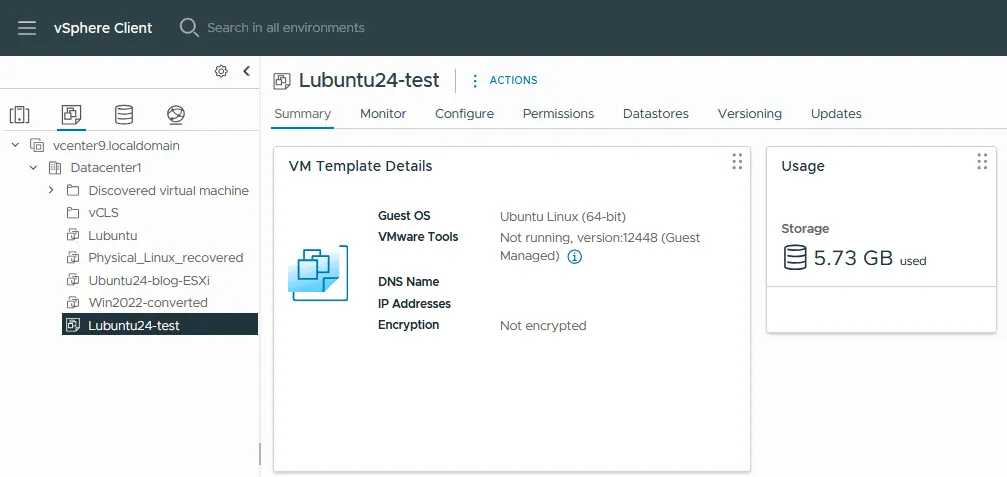
- Your newly created VM template appears at the end of the list in the VMs and Templates section. Note that the storage usage of the original VM and the template is the same. VM templates are not compressed.
If you go to the Storage section and select the datastore directory of your VM template, you should see that all the files match those of the source VM except for the configuration file: The template uses the .VMTX extension instead of .VMX, which is used for regular VMs.
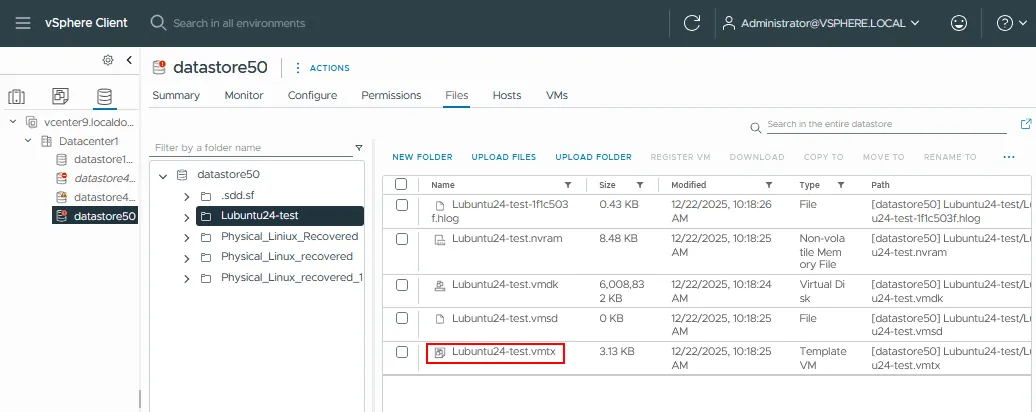
Creating a VM Guest Customization Specification
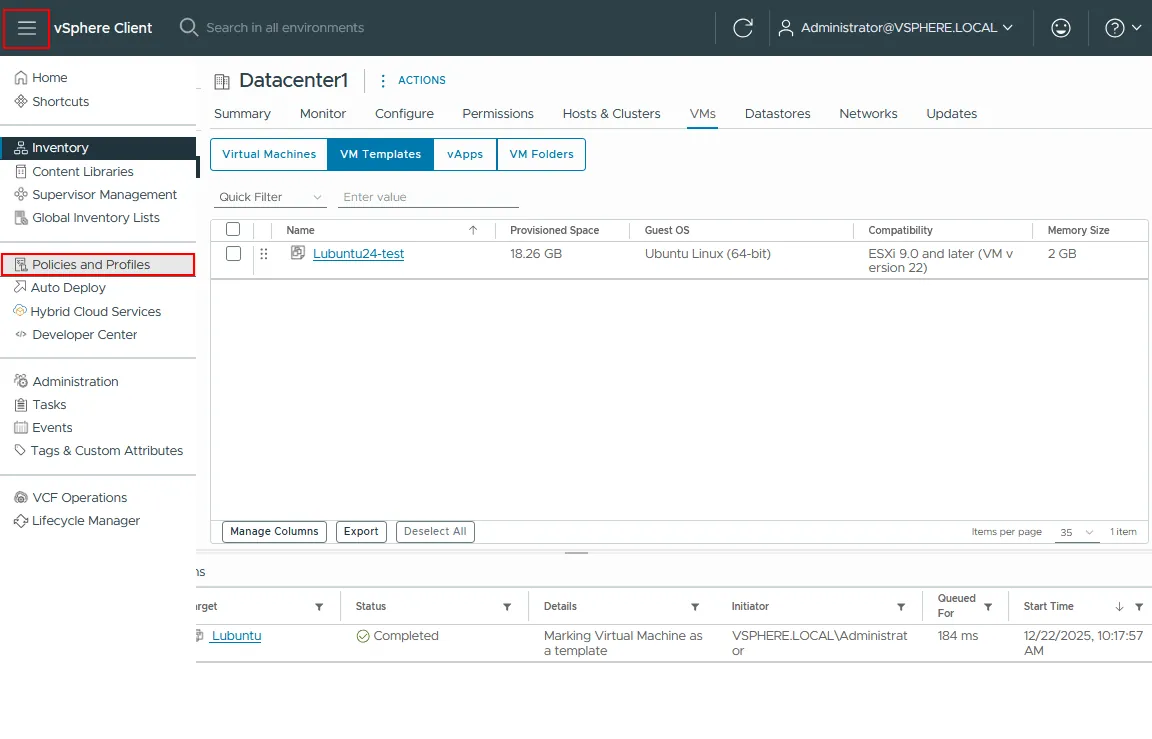
Now that a VM template is created, you can create a VM guest customization specification. To do this, open the Menu, then click Policies and Profiles.
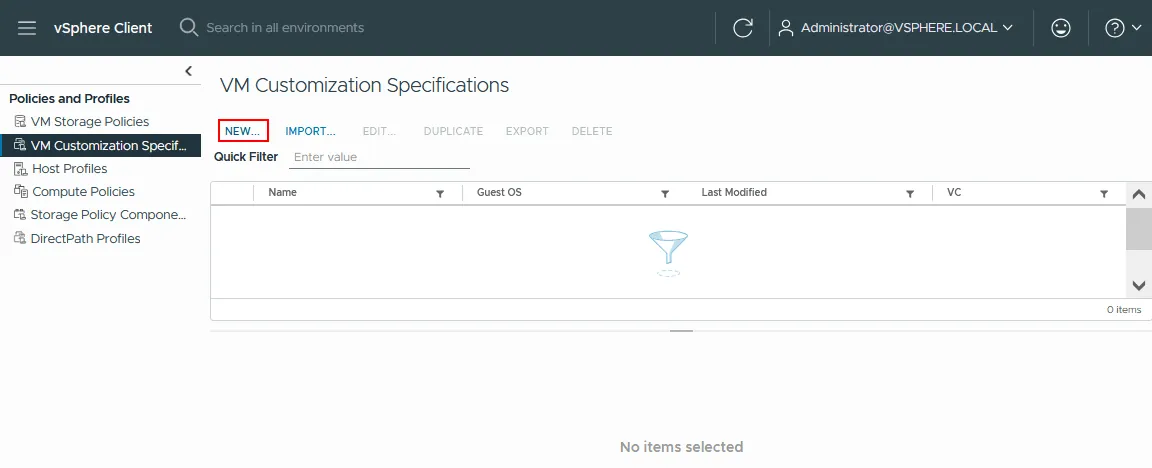
Make sure that VM Customization Specifications is selected in the left pane. Click New to create a new VM customization specification. A new wizard window opens.
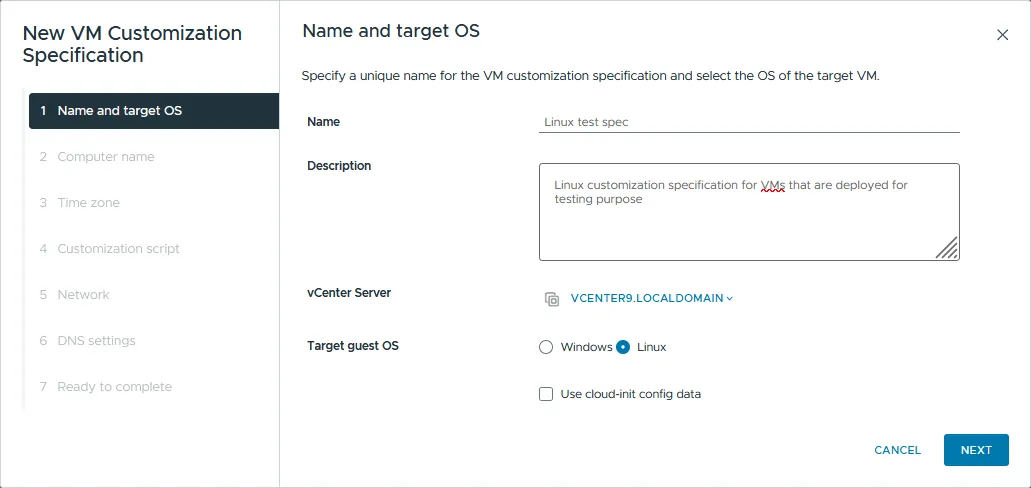
- Name and target OS. Set a unique name for the specification, enter a description, select the vCenter server and specify the guest OS of the target VM (Windows or Linux). In this walkthrough, Linux is used and the specification is named Linux test spec. Click Next.
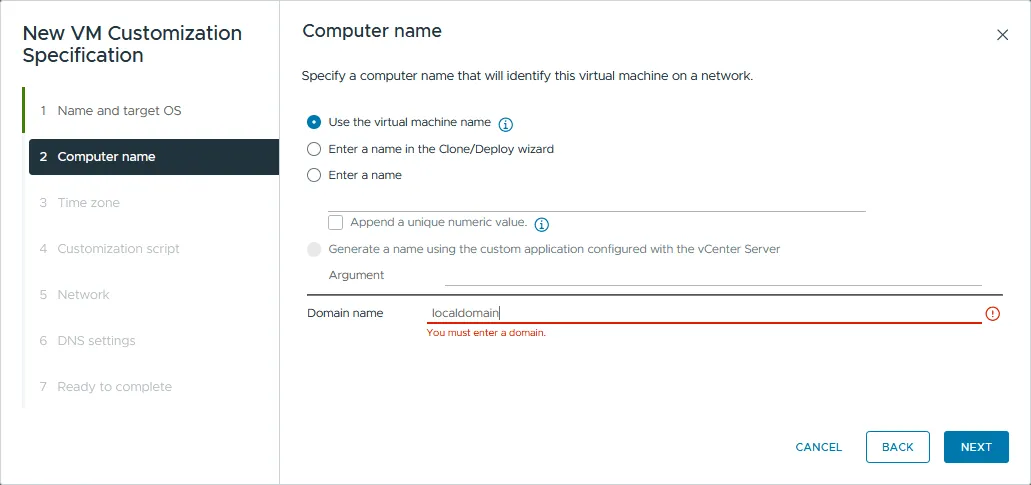
- Computer Name. Set a computer name (host name) and domain name. There are three available options to specify a computer name:
- Use the virtual machine name. The computer name of the guest OS will match the VM name. This option is convenient for administration.
- Enter a name in the Clone/Deploy Wizard. You manually enter a computer name when applying the customization specification to a VM clone. This is useful when you don’t yet know which names you want to use.
- Enter a name. Set the computer name now. To ensure uniqueness, tick the Append a numeric value checkbox so each cloned VM receives a unique computer name.
A computer name cannot exceed 63 characters; longer names are truncated. Click Next to continue.
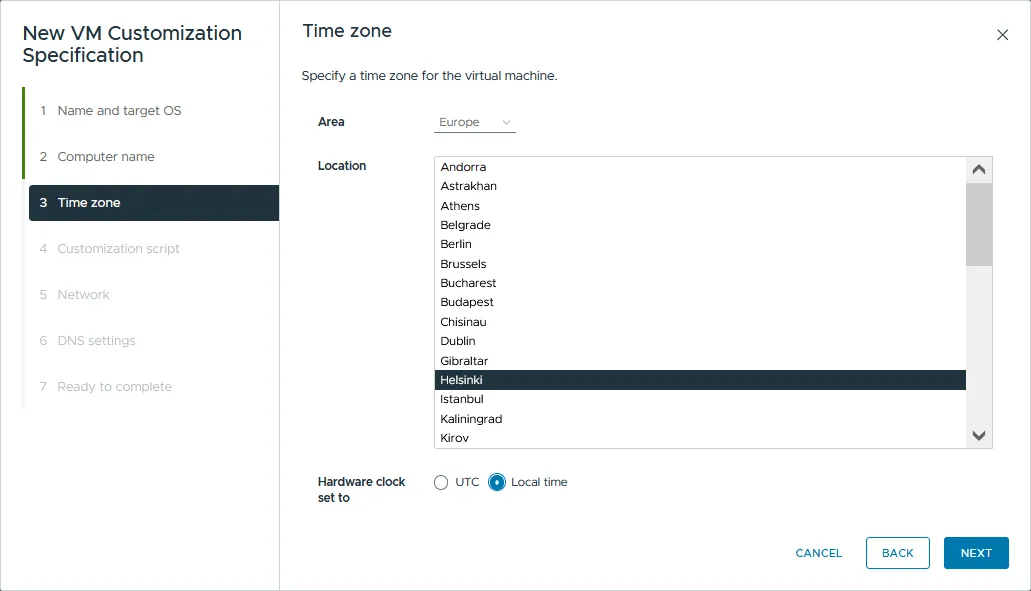
- Time Zone. Specify a time zone for the virtual machine. Then click Next.
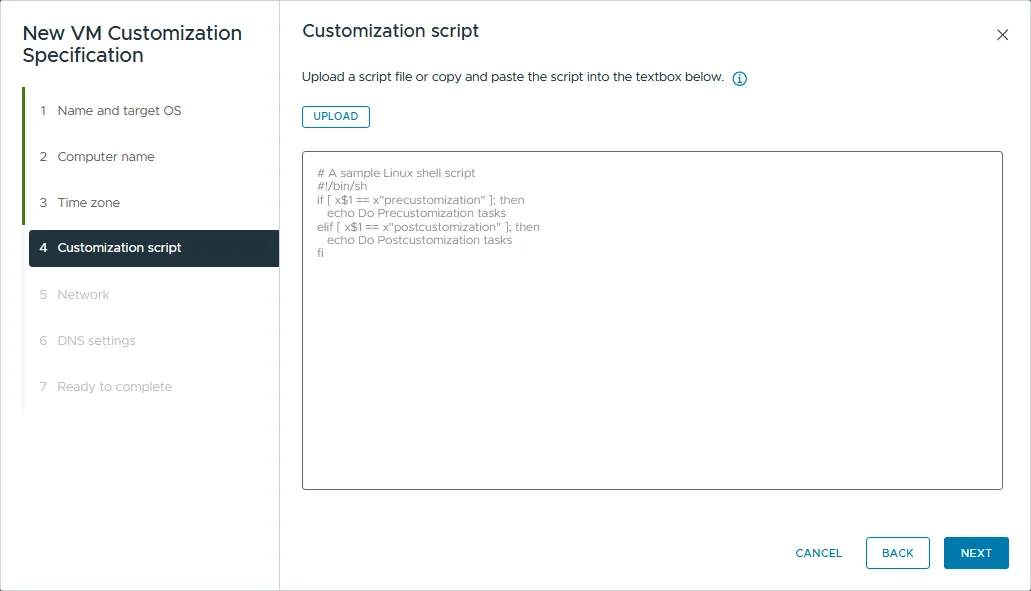
- Customization script. Optionally, you can upload a customization script to run inside the guest OS during customization.
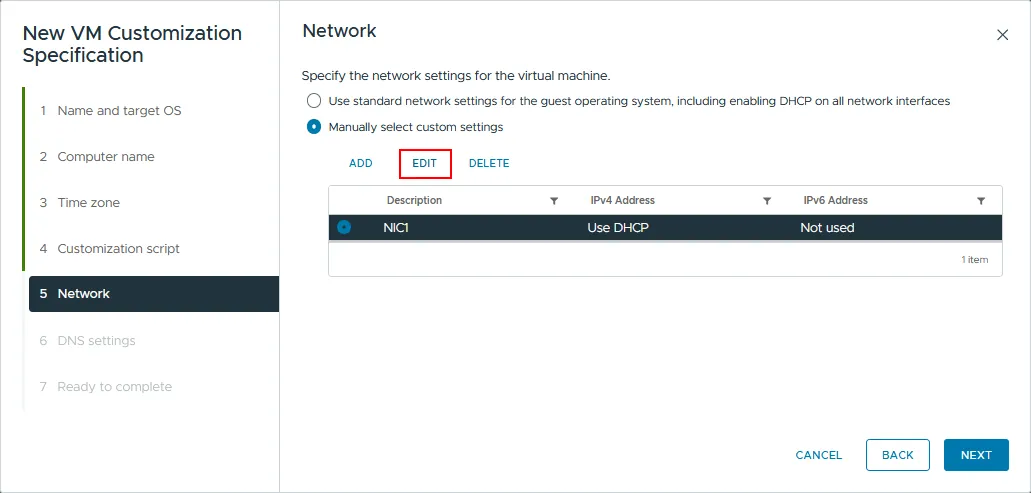
- Network. Specify the network settings for the virtual machine. There are two options:
- Use standard network settings for the guest OS, including enabling DHCP on all network interfaces.
- Manually select custom settings.
In this walkthrough, the second option is used. Click the Add button to add a virtual network interface controller (NIC) to your VM, or click Edit to modify settings for an existing NIC.
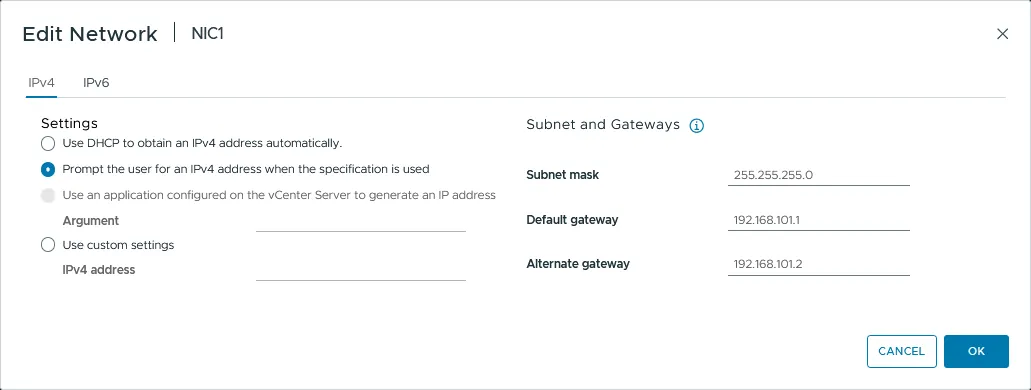
- A new configuration window opens. There are three options available in the IPv4 tab:
- Use DHCP to obtain an IP address automatically.
- Prompt the user for an IP address when the specification is used. You can preconfigure a subnet mask and default gateway with this option, but the IP address must be entered when the specification is applied to the VM.
- Use custom settings. This is similar to the previous option, but the IP address can be set immediately.
IPv6 can be disabled. Click OK after configuring the network options, then click Next.
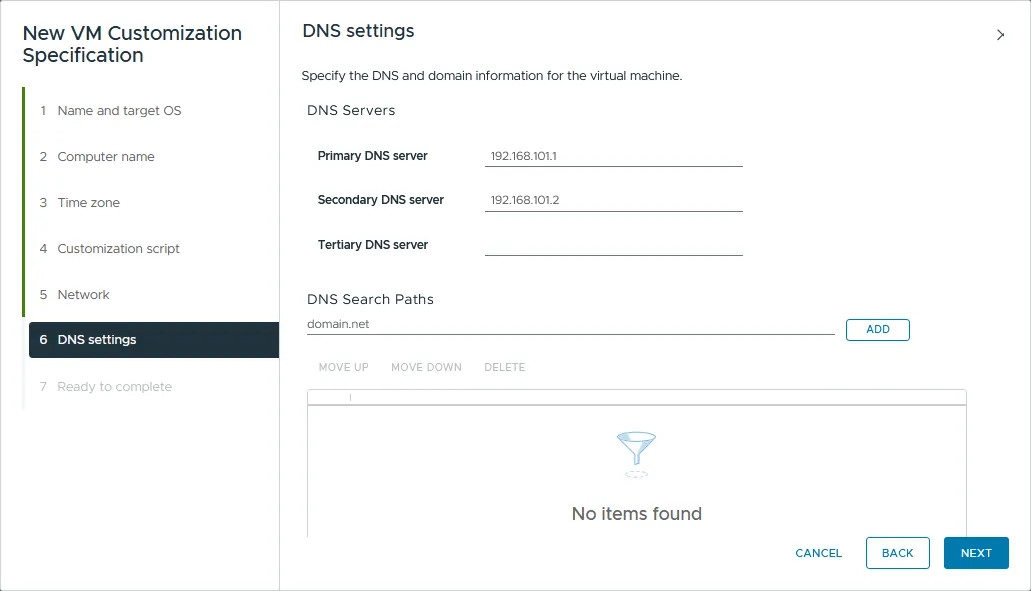
- DNS settings. Specify the DNS servers and DNS search paths for the VM. You can set up to three DNS servers. Click Next.
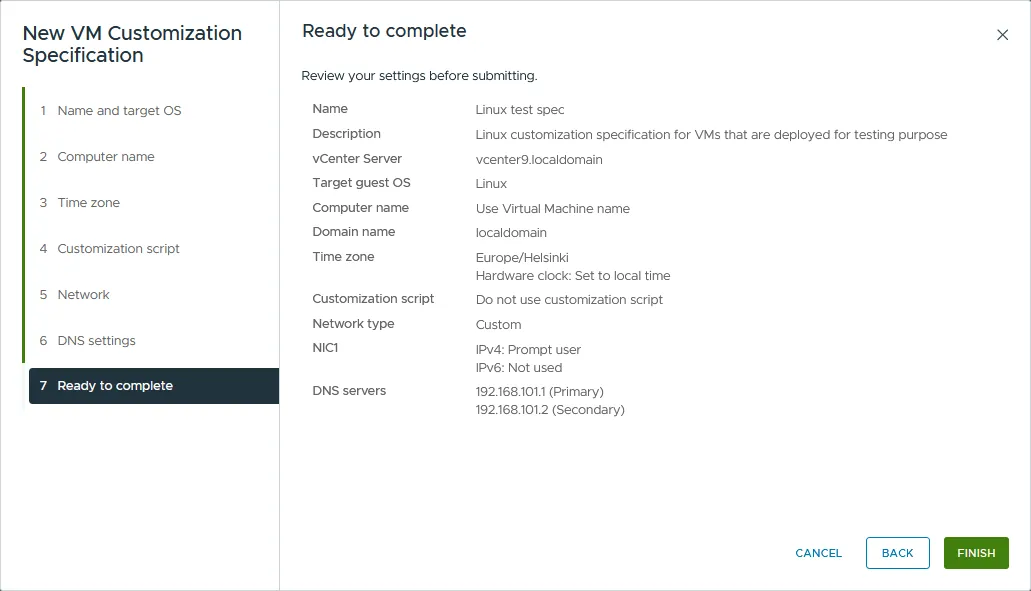
- Ready to complete. Review your settings and click Finish when you are satisfied.
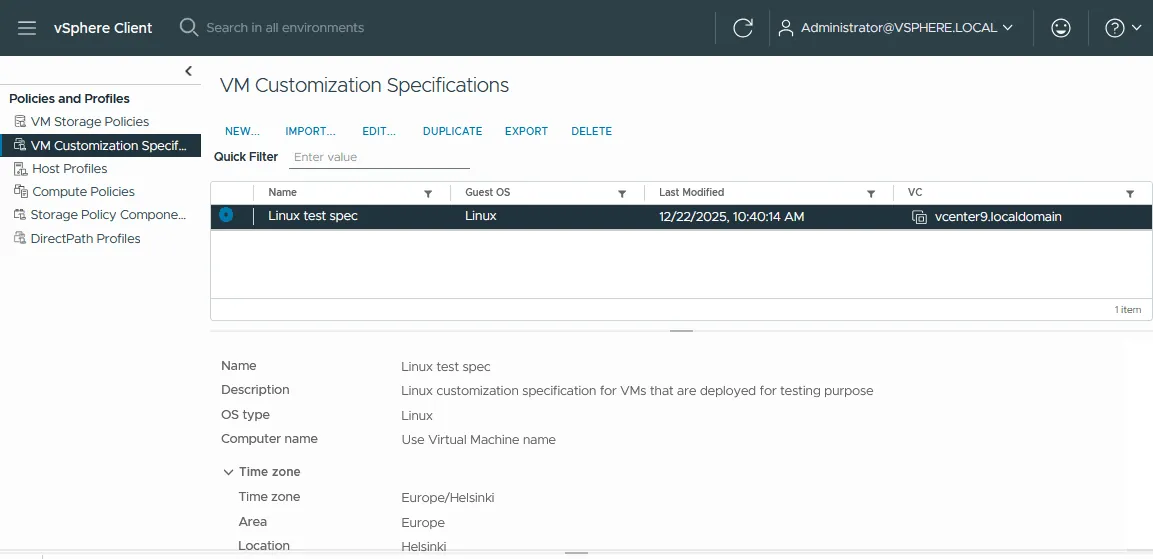
Your guest OS customization specification now appears in the list of VM customization specifications. From here, you can edit, duplicate, export and delete specifications.
Creating a VM from a Template
Now that you have a VM template and a guest OS customization specification, you can create a virtual machine from your template. Go to the VMs and Templates section, right-click the template you created and select New VM from This Template. In this case, the template is preserved. The Convert to Virtual Machine option, by contrast, converts the template into a VM and removes it from the template list.
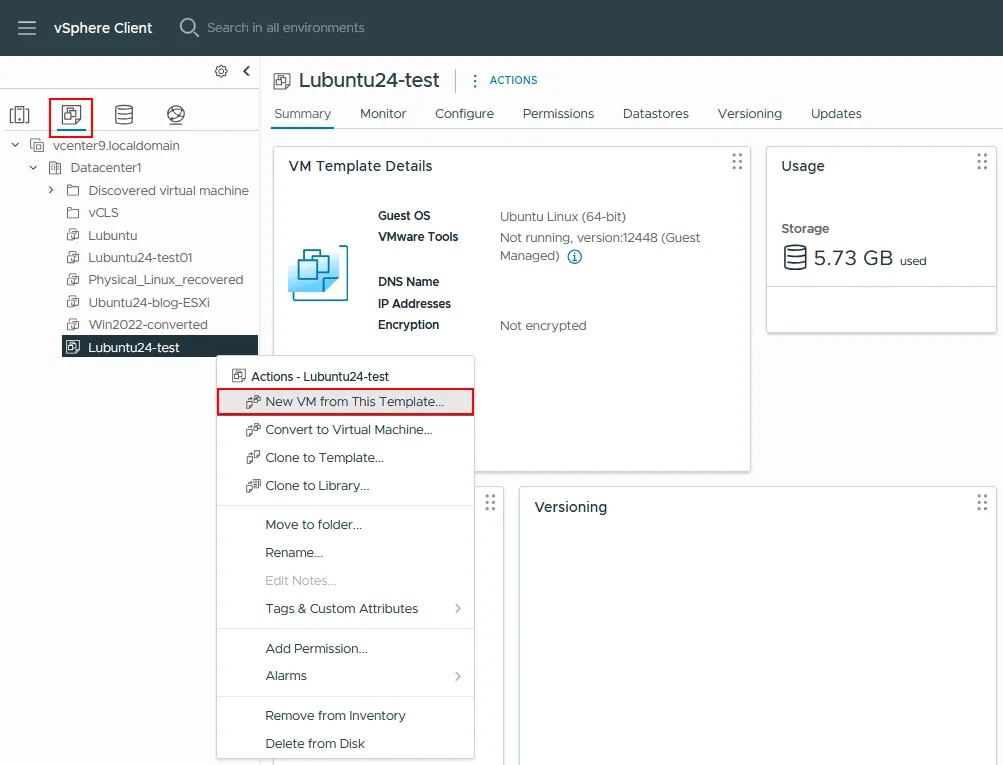
The Deploy From Template wizard is launched.
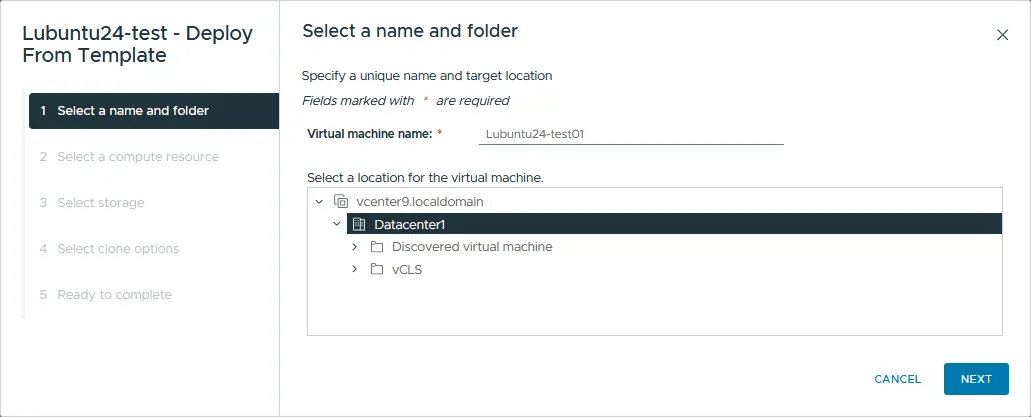
- Select a name and folder. Enter a unique VM name and target location. In this walkthrough, the virtual machine is named Lubuntu24-test01. Click Next to continue.
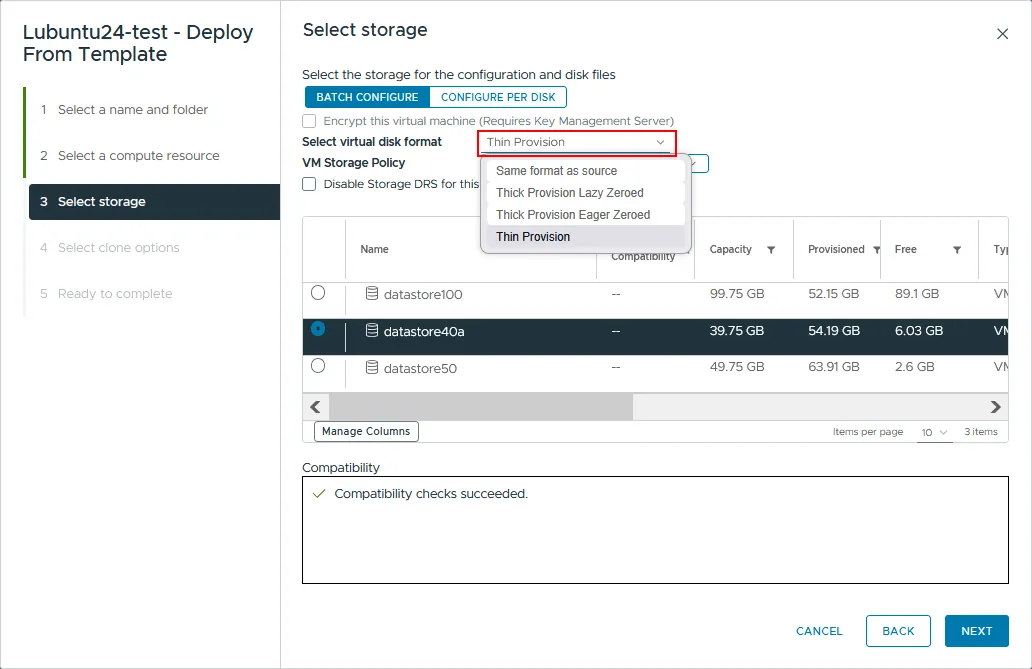
- Select a compute resource. Select the ESXi host or cluster on which the VM should run. Click Next.
- Select storage. Select the datastore for the configuration and disk files. Choose the virtual disk format manually (thin-provisioned, lazy zero thick-provisioned or eager zero thick-provisioned) or inherit the format from the source. Select a VM storage policy if necessary. Click Next.
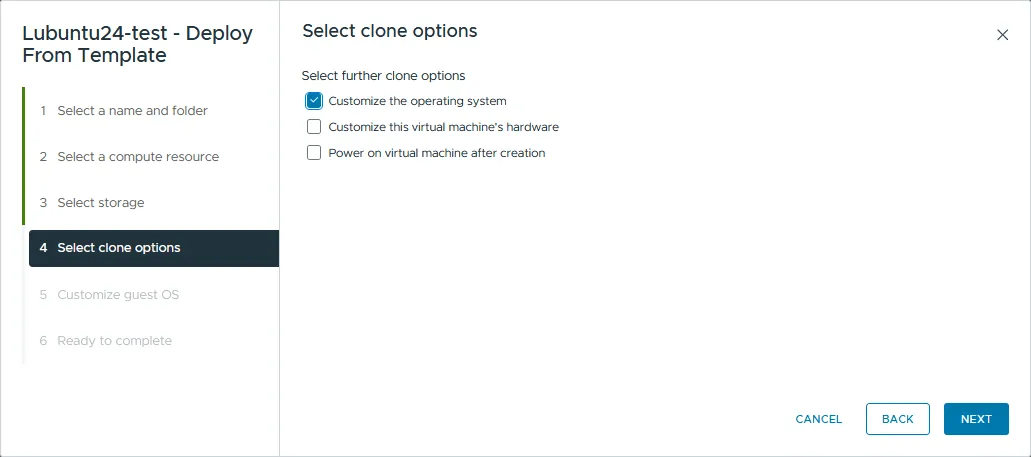
- Select clone options. To apply the customization specification you created, tick the Customize the operating system checkbox. Then click Next.
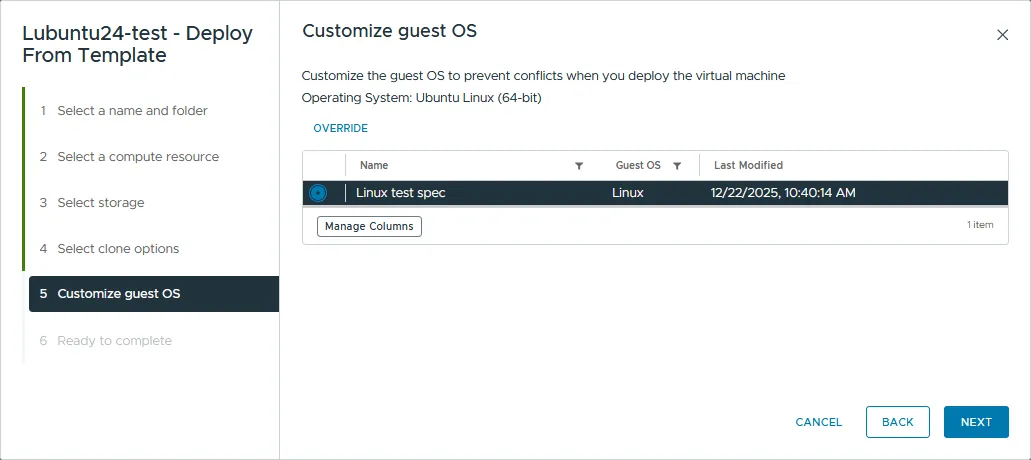
- Customize guest OS. Select the guest OS customization specification you created from the list. In this walkthrough, the specification is named Linux test spec. Click Next to proceed.
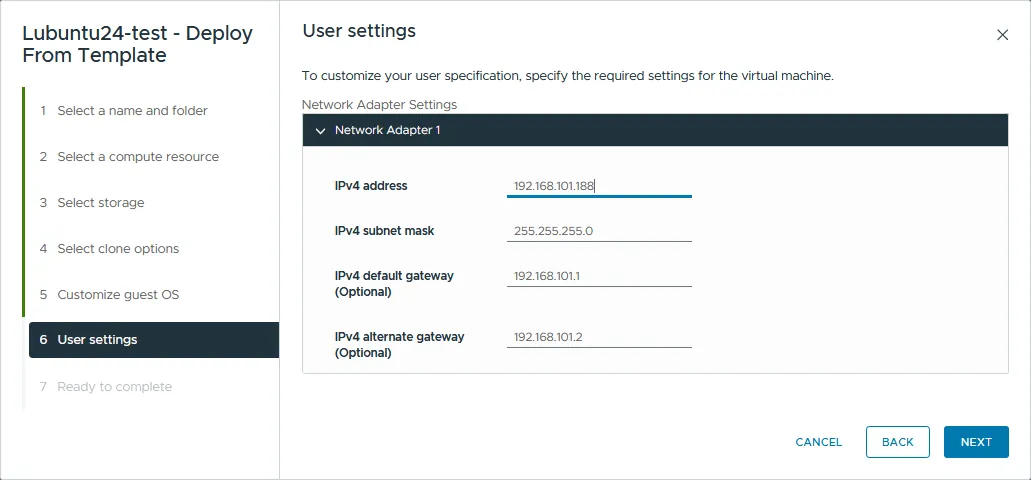
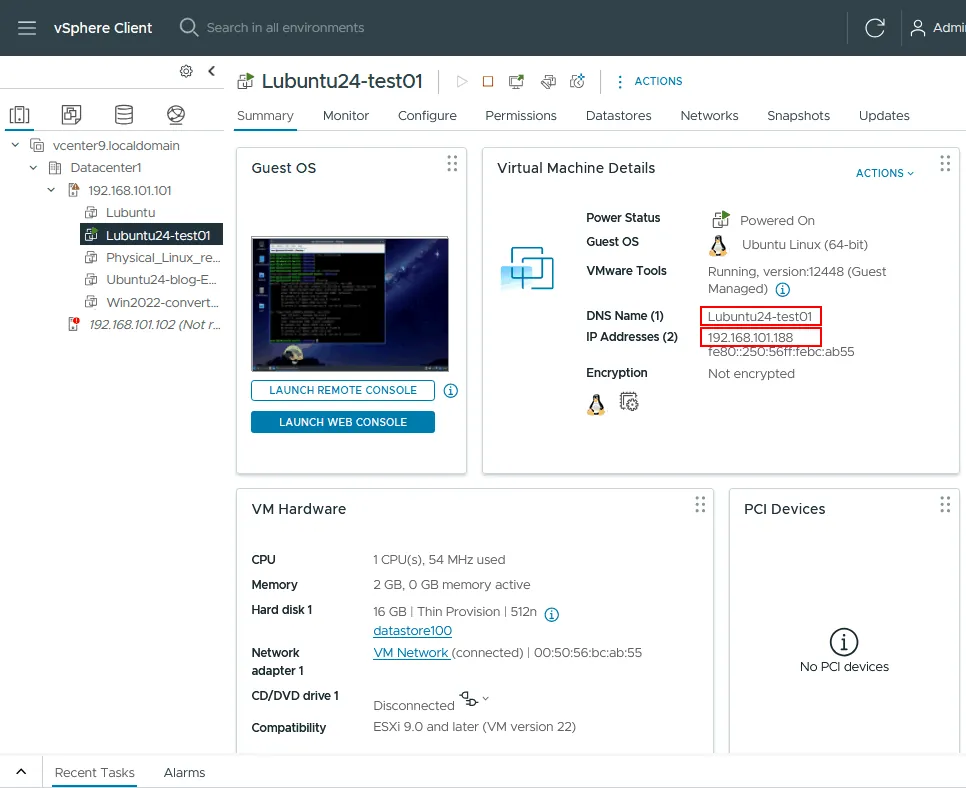
- User settings. The customization specification used here lets you set the IP address during VM clone creation. Define the IP address for the VM’s virtual network adapter — in this case, 192.168.101.188. Click Next.
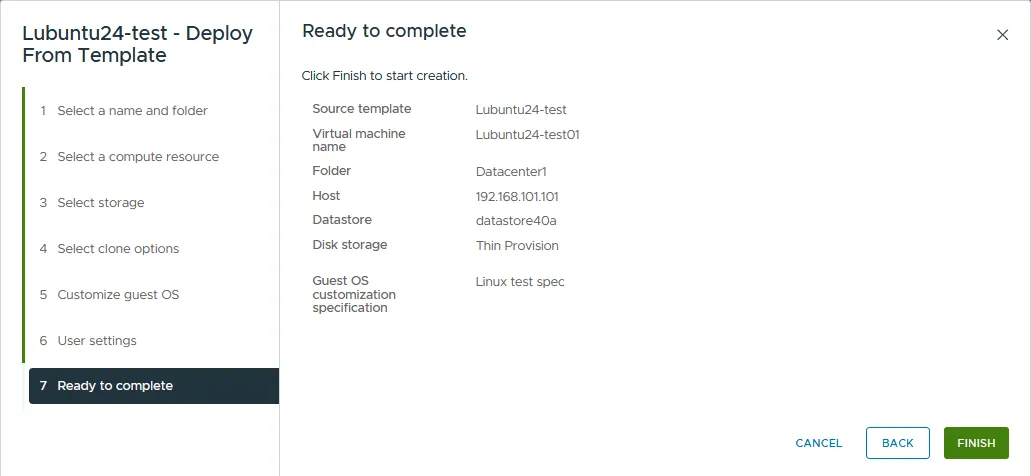
- Ready to complete. Review the summary and click Finish to initiate VM creation.
Once the VM is created, power it on and launch the vSphere Client web console (or VMware Remote Console) to access the guest OS interface. After the first login, the VM restarts and applies the customization specification. Once the VM has rebooted, open the Linux console and verify the hostname, IP configuration and time zone using the following commands:
- View the hostname:
cat /etc/hostname
You can also see the hostname in the primary prompt string.
- Check the IP configuration of network interfaces:
ifconfig - Check the time zone set on the system:
timedatectl | grep "Time zone" - Check the gateways in the routing table:
netstat -rn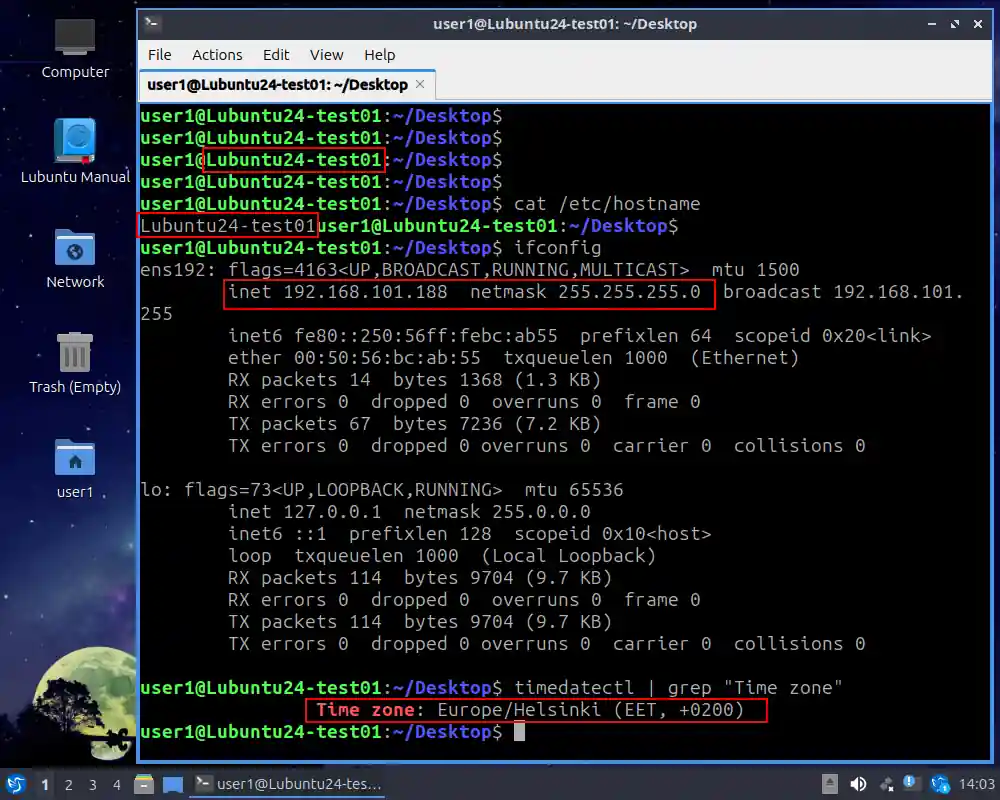
As shown in the screenshot above and the screenshot below from the vSphere Client, the IP address, computer name and time zone match the values defined in the guest OS customization specification. The VM name and the host name are the same.
Automation with PowerCLI
The walkthrough above uses the vSphere Client GUI to create and apply VM templates. For larger or more complex deployments, you can automate these tasks using VMware PowerCLI (rebranded as VCF PowerCLI starting with VCF 9.0). PowerCLI is a PowerShell-based scripting framework that includes thousands of cmdlets for vSphere automation, including full deployment automation. Useful cmdlets for working with VM templates and customization specifications include:
New-Template— Creates a new VM template from an existing VM.Get-Template— Retrieves available VM templates from vCenter.Set-Template— Modifies an existing VM template.New-OSCustomizationSpec— Creates a new guest OS customization specification.Get-OSCustomizationSpec— Retrieves OS customization specifications from vCenter.Set-OSCustomizationSpec— Modifies the specified OS customization specification.Get-OSCustomizationNicMapping— Retrieves the NIC mapping settings for an OS customization specification.Set-OSCustomizationNicMapping— Modifies the NIC mapping settings for the specified OS customization specification.New-OSCustomizationNicMapping— Adds NIC mapping settings to an OS customization specification.New-VM— Deploys a new VM from a template.
A typical deployment combines these cmdlets to create a customized VM from a template:
$template = Get-Template -Name "Lubuntu24-test"
$spec = Get-OSCustomizationSpec -Name "Linux test spec"
New-VM -Name "Lubuntu24-test01" -Template $template
       -OSCustomizationSpec $spec -VMHost "esxi01.local"
       -Datastore "datastore1"
For the full cmdlet reference, syntax and examples, see the VMware PowerCLI documentation on the Broadcom Developer Portal. You can also read our blog post about PowerCLI scripting.
Advantages of VM Templates
VM templates with guest OS customization specifications are particularly useful for VM deployment in large environments. The primary advantages are summarized below:
- Standardize VM deployments. Templates ensure every cloned VM follows the same baseline configuration, which reduces redundant work and simplifies ongoing administration.
- Fewer deployment errors. Manual VM provisioning leaves room for missed configuration steps. Investing the time to build a clean template once eliminates these mistakes across all subsequent deployments.
- Automation. PowerCLI scripts and customization specifications can deploy templates at scale, reducing manual effort and the chance of misconfiguration.
- Time and cost savings. Cutting deployment time and the associated administrative overhead also reduces operational costs.
Advanced Tips for VM Templates
Template versioning with Content Libraries
The Template Versioning feature was introduced in VMware vSphere 7 and refined in vSphere 8. Editing a template traditionally required converting it to a VM, modifying the VM and converting it back to a template, a process that introduced manual conversion risk and accidental changes.
Modern vCenter Server lets you store templates in a Content Library and use the check out and check in workflow to make controlled edits while preserving a version history. This eliminates the manual conversion risk and lets you roll back to earlier template versions if needed.
Image-based management with vSphere Lifecycle Manager
VMware vSphere 8 and vSphere 9 support image-based management through vSphere Lifecycle Manager (vLCM). In addition to manual template creation and conversion, vLCM lets you integrate VM templates into a broader lifecycle strategy. Deployed VMs can be aligned with a desired state defined by firmware, drivers and ESXi version, which is useful where consistency across hosts and VMs is critical.
Conclusion
A VM template is a master image that can be cloned during mass VM deployment. Because VM templates cannot be edited or powered on like regular VMs, they reduce the risk of accidental changes to the source image. Guest OS customization specifications further streamline deployment by automatically applying network, hostname, time zone and other settings to each cloned VM. The result: Faster deployments, fewer errors, consistent configurations and lower operational costs.
FAQ
How do I create a VM template in VMware vSphere?
You create a VMware VM template by either converting a virtual machine to a template or cloning a VM into a new template. In the vSphere Client, right-click the source VM, then select Template > Convert to Template or Clone > Clone to Template.
Can I edit or update a VM template after it's created?
VM templates cannot be edited directly. To update a template, right-click it in vCenter and select Convert to Virtual Machine. After making your changes, convert the VM back to a template using Template > Convert to Template or Clone > Clone to Template. In modern vSphere, Content Libraries also support a check-in/check-out versioning workflow.
What is the difference between a VM clone and a VM template?
A VM clone is a regular virtual machine you can edit and run. A VM template, by contrast, cannot be powered on or modified directly, but it can be cloned to create new VMs. Cloning a running VM produces inconsistent results because the source VM keeps changing, while VMs deployed from a template are always consistent.
How do VM customization specifications work with templates?
Guest OS customization specifications apply per-VM settings — IP address, DNS configuration, hostname, username, SID, license keys and time zone — to each VM created from a template. This eliminates the need to manually configure each cloned VM and ensures every deployment starts in a known, working state.
How can NAKIVO Backup & Replication help protect VM templates?
NAKIVO Backup & Replication backs up VMware VMs and VM templates, and restores them on demand. The solution combines incremental backups, immutable storage and ransomware-resilient recovery to keep template images safe and recoverable.
How do I move a VM template to another datastore in VMware?
Right-click the VM template in the vSphere Client and select Move to folder to relocate it within the inventory. To move the template files to a different datastore, use Storage vMotion or copy the files via the Datastore Browser, then re-register the template at the new location.