How to Open, Mount and Extract Data from a VMDK File
A VMDK file stores the contents of a virtual machine’s hard disk. If a VM fails to start due to OS corruption, failed updates, malware or configuration errors, you may still be able to access the data inside its virtual disk.
This guide explains how to open, mount and extract data from a VMDK file using VMware tools and alternative methods for Windows and Linux. These approaches allow you to access files without necessarily powering on the virtual machine. Note that the methods described apply only to VMDK files that are not encrypted or severely corrupted.
What Is a VMDK File?
VMDK (Virtual Machine Disk) is an open virtual disk file format developed by VMware. Files in this format use the .vmdk extension and are supported by VMware and VirtualBox.
On VMware ESXi servers, a VMDK is typically stored as two separate files on the datastore: a small virtual disk descriptor file and a virtual disk extent file that contains the raw disk data. The descriptor file usually follows the naming pattern diskname.vmdk, while the extent file containing the actual data is named diskname-flat.vmdk.
In VMware Workstation, a virtual disk is often stored as a single diskname.vmdk file (monolithic sparse format). In this case, the descriptor information is embedded within the same file that stores the disk data. The virtual disk descriptor defines the disk’s structure, geometry, virtual hardware version, and unique identifiers.
Virtual disk descriptor file
A virtual disk descriptor is stored as plain text. In the screenshot below, the left side shows a descriptor file in the ESXi format (a .vmdk file that can be opened with any text editor). On the right side, you can see the descriptor data embedded within a single .vmdk file created in the VMware Workstation format. In this case, the file is opened in a HEX editor.
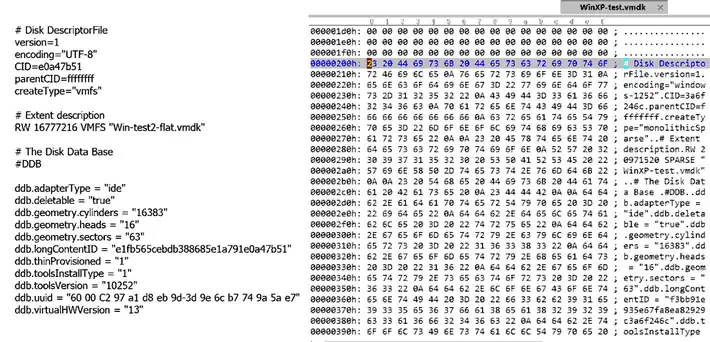
As shown, the embedded descriptor data in a monolithic Workstation-format .vmdk file begins at the 0x200 offset (byte address). Converting 0x200 from hexadecimal to decimal gives: 0x200 (HEX) = 512 (Decimal). This means that to extract the embedded descriptor from the VMDK file, you must copy the portion of data starting at byte 512.
Note: You can refer to the blog post about converting VMware VMs to Hyper-V VMs for detailed instructions on extracting, editing and importing an embedded disk descriptor.
Virtual disk data file
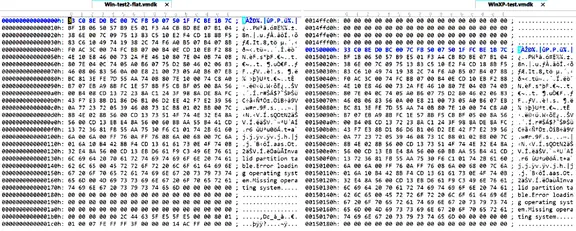
In the screenshot below, two virtual disk files are opened in a HEX editor. The same operating system is installed on both disks, and the first partition was created and formatted using a built-in Windows disk utility. On the left side of the screenshot, a -flat.vmdk file (ESXi format) is displayed. In this file, the raw disk data begins at offset 0x00000000.
On the right side, a VMware Workstation-format VMDK is shown. In this case, the same disk data begins at offset 0x00150000 rather than at the start of the file, because the descriptor and metadata are embedded before the actual disk content.
Before proceeding with opening and mounting a VMDK file, ensure that you have a backup of your data to prevent potential disk damage.
2 Methods to Open VMDK Files by Powering on a VM
Let’s start with methods for opening a VMDK file by powering on a virtual machine. These approaches are straightforward and widely applicable. However, they require a hypervisor (VMware ESXi, VMware Workstation, VMware Player or Oracle VirtualBox) to be installed on the host system.
Method 1: Using a Live DVD even if an OS on a VM is dead
This method assumes that the virtual machine can still boot from external media. Instead of a physical DVD, you can attach an ISO image to the VM’s virtual DVD drive and boot from it.
After starting the operating system from the Live DVD, you can mount the partitions of the VMDK file and copy data to a USB drive attached to the VM, to the host machine or to another system over the network. Some Live DVD distributions mount partitions automatically.
This approach is similar to recovering files from a physical computer when the installed operating system fails to boot. It can be used to extract data from VMDK files on VMware ESXi and VMware Workstation/Player.
Ensure that the Live operating system supports the file systems used inside the virtual disk. For example, Windows does not natively support Linux file systems such as EXT3, EXT4 or ReiserFS. Linux-based Live distributions, however, typically support Windows file systems such as NTFS and FAT32, making them a practical choice when recovering data from a Windows VM that cannot start.
Example: Opening VMDK files on ESXi
Consider the following scenario: a virtual machine running Windows Server 2016 on an ESXi host fails to boot, but you need to retrieve files stored on its VMDK file. The virtual disk contains two NTFS partitions: a system (boot) partition and the primary C: drive. In this example, the official Ubuntu 18 installation ISO is used as a Live DVD to access the virtual disk and copy the required data.
Note: The same approach applies to newer product versions, including VMware Workstation 17, ESXi 9.0, Windows Server 2025 and Ubuntu Linux 24.04. While specific interface elements may differ slightly, the underlying workflow remains the same.
- Upload the ISO image to the datastore accessible to the ESXi host running the VM.
- Open VMware vSphere Client, go to Hosts and Clusters, select your VM and click Edit Settings.
- In the VM settings window, go to CD/DVD drive options. Select Datastore ISO File if you have the necessary ISO file on the datastore. Then, click Browse and select the appropriate ISO file. The file name is
ubuntu-18.04.1-desktop-amd64.isoin this case.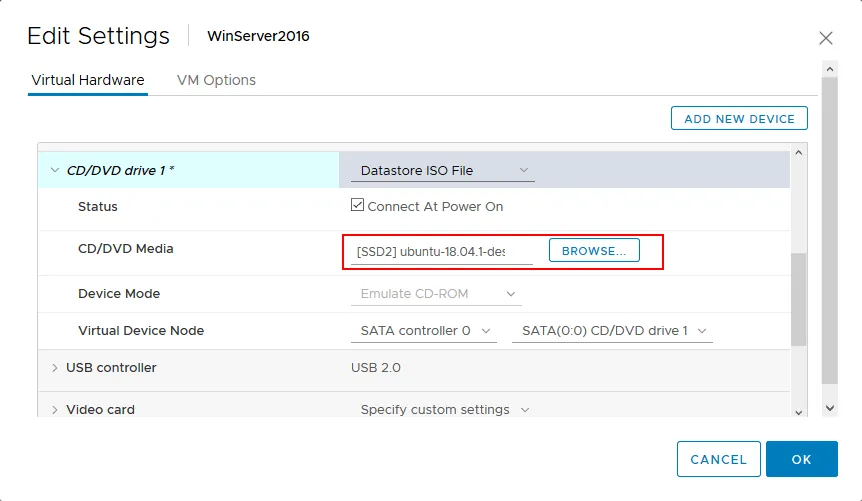
- Start the VM, boot from the ISO image and select Try Ubuntu Without Installing. Once Ubuntu has booted from the Live DVD media, open the console (Terminal).
- Get the root privileges:
sudo -i - List available hard disk devices:
ls -al /dev/sd*There are two partitions –
/dev/sda1and/dev/sda2. - Create directories to use as mount points for each partition:
mkdir /mnt/win-disk1 mkdir /mnt/win-disk2 - Mount the partitions of the virtual disk to the appropriate directories:
mount /dev/sda1 /mnt/win-disk1/ mount /dev/sda2 /mnt/win-disk2/ - Then list the files and directories of the mounted partitions:
ls -al /mnt/win-disk2/
ls -al /mnt/win-disk1/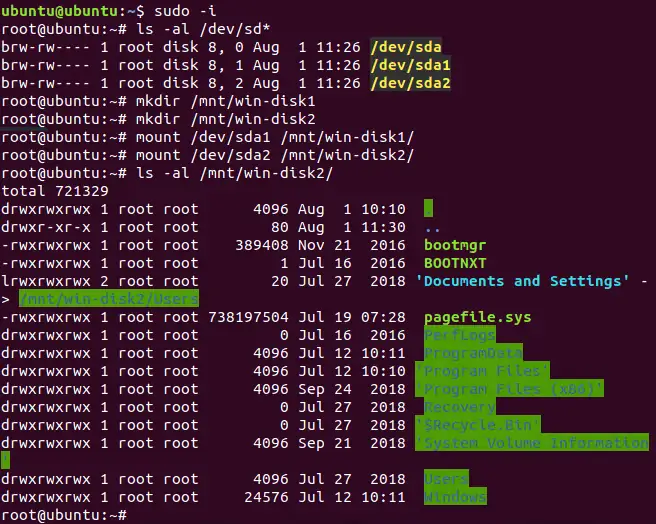
As you can see in the screenshot above, the partition mounted to
/mnt/win-disk2is the partition used as disk C: in Windows.You can attach a USB hard disk drive (HDD) to the ESXi host and connect it to the virtual machine using USB passthrough to copy the required files from the mounted VMDK. Alternatively, you can use an SMB (CIFS) share and transfer the files over the network.
In this example, data is copied to an SMB share hosted at 192.168.17.125. The share path is \\192.168.17.125\share, and user10 has write permissions.
- Let’s mount the SMB (CIFS) share on Linux loaded from the live DVD. First, create a directory to be used as the mount point.
mkdir /mnt/smb-share - Then mount the SMB (CIFS) share to this directory:
mount -t cifs -o user=user10 //192.168.17.125/share /mnt/smb-share - Enter the user’s password.
- Now, your Linux system is connected to the SMB share, and you can copy the necessary contents stored inside the VMDK file to the SMB share over the network.
Let’s go to the directory to which the SMB share is mounted and copy the bootmgr file from the mounted partition of the virtual disk (the VMDK file on the ESXi datastore) to the current directory (SMB share).
cd /mnt/smb-share
cp /mnt/win-disk-2/bootmgr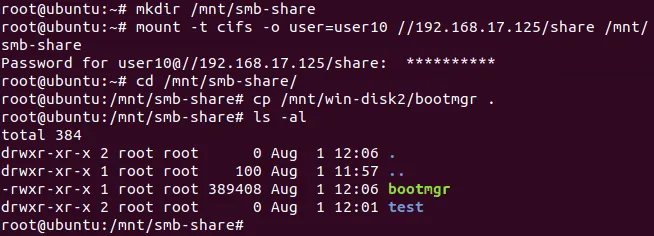
- Make sure that the necessary files have been copied, and check the contents of your SMB share.
ls -al /mnt/smb-share
As shown in the screenshot above, the bootmgr file has been copied successfully. This demonstrates the first method for copying data from a VMDK file when the operating system on a VM cannot boot. The same approach can be used in VMware Player and VMware Workstation.
Method 2: Mount a VMDK file as a virtual disk to a healthy VM (ESXi/Workstation/Player)
This method is similar to the previous one, but instead of booting from external media, you attach the VMDK file to an existing virtual machine that has a functioning operating system. The VMDK can be added as an additional virtual disk to a VM running on VMware ESXi, VMware Workstation or VMware Player.
If you need to open a VMDK file from an ESXi VM in VMware Workstation or Player, copy both the descriptor and extent files (vmdk and -flat.vmdk) to a local disk accessible to the host where Workstation or Player is installed. If the source VM has snapshots, make sure to copy the associated delta (differencing) VMDK files as well, in addition to the parent disk files.
The following examples demonstrate this approach:
- Example 1: Open a VMDK file of one VM by attaching it to another VM on the same ESXi host.
- Example 2: Extract data from a VMDK file of an ESXi VM by attaching it to a VM running in VMware Workstation.
Ensure that the operating system of the healthy VM supports the file systems used in the attached VMDK file. Otherwise, the partitions may not be accessible.
Example 1: Mounting a virtual disk to a VM running on ESXi
- Power off the VM whose virtual disk you want to access to extract files from.
- Locate the virtual disk in the ESXi datastore.
- Copy the virtual disk to another directory on the same datastore or to a different datastore to avoid issues related to disk locking. In this example, we open a VMDK file named
Win-test2.vmdk, which belongs to the Win-test2 Windows VM. The ESXi host is managed by vCenter. If you are using a standalone ESXi host without vCenter, the workflow is the same; only the user interface differs. - Open VMware vSphere Client, go to Storage and select the datastore where the required VMDK file is located. Select the VMDK file and click Copy To.
Note: If you are using a standalone ESXi host without vCenter, open VMware Host Client by entering the ESXi host’s IP address in a web browser. Then navigate to Storage > [Datastore Name] > Datastore Browser, select the VMDK file and click Copy. Choose the destination and confirm the operation.
You can also copy the files by accessing the ESXi console directly or by connecting via SSH.
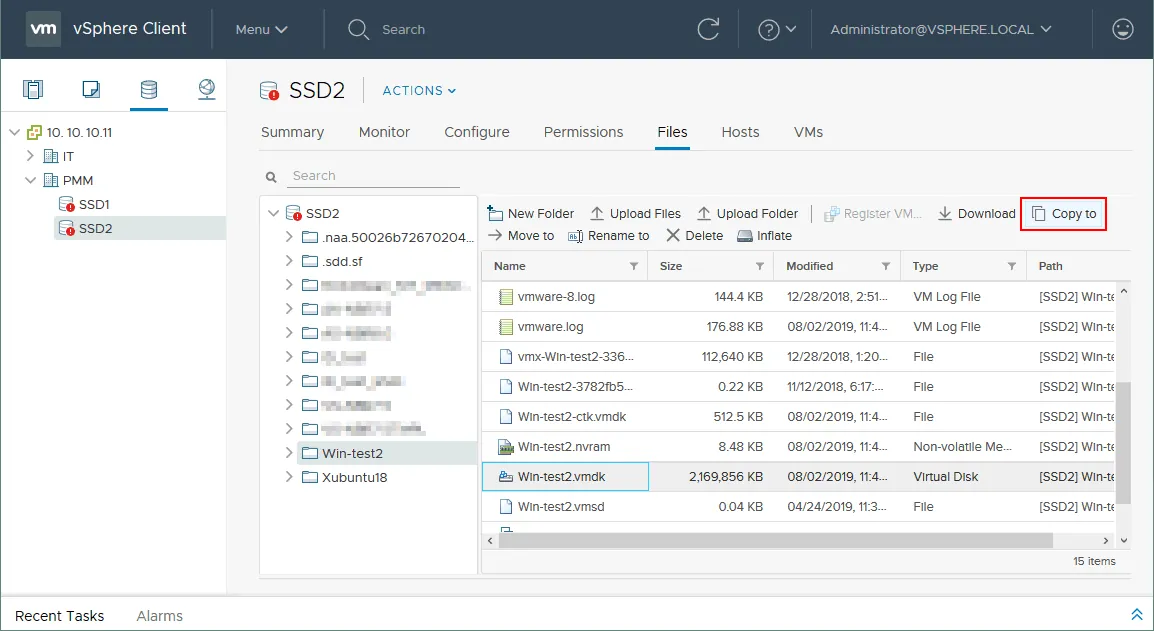
- In the opened window, select the destination. You can copy the VMDK file to a location on the same datastore or to a different datastore. In this example, the file is copied to the root directory of the same datastore. Both the
.vmdkdescriptor file and the-flat.vmdkfile are copied.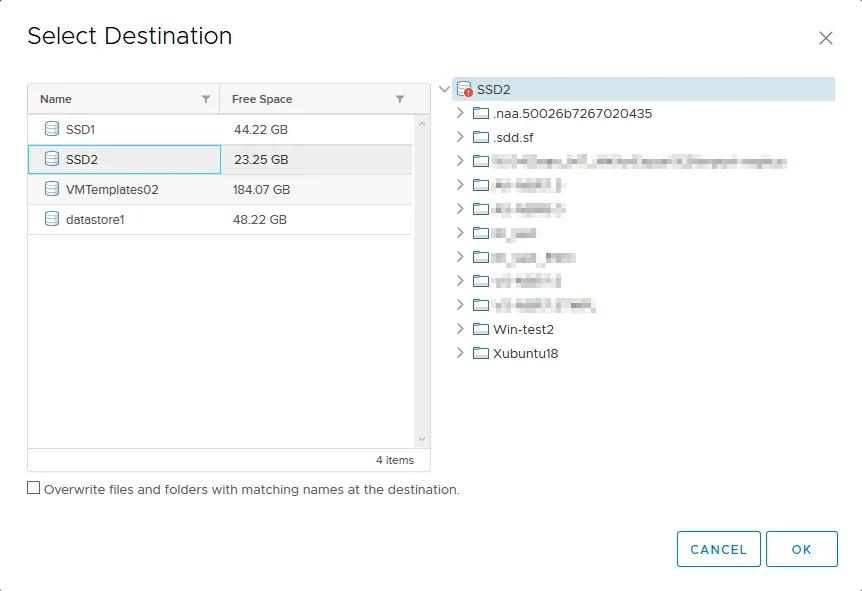
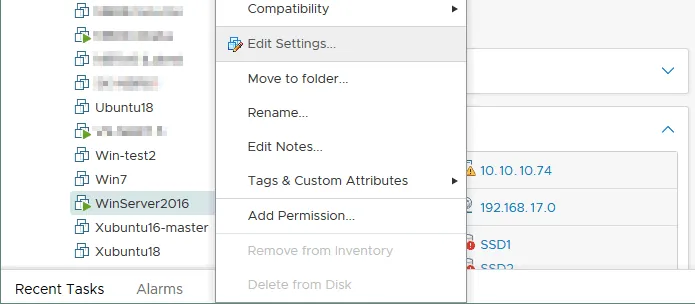
- Attach the VMDK file to a healthy VM with a functioning operating system. In this example, a VM (WinServer2016) running Windows Server 2016 on the same ESXi host is used. The virtual disk can be attached while the VM is running.
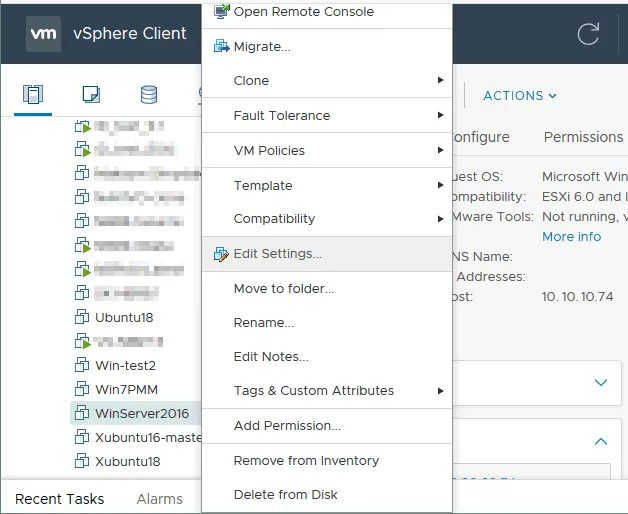
In vSphere Client, navigate to Hosts and Clusters, select the healthy VM, right-click it and click Edit Settings.
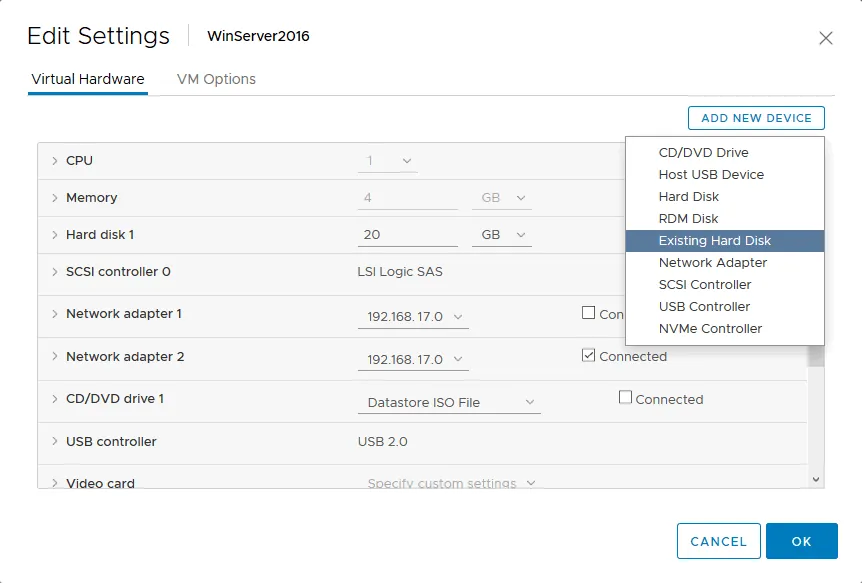
- In the window that appears, hit Add New Device and select Existing Hard Disk.
- Select the copy of your VMDK file that you previously made. In the current example, the copy of
Win-test2.vmdklocated in the root directory of the datastore was selected.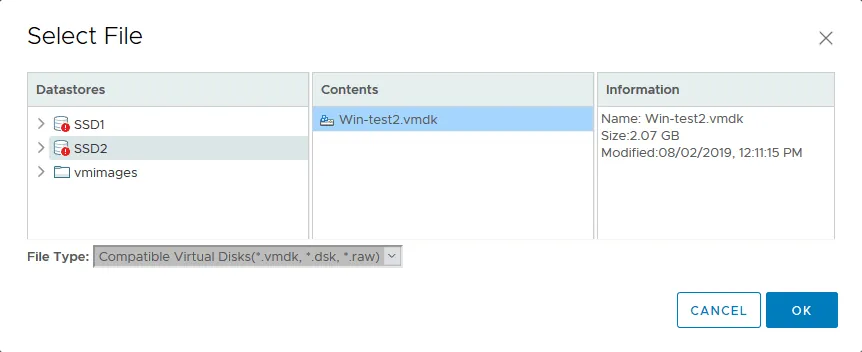
- Power on the healthy VM to which the virtual disk was attached, if it is not already running. In this example, the virtual disk is added while the Windows Server 2016 VM is running (hot-added).
- In the guest Windows OS, go to Computer Management > Disk Management (or run
diskmgmt.mscin the command line) and find the attached virtual disk. By default, the new disk is offline. Right-click the disk and hit Online. A disk letter should be assigned automatically for partitions; if not, right-click the partition and click Change Drive Letter and Paths.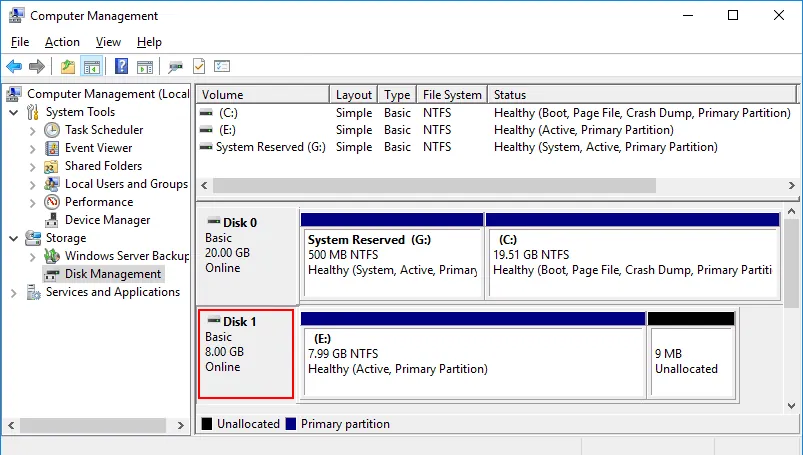
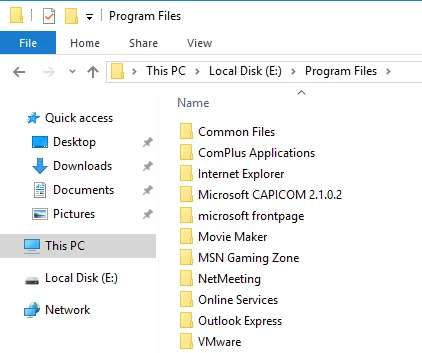
You now have full read/write access to the files and directories on the attached VMDK file. Open the mounted disk in Windows Explorer and copy the required data.
You can also delete unnecessary files (for example, malware-related files), but proceed carefully. If the VMDK file has associated snapshots, modifying or deleting data may affect snapshot consistency.
Example 2: Mounting a virtual disk to a VM running on VMware Workstation or Player
This example is similar to the previous one, but a VM running in VMware Workstation is used to open the VMDK file of an ESXi VM. This approach is useful when there is insufficient free space on the ESXi datastore to create a copy of the virtual disk.
In this case, the virtual disk of the Win-test2 VM mentioned earlier is mounted to a VMware Workstation VM to extract its data.
- In VMware vSphere Client, go to Storage > [Datastore name] > Files, select your VMDK file and hit Download.
As mentioned earlier, an ESXi virtual disk consists of a descriptor (
.vmdk) file and an extent (-flat.vmdk) file. You must download both files to the machine where VMware Workstation or VMware Player is installed. When downloading a virtual disk from an ESXi datastore using the HTML5 vSphere Client, these files are automatically packaged into a single ZIP archive.Alternatively, you can enable SSH access on the ESXi host, navigate to the datastore directory, and manually copy both disk files to your computer using an SCP client such as WinSCP.
Note: When downloading a thin-provisioned virtual disk from a VMFS datastore, the resulting
-flat.vmdkfile will expand to its full provisioned size, similar to a thick-provisioned disk. This occurs because thin provisioning is implemented at the VMFS file system level.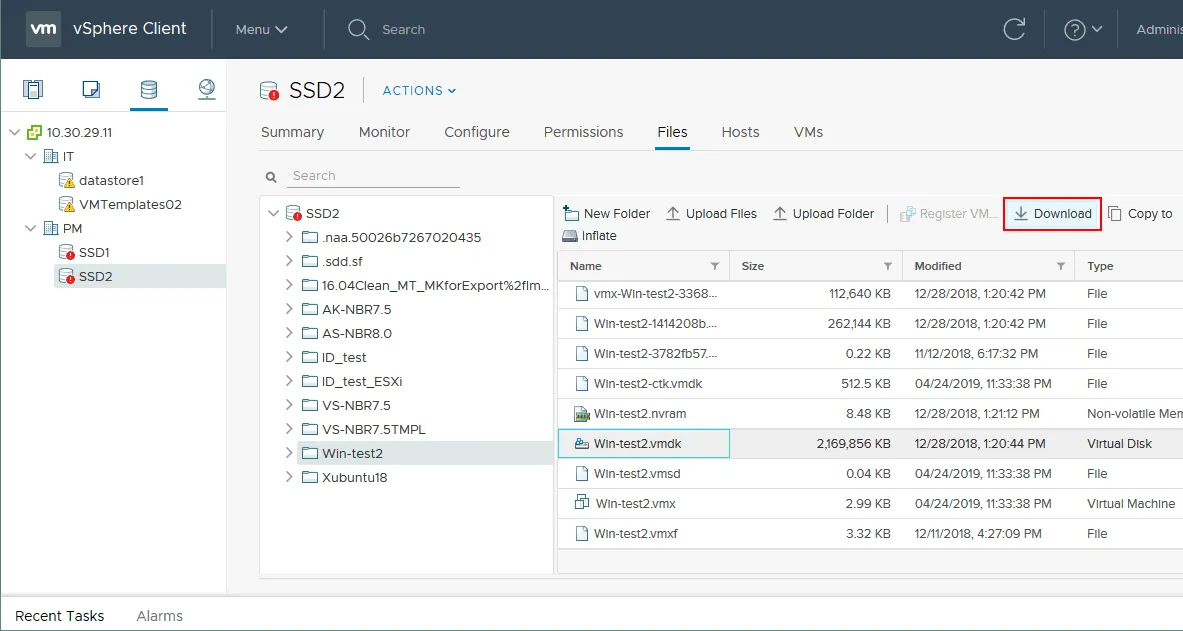
You can now see the two ESXi virtual disk files downloaded as a ZIP archive. The size of the thin-provisioned disk on the VMFS datastore is approximately 2 GB (see the screenshot above), while the same disk downloaded to the workstation is approximately 8 GB (see the screenshot below).
- Extract the two files from the archive. By default, they are unpacked into a directory named
Win-test2.vmdk, which matches the archive name without the file extension.
- For this step, you need a healthy VM with a functioning operating system on a machine where VMware Workstation or VMware Player is installed. In the previous example, a VM running Windows Server 2016 was used; in this example, a VM running Windows Server 2008 is used. The workflow is the same for newer versions of Windows.
Open VMware Workstation or VMware Player, select your healthy VM and edit virtual machine settings.
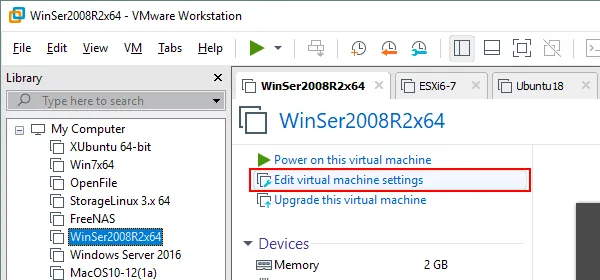
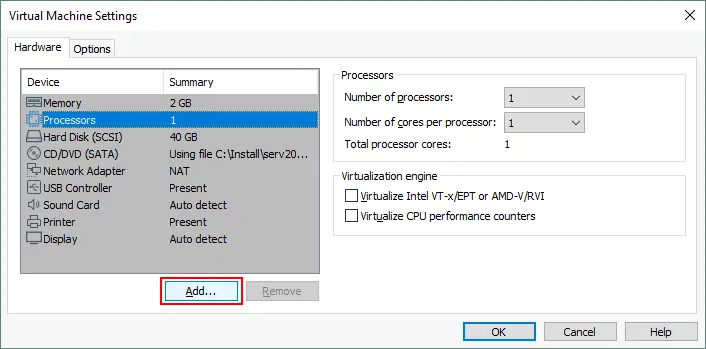
- In the Hardware tab, click the Add button.
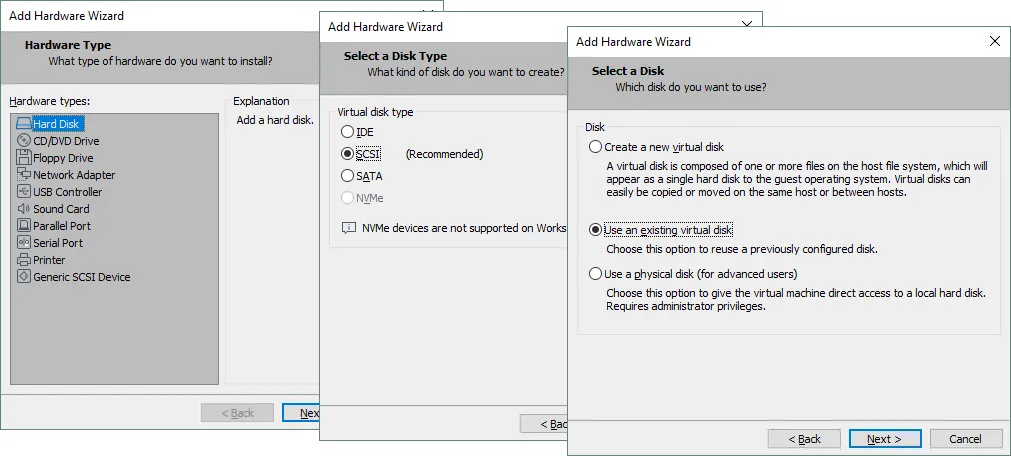
- In the Add Hardware Wizard, select Hard disk as the hardware type. Then select the disk type (you can leave the recommended value). On the Select a Disk screen, choose Use an existing virtual disk.
- Select the vmdk file (not –
flat.vmdk) you have extracted from the ZIP archive. You can browse the file or enter the file path manually.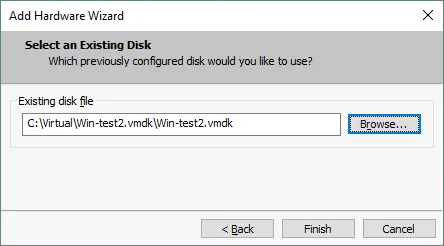
In this example, ESXi 6.5 and VMware Workstation 15 are used. The VMware Workstation VM running Windows Server 2008 uses hardware version 12 (VM version 12), while the ESXi VM, whose virtual disk is being attached, uses VM version 7. The workflow is the same for newer versions.
- When attempting to attach the virtual disk in VMware Workstation, the following compatibility error message appears:
The selected virtual disk is incompatible with this Workstation 12.x virtual machine. Adding this disk would make this virtual machine incompatible with older VMware products.
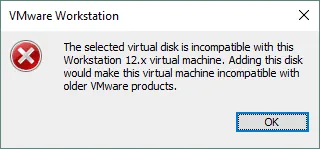
You can fix this error by editing the disk descriptor file (the lightweight vmdk file in the case of virtual disks of ESXi VMs). Open your VMDK file in the text editor and change the number in the
Ddb.virtualHWVersionstring. In our case, 13 is changed to 12.Note: Remember that for VMware Workstation VMs, the virtual disk descriptor is embedded within the VMDK file (unlike ESXi virtual disks, which use a separate descriptor file).
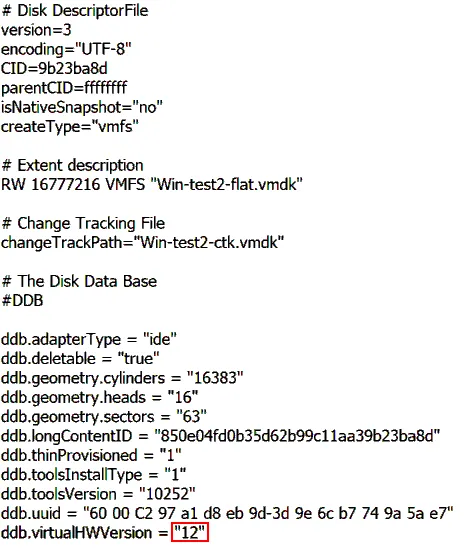
After editing the file, the virtual disk is successfully added to the existing VM.
- Power on the VM.
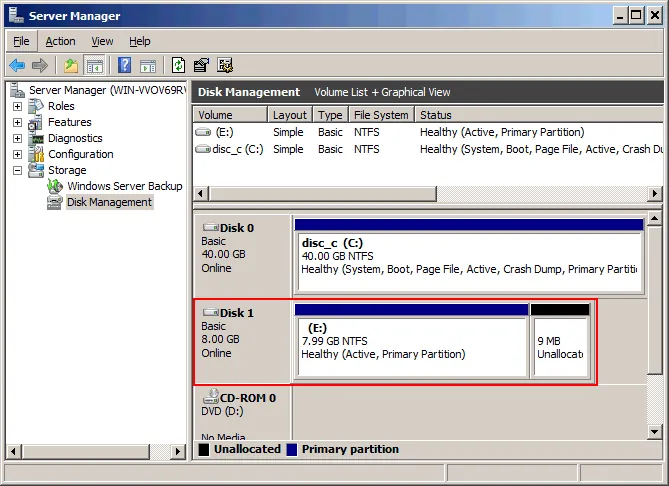
- Open Disk Management in Windows, change your virtual disk status to online, assign a drive letter to a partition and browse the files.
How To Extract Data from a VMDK File without Powering on a VM
Methods that do not require powering on a virtual machine offer several practical advantages. In some cases, a hypervisor is not required at all. Instead, you can mount a VMDK file directly on the host operating system and access its contents quickly.
Method 1: Mounting VMDK files in a host OS with VMware Workstation
This method requires VMware Workstation to be installed on a Windows or Linux host. VMware Workstation includes a feature that allows you to mount VMDK files directly to the host operating system. ESXi-format disks and delta disks associated with snapshots are supported. As with previous methods, the host OS must support the file systems used in the virtual disk partitions.
When snapshots are created, delta (differencing) virtual disks are generated. To access the state of a VM at a specific snapshot, both the parent disk and the corresponding delta disks must be available. In this case, you should mount the appropriate delta disk to the host OS. Dependencies on the parent disk are resolved automatically.
If snapshots exist but you want to mount the parent disk directly, use read-only mode. Modifying a parent disk may corrupt snapshots or linked clones created from that VM. Read-only mode prevents write operations after the disk is mounted. You can mount the VMDK file only when the VM using it is powered off, or when no VM is actively using the disk.
The following example demonstrates how to mount a VMDK file from a VMware Workstation VM that has snapshots. In this scenario, Windows is installed on a single NTFS partition. After the first snapshot, a file named Snapshot1.txt was created in the root directory of drive C:. After the second snapshot, Snapshot2.txt was created. The first example uses Linux, and the second uses Windows. The virtual disk files of an older Windows XP VM are used, but the same principle applies to other Windows versions.
Example 1: Mounting VMDK on the Linux host
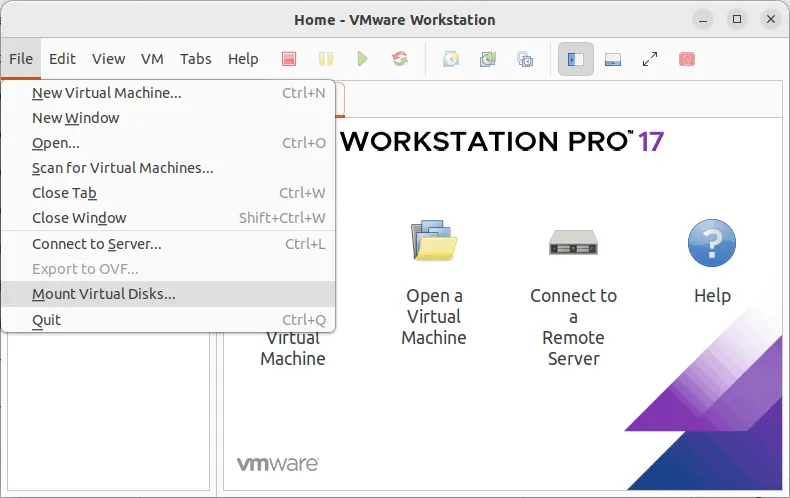
- Open VMware Workstation for Linux and go to File > Mount Virtual Disks.
- Click Mount Disk. In the pop-up window, click Browse and select the VMDK file.
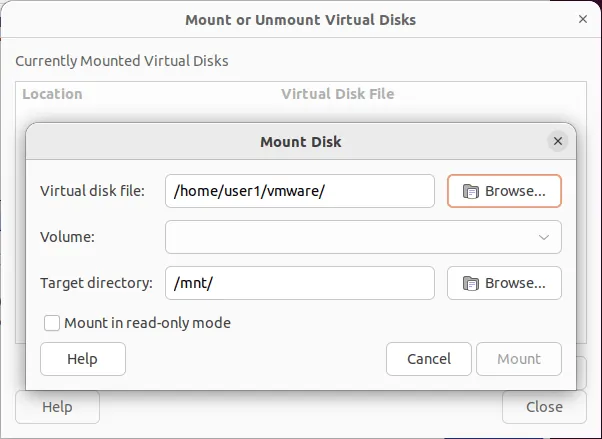
- Select the VMDK file of the second delta (differencing) disk created after the second VM snapshot. In such cases, the file name follows the pattern
VM_name-000002.vmdk(for example,WinXP-test-000002.vmdk).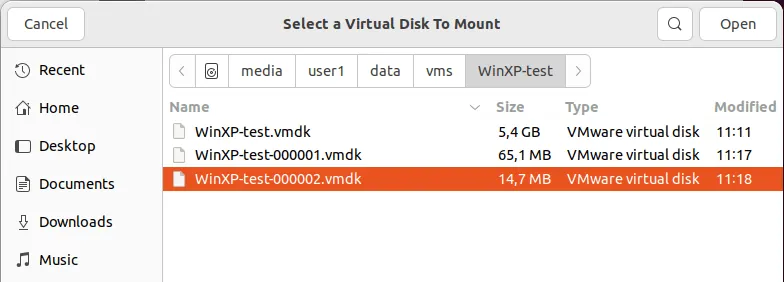
- Create a directory on the Linux file system to use as the mount point for the VMDK file. Let’s create the
/mnt/vmdk/ directory in the Linux console.mkdir /mnt/vmdk/ - Set the appropriate permissions for your user (in this example, the username is user1, which belongs to group1):
chown -R user1:group1 /mnt/vmdk/ chmod -R 0775 /mnt/vmdk/ - Now, select the directory you have created as the target directory, check the “Mount in read-only mode” checkbox and click Mount.
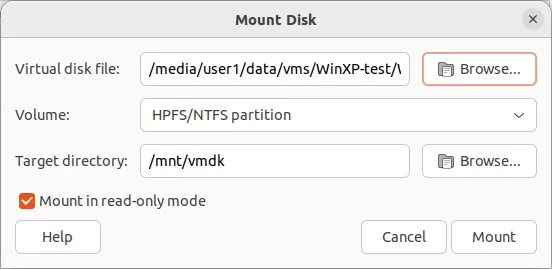
- You can now open the
/mnt/vmdk/ directory in your Linux file explorer and browse the files stored on the mounted VMDK file. The files Snapshot1.txt and Snapshot2.txt, created after the first and second snapshots in this example, are visible. Each file resides on a separate delta VMDK disk.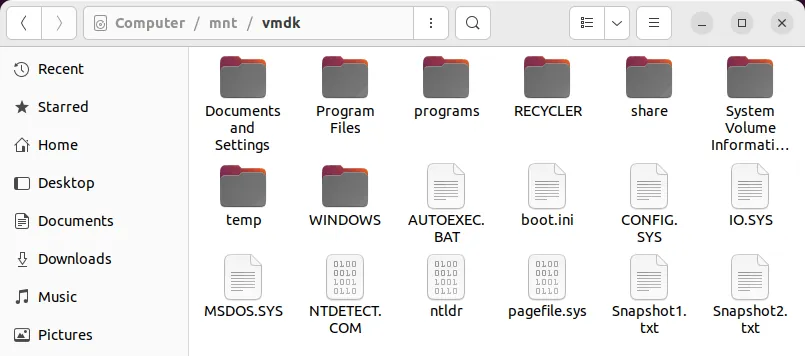
- Don’t forget to unmount the VMDK file from the directory (mount point) on the Linux host after finishing operations.
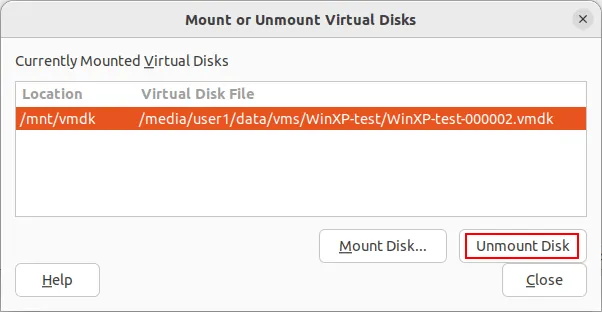
In this example, the VMDK file was successfully mounted and unmounted on Ubuntu 22.04 using VMware Workstation 17.0.
Note: Ubuntu 24.04 uses a newer Linux kernel (6.8 or later), which may affect compatibility with VMware’s proprietary kernel modules. In some cases, you may encounter the error: “VMware-fuseUI is not responding.”
This occurs because mounting a VMDK file on Linux relies on a VMware component that integrates with the Filesystem in Userspace (FUSE) layer. If the required FUSE module or helper process fails to initialize properly, the mounting interface may stop responding.
If compatibility issues occur, consider using a supported kernel version or an earlier VMware Workstation release. Monitor official VMware documentation for updates related to disk mounting support.
If you prefer using the console interface, you can mount a VMDK file with this command:
vmware-mount /media/user1/vms/vm_name/vm_disk_name-000002.vmdk /mnt/vmdkWhere:
vm_name is the name of the virtual machine (the same as the VM directory name). WinXP-test is the VM name in this example.
vm_disk_name is the name of the virtual disk (WinXP-test.vmdk in this example).
vm_disk_name-000001.vmdk is the first delta (differencing) disk created after the first VM snapshot (WinXP-test-000001.vmdk).
vm_disk_name-000002.vmdk is the second delta disk created after taking the second snapshot (WinXP-test-000002.vmdk).
- Mount the virtual disk. By default, the virtual disk is mounted in read/write mode. You can use the -r key in the command line to mount the disk in read-only mode.
vmware-mount /media/user1/vms/vm_name/vm_disk_name-000002.vmdk /mnt/vmdk - List all mounted VMDK files:
vmware-mount -L - Before completing your work with the mounted VMDK files, unmount all virtual disks:
vmware-mount -x
Example 2: How to mount VMDK on the Windows host
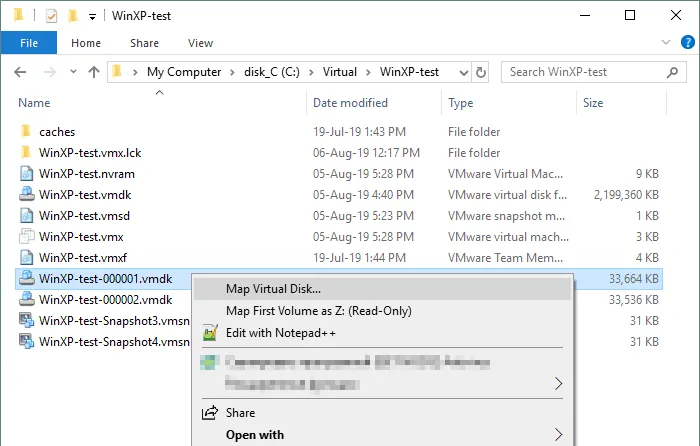
The process of mounting a VMDK file on Windows is similar. In VMware Workstation, you can use File > Map Virtual Disks in the graphical user interface (GUI). Alternatively, right-click the VMDK file in Windows Explorer and select Map Virtual Disk from the context menu.
In this example, the VMDK file of the first delta (differencing) disk created after the first snapshot is mounted. Such files follow the naming pattern VM_name-000001.vmdk ( WinXP-test-000001.vmdk in this example).
Note: The feature to mount virtual disks as a disk drive in Windows was removed in VMware Workstation 17.0 for Windows operating systems. The latest version of VMware Workstation for Windows that supports this feature is 16.1.2. This feature exists in the newest version of VMware Workstation for Linux (17.5 and later).
- Right-click the VMDK file in Windows Explorer and click Map Virtual Disk.
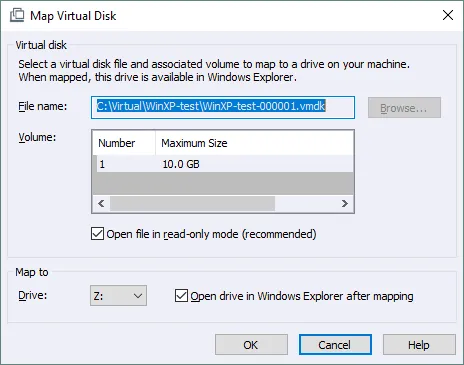
- Select the appropriate parameters to mount the VMDK file. It is recommended to open the disk in read-only mode to prevent potential damage to virtual disks in the snapshot chain.
By default, the drive letter is set to Z:, and the disk can be opened automatically in Windows Explorer after mapping if the corresponding checkbox is selected. Click OK to proceed.
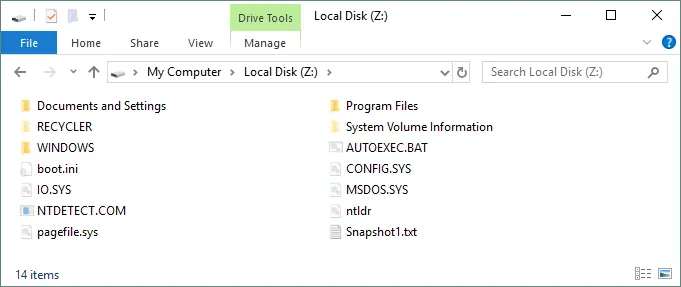
- Now the virtual disk is mounted as disk Z: in Windows and you can read its contents. In the screenshot below, you can see the Snapshot1.txt file created after taking the first snapshot.The Snapshot2.txt file is not present because it was created after the second snapshot, and the mounted delta disk corresponds to the first snapshot.
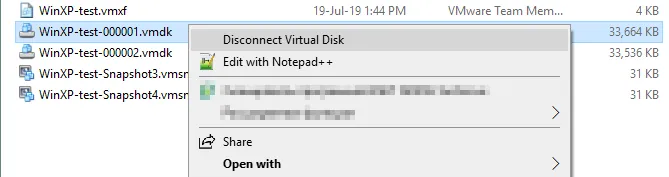
- When you finish working with the mapped VMDK file, don’t forget to disconnect the disk. Right-click the appropriate VMDK file and select Disconnect Virtual Disk. After disconnecting the virtual disk, you can power on the VM using it.
Method 2: Using 7-Zip to extract content from VMDK files
If you need to open a VMDK file without running a virtual machine, you can use 7-Zip to extract data from the virtual disk image. 7-Zip is a free file archiver that can open and extract content from various archive formats and disk images. It can be used on both Windows and Linux systems.
7-Zip can open .vmdk and -flat.vmdk files (including a standalone -flat.vmdk file if the descriptor file is missing), which typically applies to ESXi-format disks. However, 7-Zip does not support opening delta (differencing) VMDK files created after VM snapshots.
How to open VMDK files with 7-Zip on Linux
- Install a full pack of 7-Zip on your Linux machine. Ubuntu is used in this example.
apt-get install p7zip-full - List the contents of the VMDK file with 7-Zip
7z l vm_name.vmdk - Find the files that contain “boot.” in their names.
7z l /media/user1/vms/WinXP-test/WinXP-test.vmdk | grep boot[.]user1 is the name of this Linux user, l – list.

- Let’s extract (e) the
boot.inifile from the VMDK image:7z e /media/user1/vms/WinXP-test/WinXP-test.vmdk boot.ini
You can extract other files and directories from the VMDK file similarly.
How to open VMDK files with 7-Zip on Windows
- Download the compatible version of 7-Zip from the official web site and install the application on your Windows machine. Use the EXE installer for more convenience.
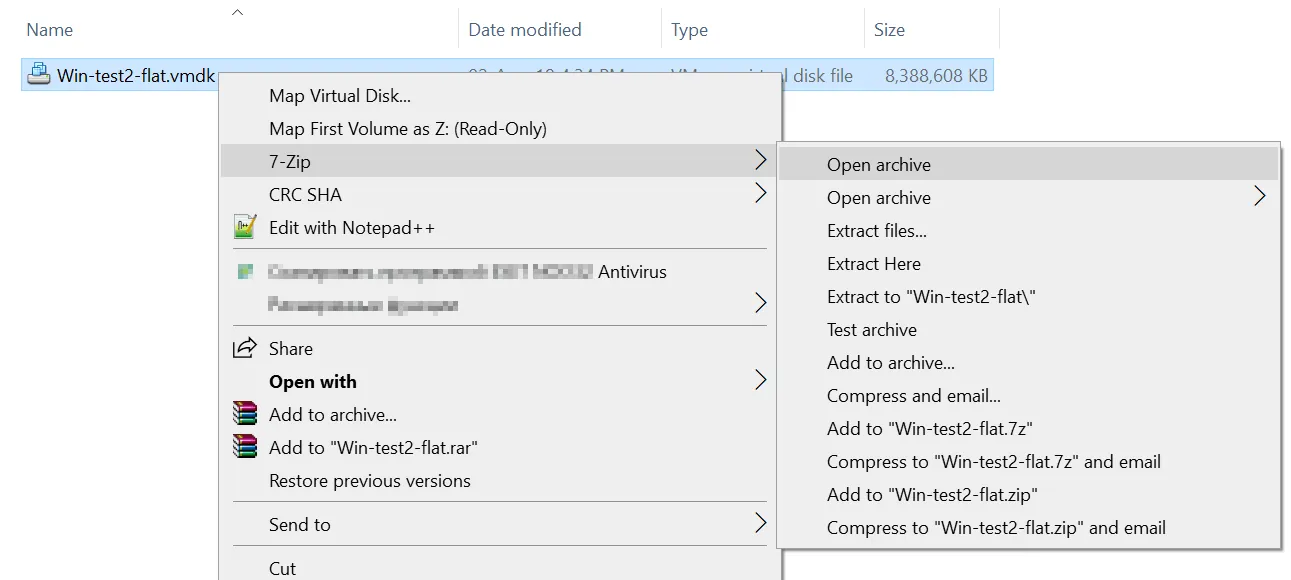
- In the screenshot below, the content of the standalone
Win-test2-flat.vmdkfile is displayed in the GUI of 7-Zip. You can extract the VMDK contents that you need.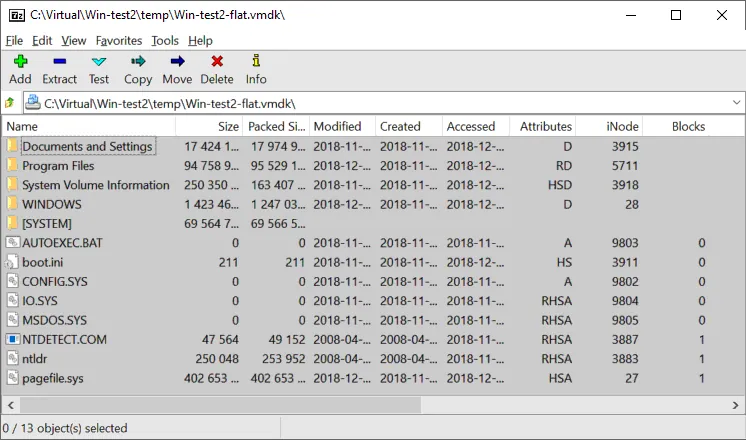
You can also watch this video to learn how to open VMDK files in VMware and extract VMDK data:
How to Mount VMDK Files in Linux (Other Methods)
Linux provides powerful command-line tools that allow you to perform advanced disk operations directly from the console. These built-in utilities can be used to mount VMDK files and access the data stored on virtual disks. The examples below use Ubuntu Linux.
Method 1: How to mount VMDK files by using /dev/loop
Loop devices are pseudo-devices in Linux that allow files to be accessed as block devices. They are commonly used to mount disk images that contain file systems. Loop devices are named /dev/loopX, where X represents the device number. This method is suitable for mounting -flat.vmdk files, even when the descriptor file is missing.
The following example demonstrates how to mount a VMDK file in Linux to access its contents. In this case, an ESXi-format virtual disk with a single partition is used, and the descriptor file is not available. The disk originally contained a Windows XP installation.
- Use one of the two commands below to check the number of existing loop devices on your Linux system.
fdisk -l | grep /dev/loop df -h | grep /dev/loop - In this case, devices with numbers 1 to 21 already exist (
/dev/loop1–/dev/loop21). Create the loop device number 30 since it is free. This device can be associated with the –flat.vmdkfile.losetup /dev/loop30 /vms/Win-test2-flat.vmdk - Set the offset:
losetup -o 32256 /dev/loop31 /dev/loop30Here, 32256 is the offset calculated as 63 × 512 for disks formatted in Windows XP, Windows Server 2003 and earlier versions. In this case, 63 is the starting sector of the partition, and 512 bytes is the sector size. For Windows 7, Windows Server 2008 and newer versions, use an offset of 105906176.
You can retrieve information about the sector size and the first sector used for the boot start with the command:
fdisk -l /dev/loop30 /vms/Win-test2-flat.vmdk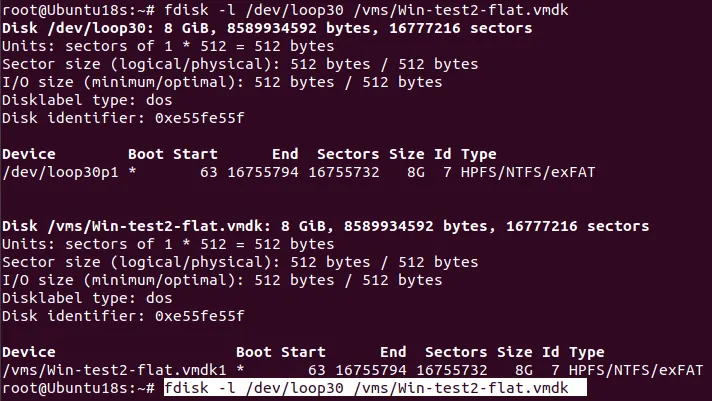
As an alternative, for virtual disks that contain multiple partitions, you can use parted to determine the start and end of each partition:
parted /dev/loop30In the parted console, enter the following commands:
unit
B
print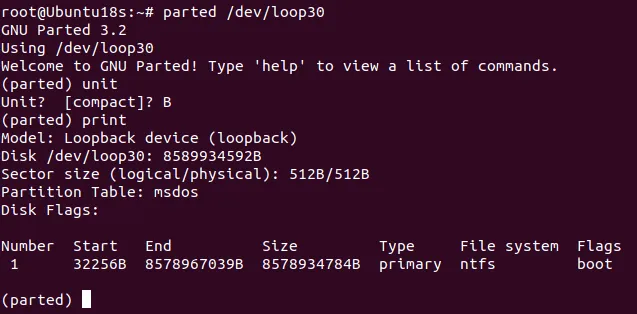
- Create the directory to be used as the mount point for the VMDK image:
mkdir /mnt/vmdk-image - Mount the loopback device associated with the VMDK image:
mount /dev/loop31 /mnt/vmdk-image - List the content of the mounted image:
ls -al /mnt/vmdk-image - Once done, unmount the VMDK image and disconnect the loop device:
umount /mnt/vmdk-image
losetup -d /dev/loop31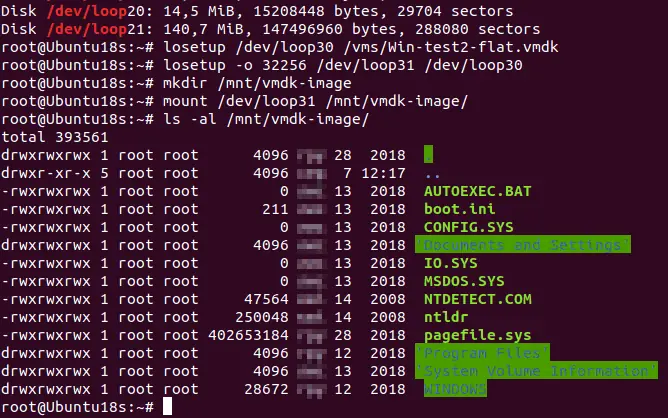
Method 2: How to mount VMDK files with kpartx
Kpartx is a tool that can mount partitions within image files to the directories of a real Linux file system. This tool can be used to set up device mappings for partitions of block devices. This method also allows for mounting –flat.vmdk images used on ESXi servers.
- Install kpartx:
apt-get install kpartx - Add the partition mapping for the VMDK image in the verbose operating mode:
kpartx -av /vms/Win-test2-flat.vmdk - Mount the partition to the
/mnt/vmdk-imagedirectory:mount /dev/mapper/loop30p1 /mnt/vmdk-image/Where loop30 is the number of the loop device and p1 is the number of the partition inside the image (the first partition on the disk image).
- List the content of the virtual disk partition:
ls -al /mnt/vmdk-image/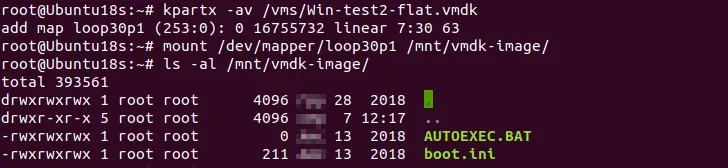
- Once done, unmount the VMDK virtual disk image.
umount /mnt/vmdk-image
kpartx -d /vms/Win-test2-flat.vmdk
Method 3: Using the QEMU Network Block Device (NBD)
This method uses the QEMU utility to expose the VMDK as a standard block device /dev/nbdN, which the Linux kernel can then mount natively. You don’t need to install VMware Workstation to use this method. The root permissions are required.
- Shut down the virtual machine to avoid virtual disk corruption.
- Install the QEMU utility package, which includes qemu-nbd.
sudo apt install qemu-utils - Load the Network Block Device kernel module:
sudo modprobe nbd - Map the VMDK file to the Network Block Device, for example,
/dev/nbd0. Use the -r flag for read-only.sudo qemu-nbd -r -c /dev/nbd0 /path/to/your/disk.vmdkIn this example, the command is:
sudo qemu-nbd -r -c /dev/nbd0 /media/user1/data/vms/WinXP-test/WinXP-test.vmdk - Identify the partitions on the mounted virtual disk:
sudo fdisk -l /dev/nbd0In the output, you should see partitions like
/dev/nbd0p1,/dev/nbd0p2, etc. - Create a mount point:
sudo mkdir -p /mnt/vmdkSet the permissions for a specific user if needed.
- Mount the partition. In this example, partition 1 holds the data:
sudo mount /dev/nbd0p1 /mnt/vmdk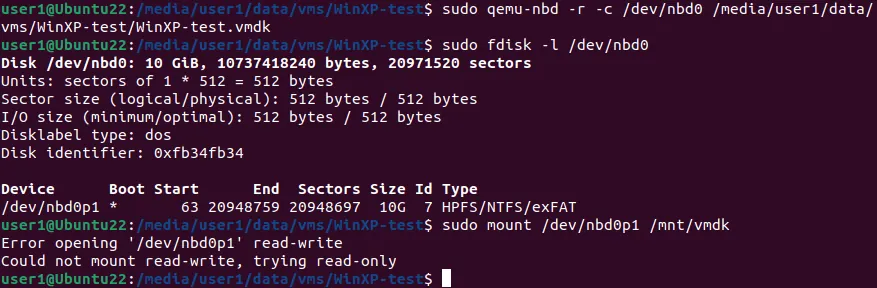
- You can now access your VMDK contents at
/mnt/vmdk/. - Once done, unmount the volume and disconnect the NBD device:
sudo umount /mnt/vmdk
sudo qemu-nbd -d /dev/nbd0
Method 4: Using guestmount to mount VMDK files
guestmount is a reliable tool for accessing VMDK contents on Linux because it intelligently handles the disk structure, including partitions and logical volumes. It doesn’t require the manual offset calculations needed by older tools, such as /dev/loop. You must have root permissions to use this method.
- Install libguestfs-tools. This package contains the guestmount utility.
sudo apt install libguestfs-tools - Shut down the VM whose virtual disk you want to mount.
- Create a directory on your Linux host where you will access the disk contents:
mkdir /mnt/vmdkNote: If you want to access the content of VMDK files as a regular user, not as root, you can make additional configurations.
- Edit the FUSE configuration file. Open the
/etc/fuse.conffile using a text editor with root privileges:sudo nano /etc/fuse.conf - Uncomment the
#user_allow_otherline to make it active in the configuration file. Just delete the # character at the beginning of the line. - Save changes and close the file (quit the text editor).
- Optionally, you can add your regular user to the fuse group:
sudo usermod -aG fuse $USER
- Edit the FUSE configuration file. Open the
- Inspect the VMDK. Before mounting, it’s helpful to see the partitions inside the VMDK. Use the virt-filesystems utility:
virt-filesystems -a /path/to/your/disk.vmdkIn this case:
virt-filesystems -a /media/user1/data/vms/WinXP-test/WinXP-test.vmdkIn the output, you should see partitions (
/dev/sda1,/dev/sda2, etc.) and their file systems. - Mount the VMDK using guestmount. You have two primary ways to use guestmount: Automated Inspection or Manual Partition Mounting. Let’s use the manual partition mounting (for specific partitions)
If you only need a single partition, you can specify it directly:
sudo guestmount -a /path/to/your/disk.vmdk -m /dev/sdaN --ro /mount_point/In our example, the exact command is:
sudo guestmount -a /media/user1/data/vms/WinXP-test/WinXP-test.vmdk -m /dev/sda1 --ro /mnt/vmdk/If you want to access the content of the mounted VMDK file as a regular user and access the files in the graphical user interface of Linux, use the command:
sudo guestmount -a /media/user1/data/vms/WinXP-test/WinXP-test.vmdk -m /dev/sda1 --ro -o allow_other /mnt/vmdk/ - You can now view, navigate and copy files from the VMDK as if it were a local directory in the Linux console:
ls -al /mnt/vmdk - Unmount the virtual disk once done:
sudo guestunmount /mnt/vmdk/
You can use the alternative FUSE method”
sudo fusermount -u /mnt/vmdk/Conclusion
Understanding how to open and extract data from a VMDK file is essential when a virtual machine fails or becomes inaccessible. Knowing multiple methods for accessing VMDK content provides flexibility, as each approach may be better suited to specific situations. At the same time, maintaining reliable backups of your VMs is equally important to ensure data availability and simplify recovery.