How to Set Up Network File Sharing in Windows
When managing more than one computer in a local area network (LAN), Windows network file sharing lets users access files from another machine without copying data manually or relying on removable media. Windows handles this through the Server Message Block (SMB) protocol.
This guide explains how to share a folder in Windows 10 and Windows 11, configure users and permissions, connect to a shared folder, map a network drive and resolve common SMB access errors.
What’s New in Windows Network File Sharing
The basic setup remains familiar: Use a private network profile, enable network discovery as well as file and printer sharing, share a folder and configure both share-level and NTFS permissions. Recent Windows releases, however, ship with stricter SMB security defaults that can affect connectivity to older servers, NAS devices and guest-only shares.
Key updates include:
- Windows 11 version 24H2 and Windows Server 2025 require SMB signing by default for outbound SMB connections. This blocks tampering and relay attacks but can break access to older or third-party SMB servers that don’t support signing.
- Windows 11 Pro no longer allows SMB client guest connections or guest fallback by default, aligning Pro with the Enterprise, Education and Pro for Workstations editions where this was already disabled.
- SMB encryption can now be enforced for outbound client connections, although encryption is not mandatory by default.
- SMB 1.0 is no longer installed by default in modern Windows versions. Modern SMB runs over TCP 445 directly. Legacy NetBIOS over TCP/IP (UDP 137, UDP 138, TCP 139) is needed only for compatibility with older systems and discovery scenarios.
Preparing for Windows File Sharing
Before you set up network file sharing in Windows, confirm that the network, firewall, user accounts and folder permissions are ready. A short pre-flight reduces access errors later, especially in small business workgroups where local accounts are common.
Requirements
To share a folder in Windows securely, verify the following:
- The shared folder is on a New Technology File System (NTFS) volume. FAT32 doesn’t support NTFS permissions, and the Security tab is missing in folder properties when using FAT32.
- The Windows network profile is set to Private, not Public.
- Network Discovery and File and Printer Sharing are enabled on the computers that need to participate in file sharing.
- Windows Defender Firewall (or another host firewall) allows SMB traffic. Modern SMB uses TCP 445. Legacy NetBIOS-based discovery and older systems can also require UDP 137, UDP 138 and TCP 139.
- The administrator account has permission to change folder sharing properties and the NTFS access control lists (ACLs).
- User accounts or groups exist for the people who need access to the share.
Initial setup checklist
This walkthrough uses the following example environment:
- Operating systems: Windows 11 Pro and Windows 10 Professional
- Computer name: Computer10
- IP address: 192.168.101.212
- Subnet: 192.168.101.0/24
- Domain membership: Workgroup, not Active Directory
- Share name: share01
- Example local users: user11, user12, user13 and user14
- Example local group: sharegroup1
The process includes these main steps:
- Enable Network Discovery and File and Printer Sharing.
- Create local users or groups for SMB access.
- Share the folder and configure share permissions.
- Configure NTFS permissions on the folder.
- Connect to the shared folder from another Windows computer.
- Map the shared folder as a network drive if users need persistent access.
Tuning Network Settings in Windows 10 and 11
Windows applies different firewall and discovery settings depending on the active network profile. For Windows file sharing over a network, use a Private profile on trusted LANs. Avoid enabling sharing on Public profiles such as guest Wi-Fi or other untrusted networks.
How to change the network profile
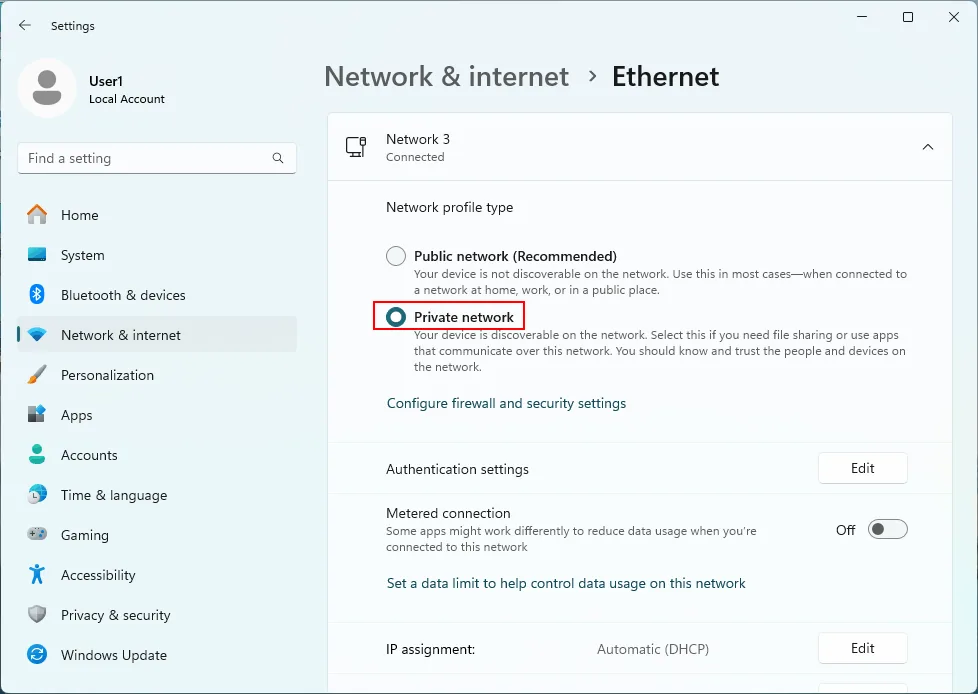
To change the network profile in Windows 10 or Windows 11:
- Open Start > Settings > Network & internet.
- Select the active network adapter, such as Ethernet or Wi-Fi.
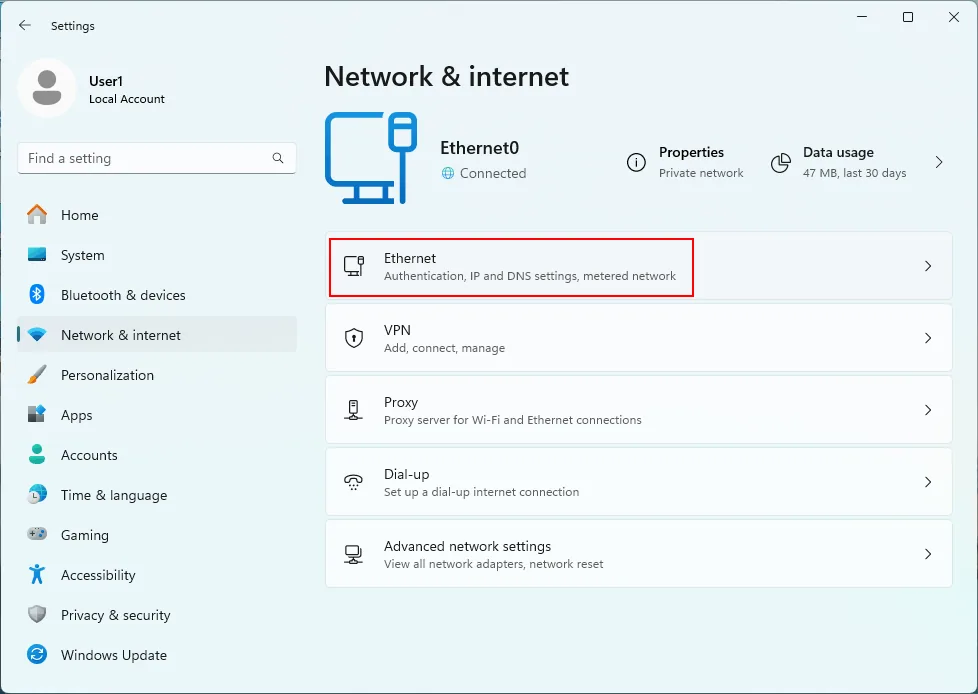
- Open Properties.
- Under Network profile type, select Private.
Enabling network discovery and file sharing
To enable the required sharing options:
- Open Control Panel > Network and Internet > Network and Sharing Center. Alternatively, run:
control /name Microsoft.NetworkAndSharingCenter - Click Change advanced sharing settings. You can also open this page by running:
control.exe /name Microsoft.NetworkAndSharingCenter /page Advanced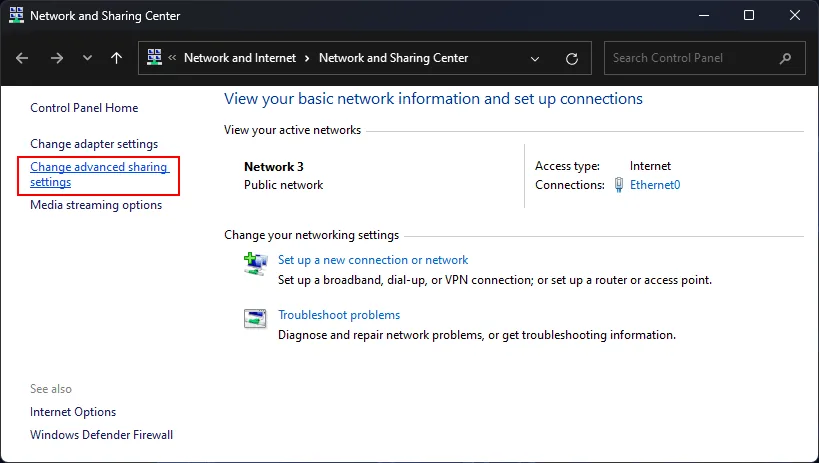
- Expand the Private networks profile.
- Enable Network discovery and File and printer sharing.
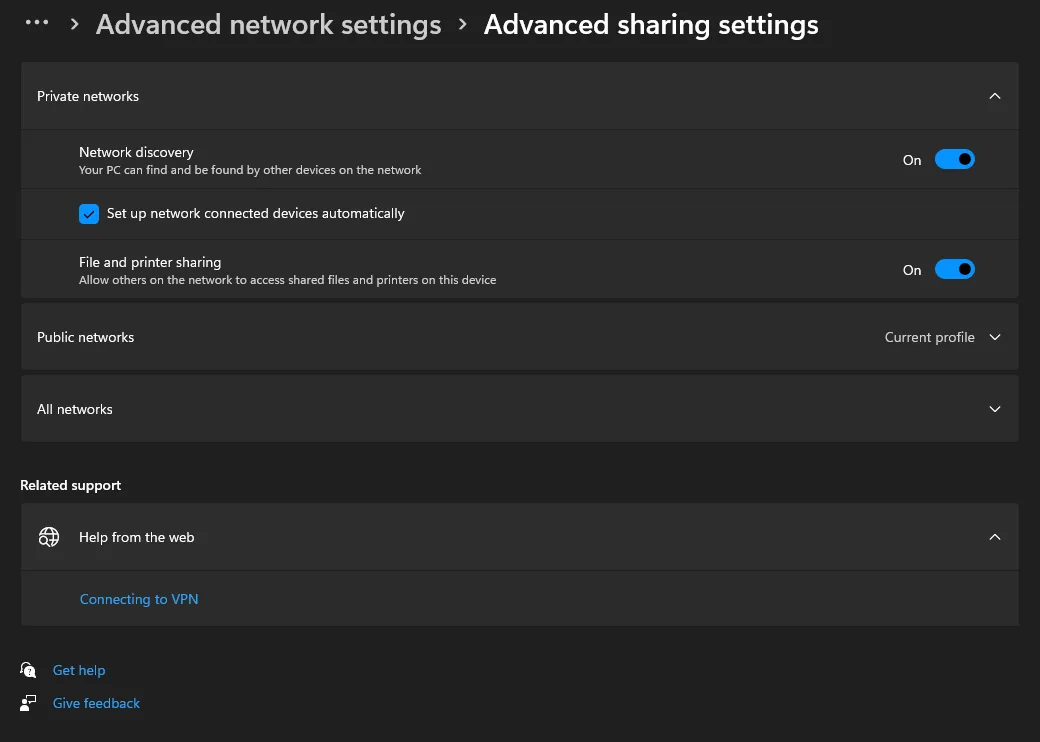
Repeat these steps on the Windows computer hosting the shared folder and on any client computers that need discovery.
In SMB terminology:
- The SMB server is the computer that hosts the shared folder.
- The SMB client is the computer that connects to the share over the network.
Creating Users and Permissions for File Sharing
Avoid sharing your personal Windows account password with other users. For a safer setup, create dedicated local users or groups and grant only the access required for the shared folder.
Creating a local user
To create local users in Windows 10 Pro or Windows 11 Pro:
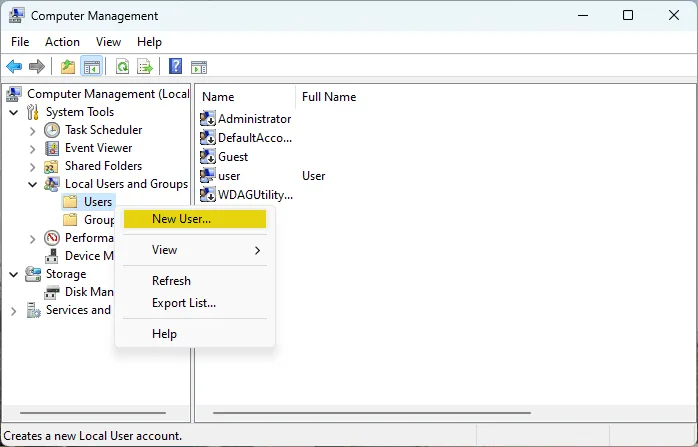
- Right-click This PC and select Manage. You can also run:
compmgmt.msc - In Computer Management, go to Local Users and Groups > Users.
- Right-click Users and select New User.
- Enter a username and password.
- Set the account options according to your password policy.
- Click Create.
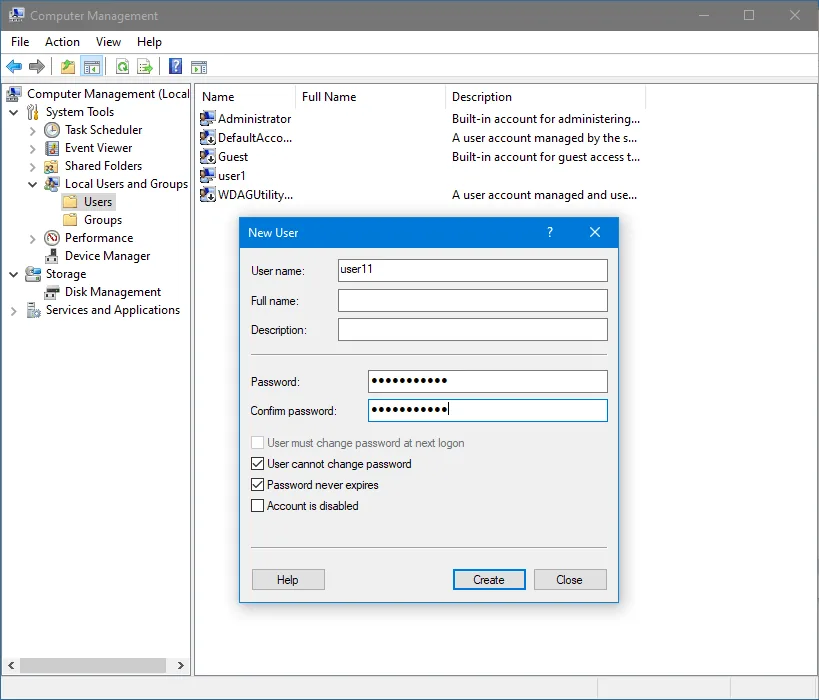
In this example, the users are user11, user12, user13 and user14. By default, these users belong to the local Users group.
Creating a local group
To grant the same permissions to multiple users with separate credentials, create a group and assign permissions to that group. To create a local group:
- In Computer Management, go to Local Users and Groups > Groups.
- Right-click Groups and select New Group.
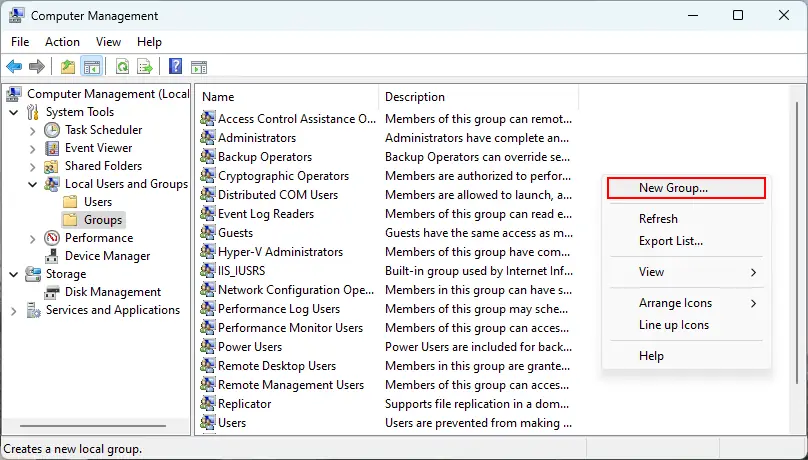
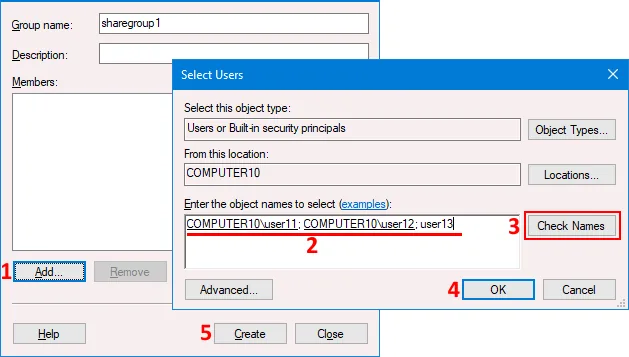
- Enter a group name, such as sharegroup1.
- Click Add.
- Enter the users to add to the group, such as user11, user12 and user13.
- Click Check Names to validate each entry.
- Click OK, then Create.
Understanding share permissions vs NTFS permissions
Windows shared folder access is controlled by two permission layers:
- Share permissions: SMB-level permissions that apply only when users access the folder over the network.
- NTFS permissions: File system permissions that apply to both local and network access.
When both layers apply, Windows uses the most restrictive effective permission. For example, if a user has Full Control at the share level but Read access in NTFS permissions, the user has read-only access over the network.
For predictable administration, grant broad access at the share level only when necessary and enforce least privilege through NTFS permissions. In small workgroups, many administrators grant Change or Full Control at the share level to a trusted group and then refine access on the Security tab.
How to Share a Folder in Windows
This section explains how to share a folder in Windows using Advanced Sharing, which provides more control than the simple Share button in File Explorer.
Standard folder sharing method
To share a folder in Windows 10 or Windows 11:
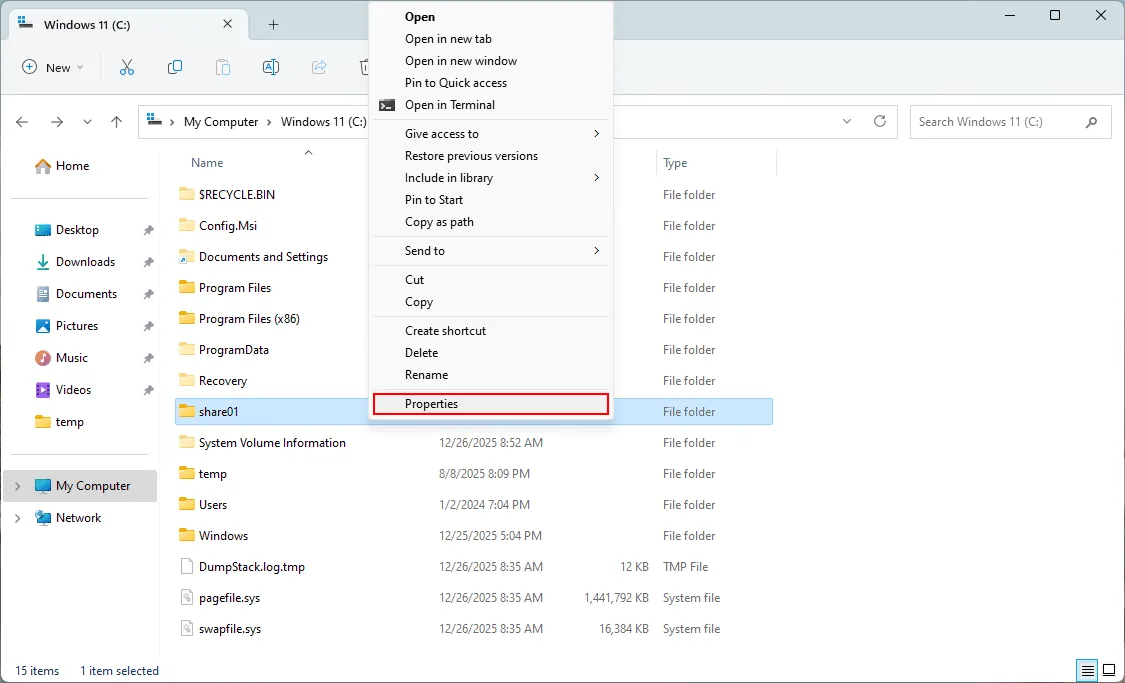
- Right-click the folder you want to share. In this example, the folder is share01.
- Select Properties.
- Open the Sharing tab and click Advanced Sharing.
- Select Share this folder.
- Confirm or edit the share name. In this example, the share name is share01.
- Click Permissions.
- Remove Everyone if you don’t want all authenticated users to inherit access through the share.
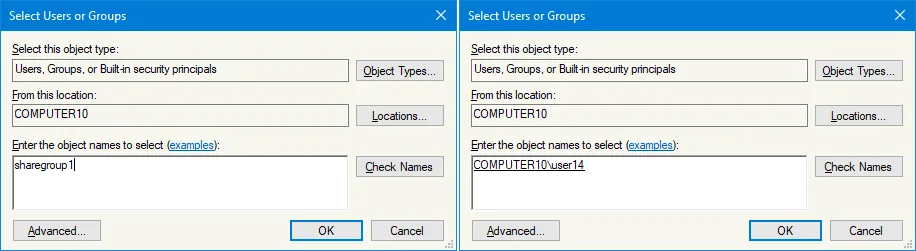
- Click Add.
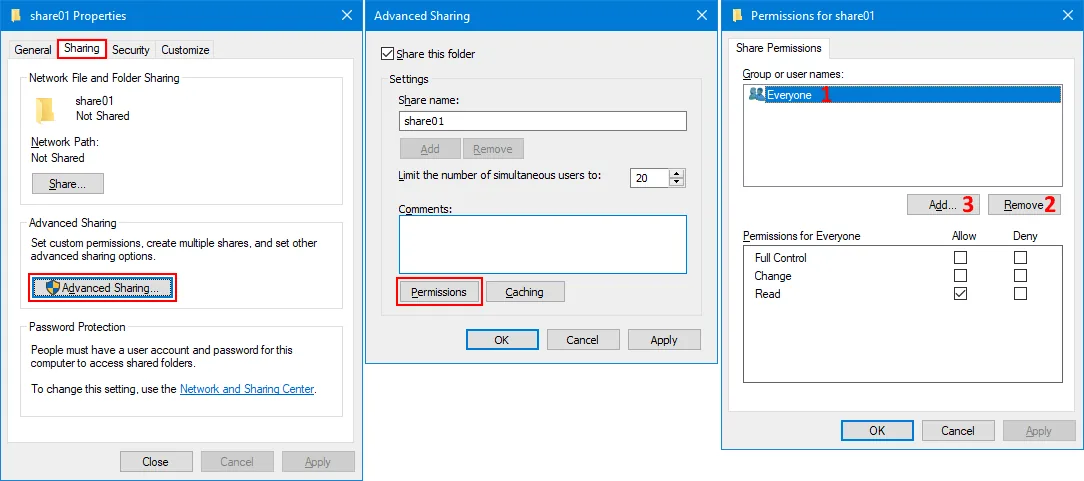
- Enter a user or group name, such as sharegroup1 or user14.
- Click Check Names to validate the entry.
- Click OK.
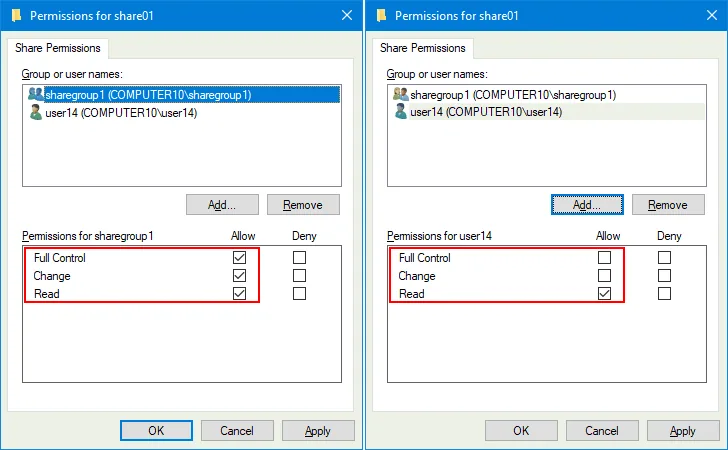
- Select sharegroup1 and grant Full Control if the group requires read and write access.
- Select user14 and leave Read enabled if this user only needs read-only access.
- Click OK to save the share permissions.
Next, configure NTFS permissions:
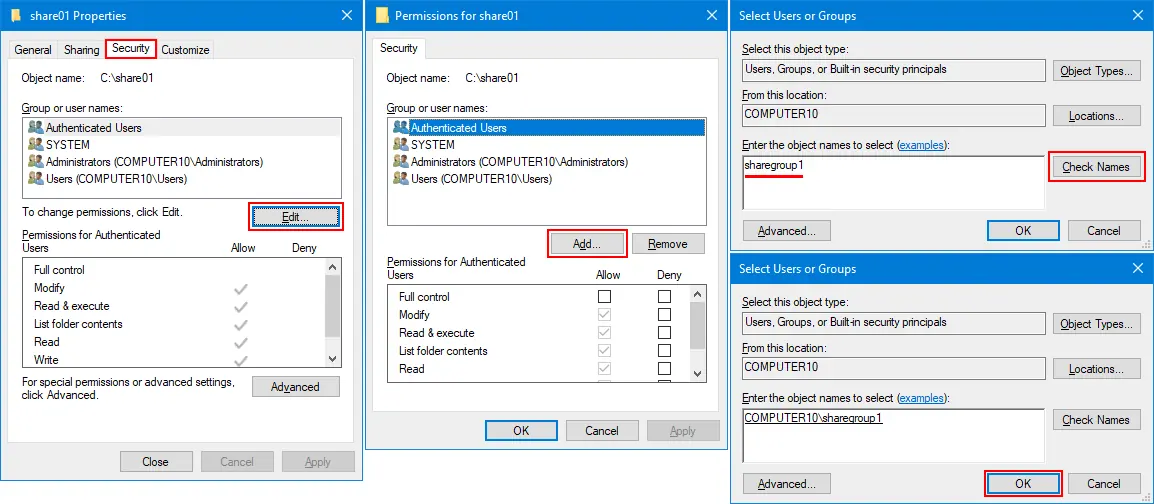
- In the folder Properties window, open the Security tab.
- Click Edit.
- Click Add.
- Enter sharegroup1 and user14, then validate the entries with Check Names.
- Grant sharegroup1 Full Control if members need full access.
- Leave user14 with read-only permissions if this user only needs to view or copy files.
- Click OK.
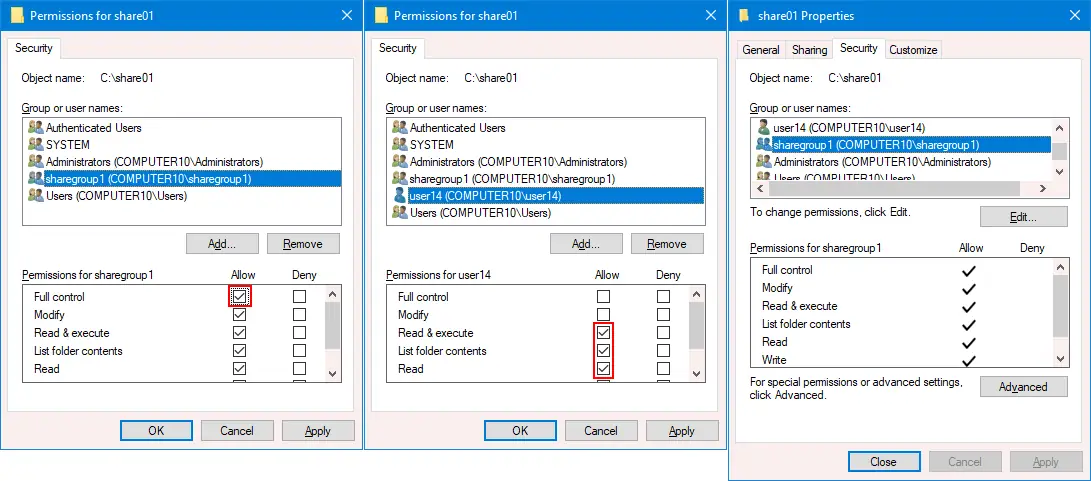
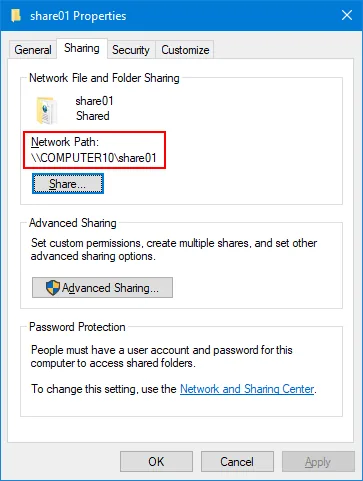
The folder Properties window now shows the network path to the shared folder. You can access the share by hostname or IP address, for example:
\\Computer10\share01
\\192.168.101.212\share01
Alternative sharing method
You can also manage shares with the Shared Folders snap-in:
- Right-click This PC and select Manage.
- Go to System Tools > Shared Folders > Shares.
- Right-click Shares and select New Share.
- Follow the wizard to select the folder path, share name and permissions.
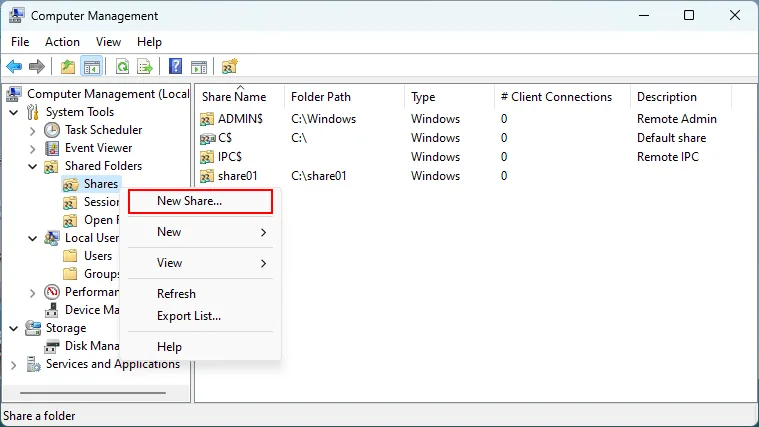
The snap-in also shows active shares, sessions and open files. Use it to audit connected users, close open sessions or disable a share.
Sharing a folder via PowerShell
You can create a Windows SMB share with PowerShell. For example:
New-SmbShare -Name "MyShare" -Path "C:\Folder" -FullAccess "user1"This command shares C:\Folder as MyShare and grants Full Access to user1. Adjust the share name, path, user (or group) and access level to match your environment.

Connecting to a Shared Folder
Once the folder is shared, users can connect from another Windows computer using a hostname, IP address or UNC path.
Connecting via UNC path
To connect to a shared folder in File Explorer:
- Open File Explorer.
- Enter the SMB server hostname or IP address in the address bar:
\\Computer10
\\192.168.101.212
- Open the shared folder from the list, or enter the full UNC path directly:
\\Computer10\share01
\\192.168.101.212\share01
- Enter credentials if prompted. Use an account that exists on the SMB server and has permission to access the shared folder.
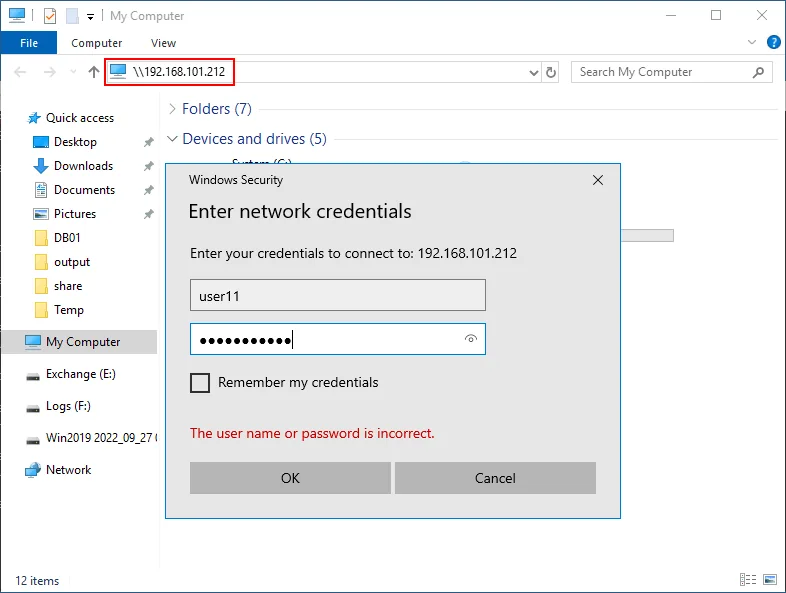
A full UNC path is often more reliable than browsing for a computer, particularly when discovery traffic is blocked or name resolution is inconsistent.
Connecting from Command Prompt or PowerShell
In Command Prompt, use pushd to connect to a share and temporarily assign a drive letter:
pushd \\192.168.101.100\ShareNameThe pushd command maps the share to a temporary drive letter, starting from Z: and moving backward, then changes the current directory to that drive. When you’re finished, run:
popdTo copy a file with a UNC path without changing directories, use:
copy \\192.168.101.100\ShareName\file.txt C:\DestFolder\Commands such as copy, xcopy and robocopy support UNC paths. Standard Command Prompt cannot use a UNC path as the current directory with cd, so use pushd when you need to work inside the share.
PowerShell handles UNC paths more directly. For example:
Get-ChildItem \\192.168.101.100\ShareName
Set-Location \\192.168.101.100\ShareName
Copy-Item "C:\localfile.txt" -Destination "\\192.168.101.100\ShareName\"
If the share requires different credentials from the current Windows session, establish the connection first:
net use \\192.168.101.100\ShareName /user:Username PasswordFor better security, avoid typing passwords in clear text where command history or screen capture tools may expose them. Choose prompted credentials, or use a mapped drive with saved credentials only when policy allows.
How to map a network drive in Windows 10 and 11
Mapping a network drive gives users persistent access to a shared folder from File Explorer. This is useful when the same share is accessed regularly.
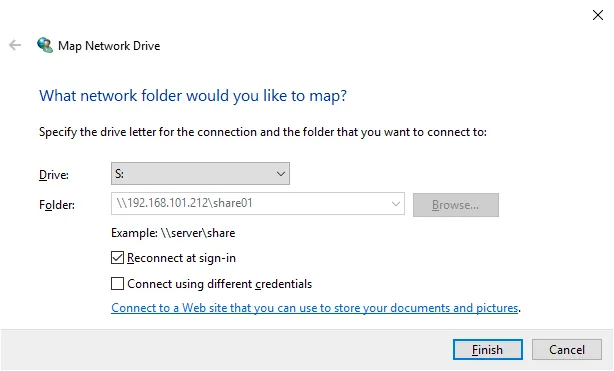
To map a network drive in Windows 10 or Windows 11:
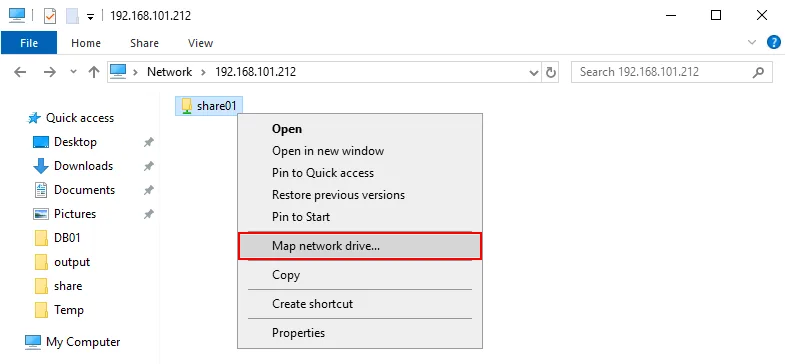
- Open the shared folder in File Explorer.
- Right-click the shared folder and select Map network drive.
- Select a drive letter.
- Select Reconnect at sign-in if the mapping should persist after restart.
- Select Connect using different credentials if needed.
- Click Finish.
To map a network drive with Windows CMD, use the following commands:
- Standard mapping (until reboot):
net use H: \\192.168.101.100\SharedFolder
- Persistent mapping:
net use K: \\192.168.101.100\SharedFolder /persistent:yes
- Mapping with specific credentials:
net use S: \\192.168.101.100\SharedFolder /user:UserName Password
- Assigning the next available drive letter:
net use * \\192.168.101.100\SharedFolder
- Disconnecting a mapped drive:
net use S: /delete
You can also map a persistent drive with PowerShell:
- Persistent mapping:
New-PSDrive -Name "S" -PSProvider FileSystem -Root "\\192.168.101.100\SharedFolder" -Persist - Mapping with credentials:
$cred = Get-Credential
New-PSDrive -Name "Z" -PSProvider FileSystem -Root "\\192.168.101.100\SharedFolder" -Persist -Credential $cred
- Removing a mapping:
Remove-PSDrive -Name "Z"
How to Connect to a Shared Folder Without a Password
The safest way to avoid repeated password prompts is not anonymous access. Instead, use matching local credentials or a domain identity so Windows can authenticate the user automatically.
Secure passwordless sign-in experience
A secure, no-prompt experience is possible when these conditions are met:
- The SMB server has a local user account with the same username as the account used on the SMB client.
- The password for that local user is identical on both Windows computers.
- The user is signed in to the SMB client with that matching username and password.
- The shared folder grants the user or group the required share and NTFS permissions.
Example configuration:
Computer 1:
- Computer name: Computer1
- Username: User1
- Password: Password1
Computer 2:
- Computer name: Computer2
- Username: User1
- Password: Password1
Once configured, User1 can access the shared folder on Computer1 from Computer2 without entering credentials again. The connection is still authenticated and password-protected because Windows reuses the current sign-in.
Risks of connecting without a password
Anonymous or guest-based file sharing isn’t recommended. It weakens accountability, makes access harder to audit and can expose data if an unauthorized device reaches the network. Microsoft also disables insecure guest logons by default in modern Windows because guest sessions don’t support standard protections such as SMB signing and SMB encryption.
Use anonymous access only for isolated legacy scenarios where no safer option is available. For business environments, rely on named accounts, group-based permissions and strong authentication.
How to enable or disable guest access in Windows
Guest access lets a user connect to a shared resource without providing a named username and password. In Windows file sharing, this can involve the built-in Guest account or guest fallback behavior.
Guest access is disabled or restricted by default in modern Windows versions because it widens the attack surface. It can let users or malicious systems reach data without accountable credentials, and it doesn’t support SMB signing or encryption the way authenticated SMB sessions do.
The recommended setting is to keep insecure guest access disabled. If a legacy NAS or third-party appliance requires guest access and can’t be upgraded, document the exception and isolate the device on a trusted network segment.
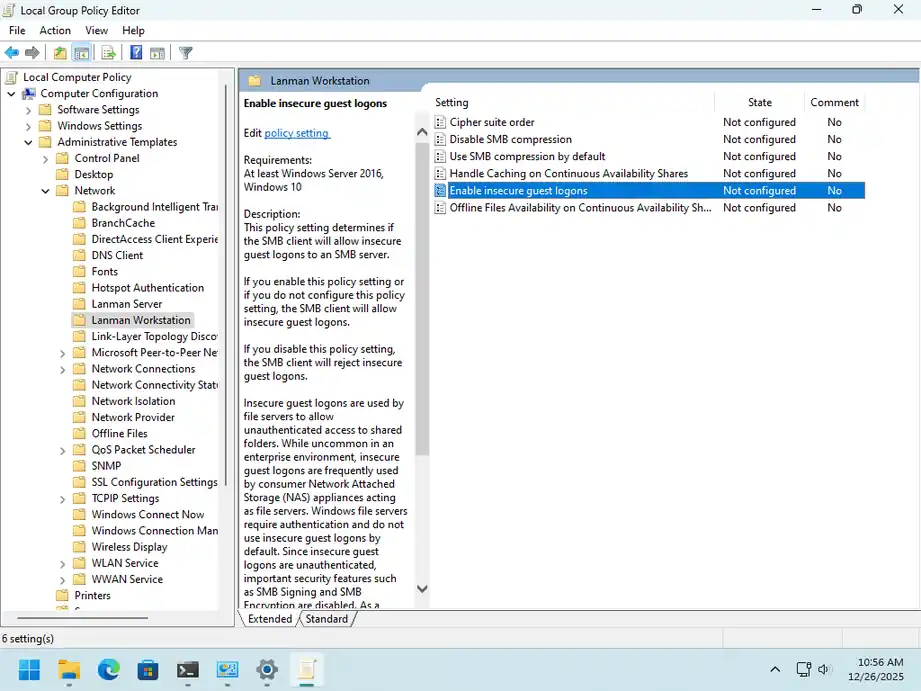
To enable insecure guest logons on a Windows client through Group Policy:
- Open gpedit.msc.
- Go to Computer Configuration > Administrative Templates > Network > Lanman Workstation.
- Open Enable insecure guest logons.
- Set the policy to Enabled.
- Click OK.
You can also use the PowerShell command below:
Set-SmbClientConfiguration -EnableInsecureGuestLogons $true -ForceIn Windows 11 Home, you must do this via the Windows Registry:
- Use this path:
HKEY_LOCAL_MACHINE\SOFTWARE\Policies\Microsoft\Windows\LanmanWorkstation
- Create or update this DWORD value:
AllowInsecureGuestAuth = 1
- To disable insecure guest logons again, set the policy to Disabled or run:
Set-SmbClientConfiguration -EnableInsecureGuestLogons $false -Force
SMB Protocol Versions Explained
SMB is the Windows file sharing protocol used to access shared folders, printers and named pipes over a network. Modern Windows versions use SMB 3.1.1 when both the client and server support it. Older SMB versions exist for backward compatibility but should be avoided where possible.
Common SMB versions include:
- SMB 1.0/Common Internet File System (CIFS): Legacy protocol used by older systems such as Windows XP and some obsolete NAS devices. It’s deprecated and disabled or removed by default in modern Windows.
- SMB 2.x: Introduced major performance improvements over SMB 1.0. SMB 2.x and SMB 3.x share the same protocol stack in Windows, so they’re enabled and disabled together.
- SMB 3.x: Adds modern security and availability features, including encryption, preauthentication integrity, continuous availability and better performance for enterprise workloads.
- SMB 3.1.1: The current SMB dialect used by modern Windows clients and servers when both sides support it.
For SMB file sharing in current Windows environments, use SMB 3.1.1 where possible and keep SMB 1.0 disabled unless a documented legacy dependency requires it.
How to Enable SMB 1.0 in Windows
SMB 1.0 should remain disabled in production environments unless a legacy system absolutely requires it. Ransomware campaigns and wormable vulnerabilities have historically abused SMB 1.0 weaknesses, and Microsoft no longer installs SMB 1.0 by default in current Windows releases.
To check whether SMB 1.0 is enabled in Windows 10 or Windows 11:
- Run PowerShell as administrator:
Get-WindowsOptionalFeature -Online -FeatureName SMB1Protocol
- You can also check with DISM:
Dism /online /Get-Features /format:table | find "SMB1Protocol"
To check whether SMBv2 and SMBv3 support is enabled on the SMB server service, run:
Get-SmbServerConfiguration | Select-Object EnableSMB2ProtocolTo check the SMB server protocol settings more broadly, run:
Get-SmbServerConfiguration | Select-Object "*enablesmb*"To enable SMB 1.0 from Windows Features:
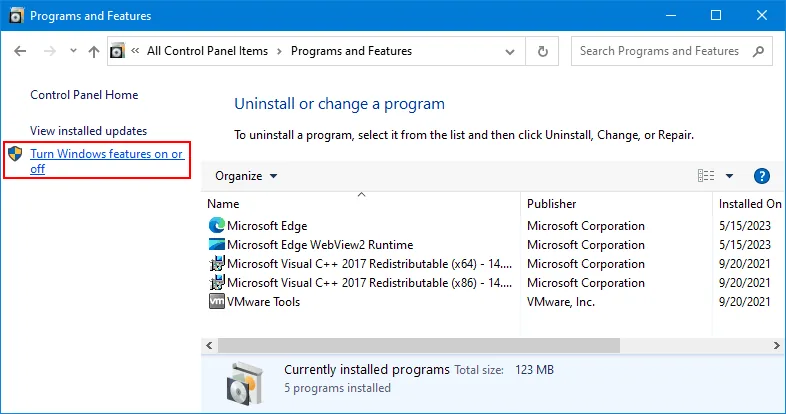
- Open Control Panel > Programs > Programs and Features.
- Click Turn Windows features on or off.
- Select SMB 1.0/CIFS File Sharing Support only if a verified legacy dependency requires it.
- Select only the client or server component required for the legacy workflow.
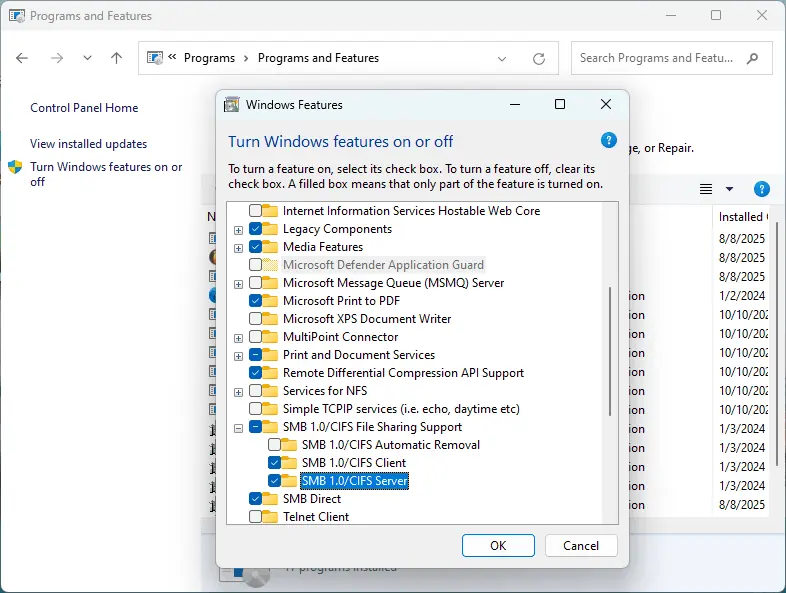
- Click OK and restart if prompted.
You can also enable and disable SMB 1.0 with PowerShell:
- Enable the SMB 1.0 client only:
Enable-WindowsOptionalFeature -Online -FeatureName "SMB1Protocol-Client" -All
- Enable the SMB 1.0 server component:
Enable-WindowsOptionalFeature -Online -FeatureName "SMB1Protocol-Server" -All
- Disable SMB 1.0 after the legacy dependency is removed:
Disable-WindowsOptionalFeature -Online -FeatureName "SMB1Protocol" -Remove
How to Resolve Common Windows Sharing Errors
Windows sharing errors usually trace to one of five causes: Network profile settings, firewall rules, name resolution, SMB protocol compatibility or mismatched permissions. Start with the simplest checks before changing security policies.
Windows cannot access \\hostname\share
Error message:
“Windows cannot access \\hostname\share
You do not have permission to access \\hostname\share. Contact your network administrator to request access.”
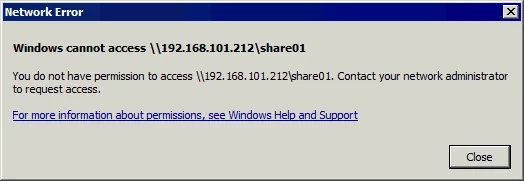
Possible fixes:
- Confirm that the user or group is listed in the share permissions.
- Confirm that the same user or group has the required NTFS permissions on the Security tab.
- Check that the user is entering the correct username and password.
- Try the share path by IP address to rule out hostname resolution issues.
- Clear outdated saved credentials in Credential Manager.
To open Credential Manager, go to Control Panel > User Accounts > Credential Manager.
Alternatively, you can open the classic stored-credentials interface by running:
rundll32.exe keymgr.dll,KRShowKeyMgrTo check SMB share permissions with PowerShell:
Get-SmbShareAccess -Name "share01"To check NTFS permissions on the folder:
Get-Acl C:\share01\ | Format-ListIf discovery or browsing fails, check the Function Discovery Provider Host and Function Discovery Resource Publication services. For older environments, the TCP/IP NetBIOS Helper service can also affect name resolution.
Error 0x80070035
Error message:
“Windows cannot access \\sharename
Check the spelling of the name. Otherwise, there might be a problem with your network.
Error code: 0x80070035.
The network path was not found.”
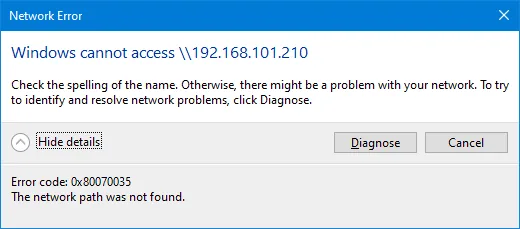
Fix 1: Check the network path
Confirm that the hostname, IP address and share name are correct. Then try the direct UNC path: \\192.168.101.212\share01
Fix 2: Check the network profile and firewall
Confirm that the SMB server uses a Private network profile and allows File and Printer Sharing. Modern SMB primarily uses TCP 445. Legacy NetBIOS scenarios may also require UDP 137, UDP 138 and TCP 139.
Fix 3: Check SMB services
On the computer hosting the share, verify that these services are running when needed:
- Server
- Workstation
- Function Discovery Provider Host
- Function Discovery Resource Publication
Fix 4: Check SMB signing compatibility
If a Windows 11 24H2 client or Windows Server 2025 system can’t connect to an older SMB server or third-party NAS, check whether SMB signing is required on the client and supported by the server. Microsoft doesn’t recommend disabling SMB signing as a workaround unless no safer option is available.
To verify SMB signing status, run:
Get-SmbClientConfiguration | Format-List RequireSecuritySignature
Get-SmbServerConfiguration | Format-List RequireSecuritySignature
Anonymous access error
Error message:
“You can’t access this shared folder because your organization’s security policies block unauthenticated guest access.”
The related Event Viewer entry can include:
“Log Name: Microsoft-Windows-SmbClient/Security
Source: Microsoft-Windows-SMBClient
Event ID: 31017
Rejected an insecure guest logon.”
This error appears when the client blocks unauthenticated guest access. Starting with Windows 10 version 1709 and Windows Server 2019, SMB2 and SMB3 clients no longer allow guest access or guest fallback by default in multiple editions. Windows 11 24H2 and Windows Server 2025 also require SMB signing by default, which creates additional compatibility issues for guest-only devices.
Recommended fixes:
- Disable guest access on the SMB server or NAS.
- Create named users with passwords.
- Grant permissions to those users or groups.
- Use SMB 3.x where supported.
- Replace or upgrade devices that only support guest SMB access.
If a temporary exception is unavoidable, document the risk and isolate the system before enabling insecure guest logons.
Error 0x80004005
Error message:
“Windows cannot access \\sharename
Check the spelling of the name. Otherwise, there might be a problem with your network.
Error code: 0x80004005.
Unspecified error.”
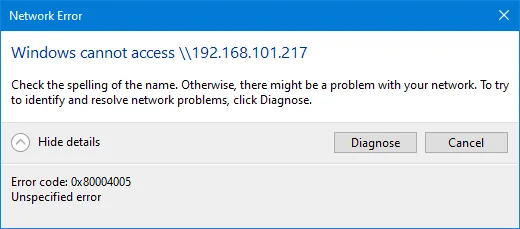
This is a generic Windows error and can appear for several reasons. In Windows file sharing, common causes include SMB version mismatches, blocked firewall rules, disabled services, stale credentials or guest access restrictions.
Troubleshooting steps:
- Test the UNC path by IP address.
- Confirm that TCP 445 is reachable between the SMB client and server.
- Check share and NTFS permissions.
- Clear saved credentials in Credential Manager.
- Verify SMB protocol compatibility.
- Avoid enabling SMB 1.0 unless a legacy device requires it and no safer upgrade path exists.
Connection limits in Windows client editions
Windows client editions (Windows 7 and newer) cap concurrent SMB connections to shared folders at 20. The 21st connection attempt fails with an error. This limit applies to file and printer sharing on every Windows client SKU and isn’t configurable.
For light sharing, small workgroups and temporary access, this limit is rarely an issue. If more than a small number of users need reliable shared folder access, use a Windows Server file server, NAS platform or managed file service rather than relying on Windows 10 or Windows 11 as a file server. Server editions don’t apply this connection cap.
Windows 11 24H2 and newer SMB compatibility issues
If a newer Windows 11 client can’t connect to an older server, NAS or appliance, work through these checks:
- Does the server support SMB signing?
- Does the server support SMB 2.x or SMB 3.x?
- Is the server relying on guest access or guest fallback?
- Is the client requiring SMB signing for outbound connections?
- Is the server using SMB 1.0 only?
- Can the appliance firmware be updated to support modern SMB security?
For production environments, the preferred fix is to update or replace the SMB server, enable named user authentication and use SMB 3.x. Avoid disabling SMB signing or enabling guest access except as a documented temporary workaround.
Conclusion
Windows network file sharing can be both secure and manageable when you configure it with a private network profile, authenticated users, the right share permissions and matching NTFS permissions. For small business workgroups, local users and groups usually provide enough control for light file sharing without the overhead of a full file server.
For reliable access, use UNC paths or mapped network drives, keep SMB 1.0 disabled and troubleshoot common errors by checking credentials, firewall rules, SMB compatibility and effective permissions. For larger environments or high concurrent use, move file services to Windows Server, a NAS or another dedicated platform rather than running them on a Windows client.

FAQ
How do I share a folder on a network in Windows 11?
To share a folder on a network in Windows 11, set the network profile to Private, enable Network Discovery and File and Printer Sharing, then right-click the folder and open Properties > Sharing > Advanced Sharing. Select Share this folder, add the required users or groups and configure share permissions. Then open the Security tab and set matching NTFS permissions.
Why can’t I access a shared folder in Windows?
Access can fail because the network profile is Public, File and Printer Sharing is blocked by the firewall, the UNC path is incorrect, saved credentials are outdated or the user lacks the right share or NTFS permissions. SMB version mismatches, guest access restrictions and SMB signing requirements can also block access.
Is it safe to enable SMB 1.0 in Windows?
No. SMB 1.0 isn’t safe for normal Windows file sharing and should remain disabled unless a documented legacy dependency requires it. If SMB 1.0 must be enabled temporarily, isolate the system, enable only the required component and remove the feature once the legacy dependency is replaced.
How do I share a folder without a password in Windows?
The safest way to access a shared folder without repeated password prompts is to use matching authenticated credentials on the client and server. Create the same username and password on both computers, grant that user share and NTFS permissions, then sign in to the client with that account. Avoid true anonymous or guest access because it weakens security and auditing.
What permissions are required to access a shared folder?
A user needs both share-level and NTFS permissions to access a shared folder over the network. Share permissions control SMB access, while NTFS permissions control file system access. The most restrictive of the two layers wins, so a user with Full Control at the share level but Read access in NTFS gets read-only access.
How do I map a network drive in Windows?
Open File Explorer, access the shared folder with a UNC path such as \\Computer10\share01, then right-click the folder and select Map network drive. Choose a drive letter, select Reconnect at sign-in if needed and supply different credentials if the share requires them. You can also map a drive with the net use command.