How to Set Up VMware ESXi Lab – A Complete Guide
Virtualization has become a core skill for IT professionals, and building a small, flexible home environment is one of the most effective ways to develop it. A VMware Home Lab allows you to experiment freely, test complex configurations and understand how VMware technologies behave without risking production systems.
With the right mix of hardware, VMware Workstation, ESXi and vCenter Server, you can recreate many aspects of a full enterprise setup. This guide explains how to assemble the hardware, deploy the software and create a scalable VMware lab setup that supports hands-on learning. Read this post to begin building your own fully featured VMware Home Lab.
Hardware Configuration for a VMware Home Lab
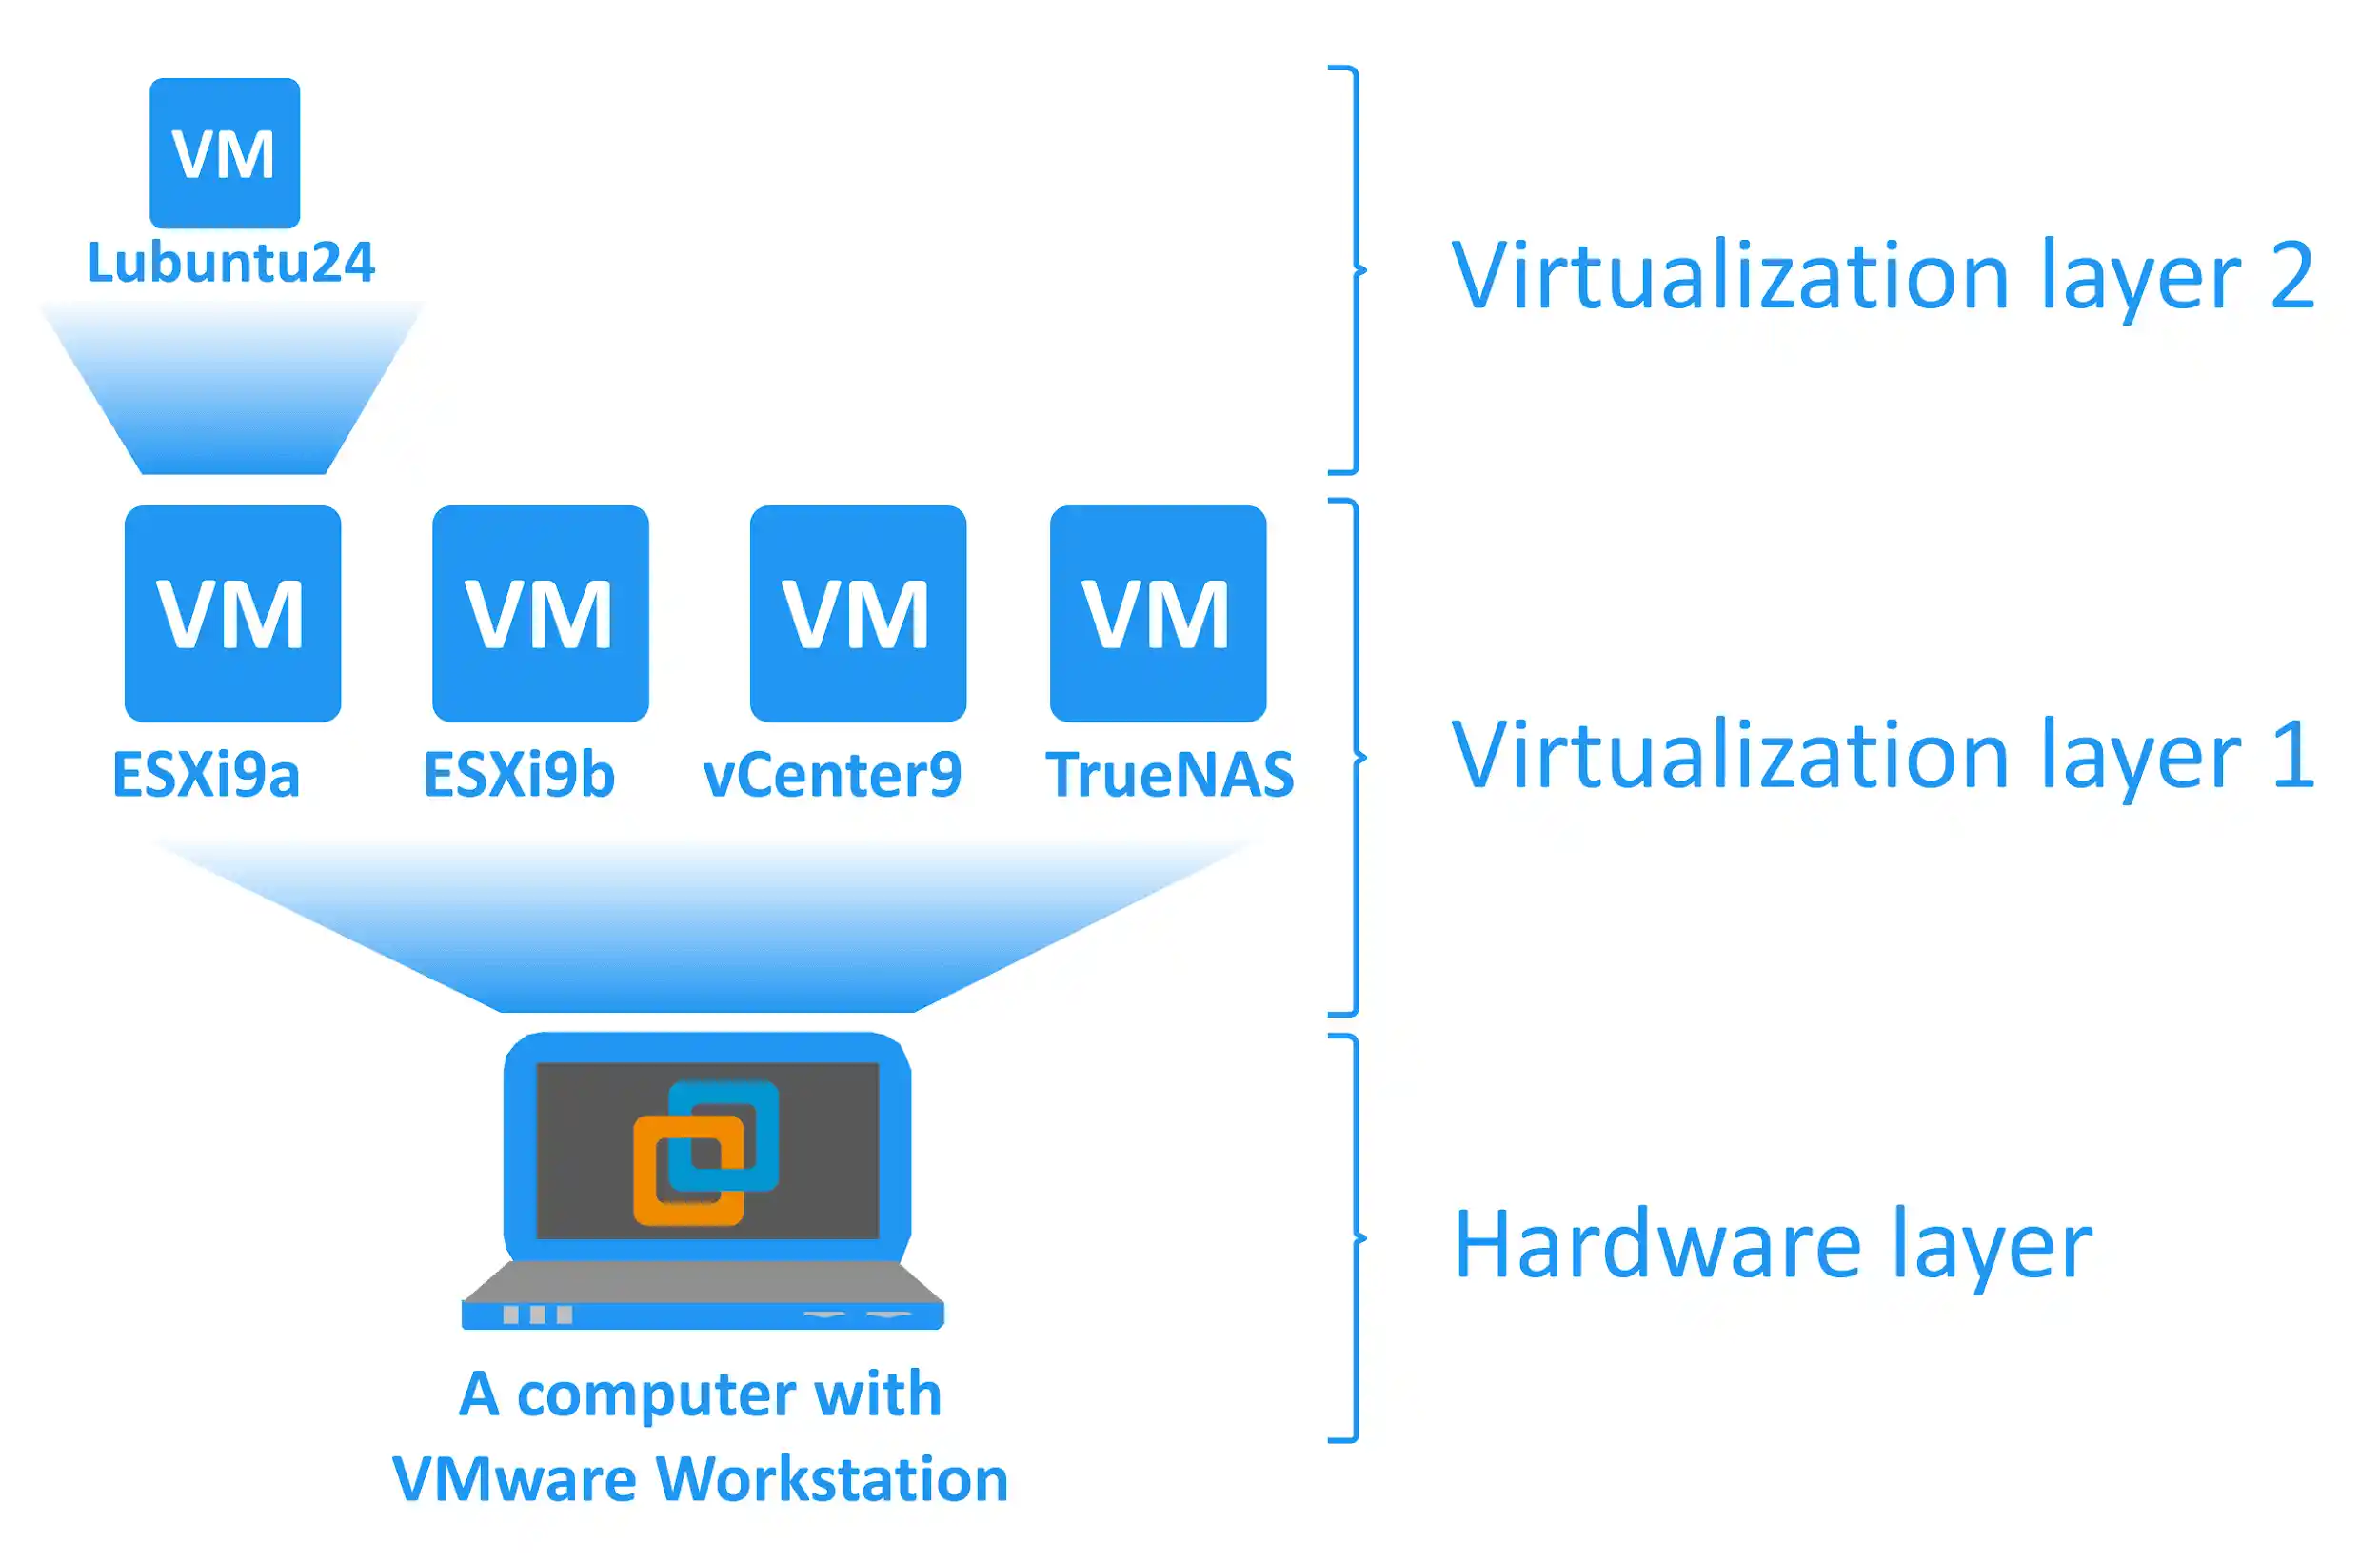
In this blog post, we use VMware Workstation to deploy ESXi hosts as virtual machines. Using VMware’s nested virtualization feature, you can create a VM running inside a VM. In this particular case, you can deploy a VM on an ESXi host running on a VM. For convenience, working with the VMware home lab requires a computer that meets the minimal hardware requirements:
- A multicore x64 CPU with 1.3 GHz or faster core speed (produced in 2011 or later) that supports Intel VT-x or AMD-V virtualization hardware extensions
- 32 GB of RAM
- A hard disk drive (HDD) with about 200 GB of free space. SSD is preferred due to a higher read/write speed, especially for random read/write operations that are common for VM storage
- Ethernet network adapter
- Linux or Windows x64 operating system (with GUI) installed on your physical machine.
The newer hardware generation is generally better.
Examples of Hardware Configuration
Example 1: Desktop computer
- AMD Ryzen 7 7800X3D (100-100000910WOF) 4,2 GHz Socket AM5
- Motherboard GIGABYTE B650E AORUS MASTER AMD B650 4xDDR5 6600 MHz, up to 192 GB RAM
- SSD drive Kingston KC600 2 TB Upgrade Bundle Kit (SKC600B/2048G) SATA
- HDD 3.5″ WD Ultrastar DC HC320 8 TB (HUS728T8TALE6L4/0B36404) SATA
- RAM Kingston FURY 16 GB DDR5 6400 MHz Renegade Silver RGB (KF564C32RSA-16) – 4 modules (64 GB RAM total)
- Power Supply Be Quiet! Straight Power 11 Platinum 850W (BN308)
- Video card AMD Radeon RX 7900 XT (100-300000071) GPU frequency: 2400 (Boost) MHz GDDR6 20 GB Memory frequency: 20000 MHz Bus: 320 bit PCI-Express 4.0 x16
Example 2: Desktop computer
- Intel Core i7-14700K (BX8071514700K) 3,4 GHz Socket 1700
- Motherboard ASUS PRIME Z690-A Intel Z690 4xDDR5 6000 MHz, up to 192 GB RAM
- SSD drive Intel D3-S4620 1.92 TB (SSDSC2KG019TZ01) SATA
- HDD 3.5″ WD Gold Enterprise Class 6 TB (WD6003FRYZ) SATA
- RAM Kingston FURY 32 GB DDR5 6000 MHz Beast EXPO White (KF560C36BWE-32) – 4 modules (64 GB RAM total)
- Power supply Chieftec 1000W Proton (BDF-1000C)
- Video card GIGABYTE GeForce RTX 4090 WINDFORCE 24G (GV-N4090WF3-24GD)
Example 3: Laptop Acer Predator Helios 16 Gaming Laptop – GeForce RTX™ 4080 – PH16-71-948L
- Intel® Core™ i9-13900HX processor 2.20 GHz
- NVIDIA® GeForce RTX™ 4080 with 12 GB dedicated memory
- 16″ WQXGA (2560 x 1600) 16:10 IPS 240 Hz
- 32 GB, DDR5 SDRAM
- 1 TB SSD
Example 4: Laptop ASUS ProArt Studiobook 16 (H7600, 12th Gen Intel)
- Intel® Core™ i9-12900H
- NVIDIA® GeForce RTX™ 3080 Ti
- 64GB RAM 4800 MHz DDR5 2 x SO-DIMM slots memory
- Up to 4 TB two M.2 slots PCIe® SSD
NOTE: You don’t need the most powerful video card for a VMware lab setup. The most important components are CPU, memory and storage. Unlike AMD processors, Intel processors technically allow you to run macOS virtual machines on VMware hypervisors.
Required Software
The following software are used for the VMware home lab explained in this blog post:
- VMware Workstation 17.6.1 is used as a desktop hypervisor
- VMware ESXi hypervisor 9.0 as a VM (2 VMs total)
- VMware vCenter Server 9.0 (1 VM, deployed as a virtual appliance)
- TrueNAS Core (FreeNAS) to create an iSCSI shared storage (1 VM)
- Lubuntu 24 Linux or any other supported OS to install on a nested VM
You can use this workflow to deploy a lab for vSphere versions 9.0, 8.0, 7.0 and 6.7.
To learn how to build a VMware home lab, it is essential to understand its structure. Below you can see a principal scheme of the VMware home lab to be deployed.
Requirements justification
The complete VMware home lab hardware and software requirements are based on the following minimum requirements:
- VMware ESXi requires at least 4 GB of RAM for installation (8 GB or more is recommended for running VMs); 2 CPU cores are required
- VMware vCenter Server 9.0 requires at least 14 GB of RAM and 2 CPU cores
- FreeNAS: 8 GB of RAM is recommended
- Your host operating system needs at least 4 GB of RAM to work properly
- VMware Workstation needs at least 2 GB of RAM (4 GB or more are recommended)
Licensing and price
You can set up a VMware lab at home for free during the trial period. It is recommended to set up all lab components within a short time period (for example, within days) to benefit from the full 60-day free trial period for ESXi and vCenter. For example, if you install vCenter one month after installing ESXi, you’ll have only one month left for testing vSphere in your lab, given that 30 days have already elapsed for your ESXi free trial license.
- VMware Workstation 17.6.1 is now available for free. There is no reason to use the free, deprecated VMware Player.
NOTE: VMware Workstation and VMware Player can be installed on a completely free Linux operating system. You don’t need to buy a Windows OS for your VMware lab setup for home. Of course, if you already have a computer running Windows, you can use it for installing VMware Workstation.
- VMware vCenter Server for vSphere 9.0 can be used for a 60-day evaluation period at no charge, with a complete set of features that includes APIs for data protection.
- TrueNAS Core (formerly FreeNAS) is a free software solution based on the FreeBSD operating system that allows you to configure a file server (similar to NAS) on any machine.
Installing VMware Workstation
Now that the hardware is prepared and the operating system is installed, you can download and install VMware Workstation on your physical machine. To download VMware Workstation for Linux or Windows, refer to this page on VMware’s website.
Installing VMware Workstation on Linux
To install VMware Workstation on Linux:
- Go to the directory where you saved the downloaded installer file. In the current example, the VMware Workstation installer is located in the ~/Downloads directory:
cd /home/user1/Downloads/ - Make the installer file executable (change the version number to the one you are using):
sudo chmod +x ./VMware-Workstation-17.6.1-24319023.x86_64.bundle - Run the VMware Workstation Linux installer:
sudo ./VMware-Workstation-17.6.1-24319023.x86_64.bundle - The installation wizard window now appears. Answer the questions provided by the wizard and click Next to switch to the next step.
- Accept the license agreement.
- Would you like to check for product updates on startup? Select Yes or No.
- Would you like to join the VMware Customer Experience Improvement Program? Select Yes or No.
- Enter the user who will initially connect to the Workstation Server. Type the username of the account you are using in Linux.
- Choose a directory for your shared virtual machines (for example /var/lib/VMware/SharedVMs).
- Enter the port to use for HTTPS access to Workstation Server (443 by default).
- Enter the license key. Keep this field empty for the free trial mode.
- The product is now ready for installation.
- GNU C Compiler must be installed before running VMware Workstation. To install this compiler, execute the command:
sudo apt-get -y install gcc make linux-headers-$(uname -r) dkms
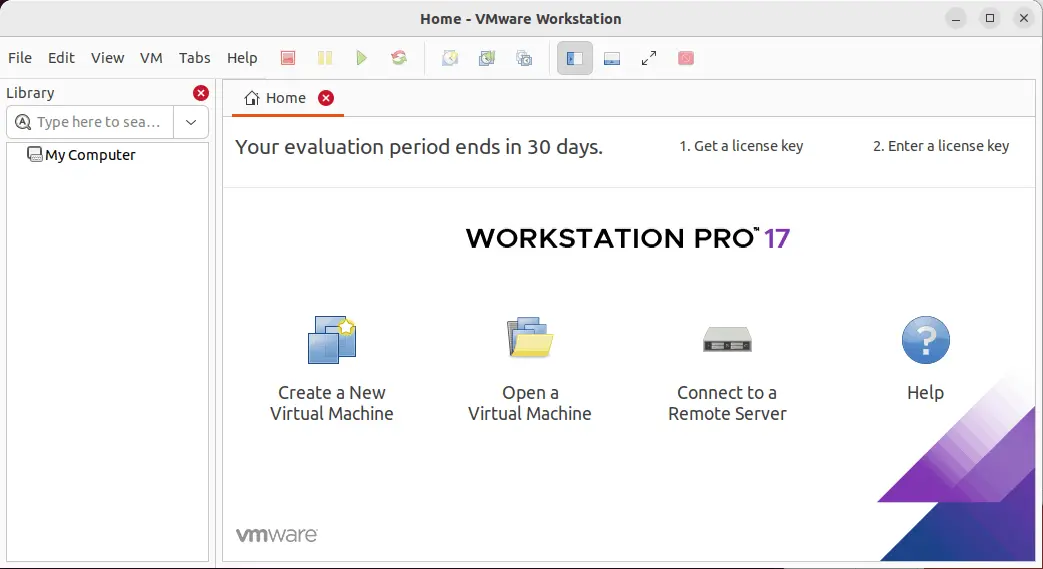
The user interfaces of VMware Workstation for Linux and for Windows are identical. Below, you can see a screenshot of the VMware Workstation 17 interface running on Linux.
VMware Player is also installed by default when you install VMware Workstation.
Installing VMware Workstation on Windows
Go to the directory where you saved the downloaded installer and run the installer file. The name of the file is VMware-workstation-17.6.1-24319023.exe in this case. Similar to the installation on Linux, a user-friendly wizard opens. After configuring options, click Next to switch to the next step of the wizard.
- On the Welcome screen, click Next.
- Accept the license agreement.
- Select the installation destination.
- Tick the checkboxes if you want to check for updates on startup or join the VMware Customer Experience Improvement Program.
- Select the shortcuts you wish to place on your system.
- Click Install to begin the installation.
- The final installation screen allows you to enter a license (optional).
You now have an installed instance of VMware Workstation on your physical computer.
Deploying a VM Running ESXi on VMware Workstation
For further experiments conducted in the VMware home lab, a computer with VMware Workstation 17 installed on Windows 10 should be used (note that there are C: and D: partitions on the disk). You can reproduce all the explained actions on a Linux machine because VMware Workstation is a cross-platform virtualization solution (note that the paths would be different in this case). The next step is to install ESXi on a VM.
Creating a VM
- Download the ESXi 9.0 installer in the ISO format from Broadcom’s website. You need to create a Broadcom account.
- Create a directory to store virtual machines (for example, D:VMware Home Lab).
- Create a subdirectory D:VMware Home LabESXi9a for storing the files of the first ESXi VM.
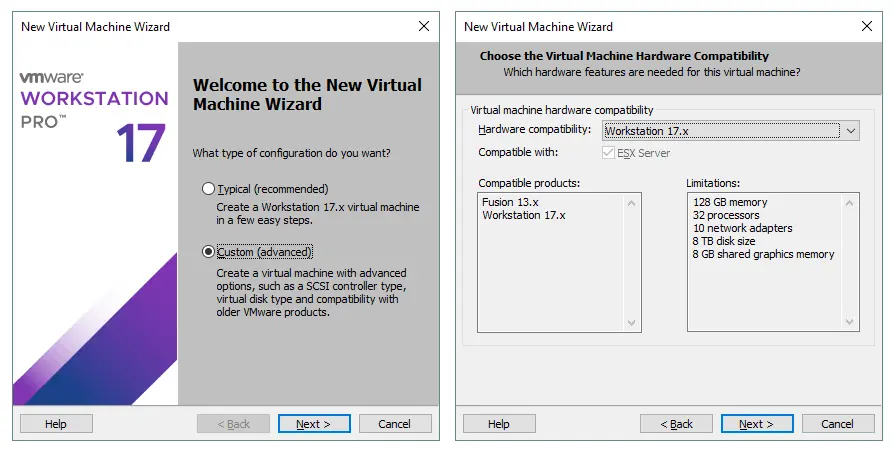
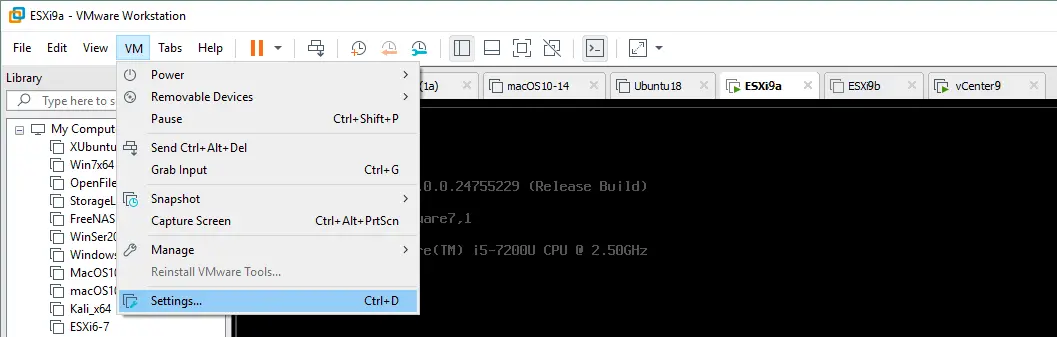
Create a new virtual machine in VMware Workstation by clicking File > New Virtual Machine. The new virtual machine wizard appears.
- On the Welcome screen, select Custom (advanced).
- Choose the Virtual Machine Hardware Compatibility. Select Workstation 17.x.
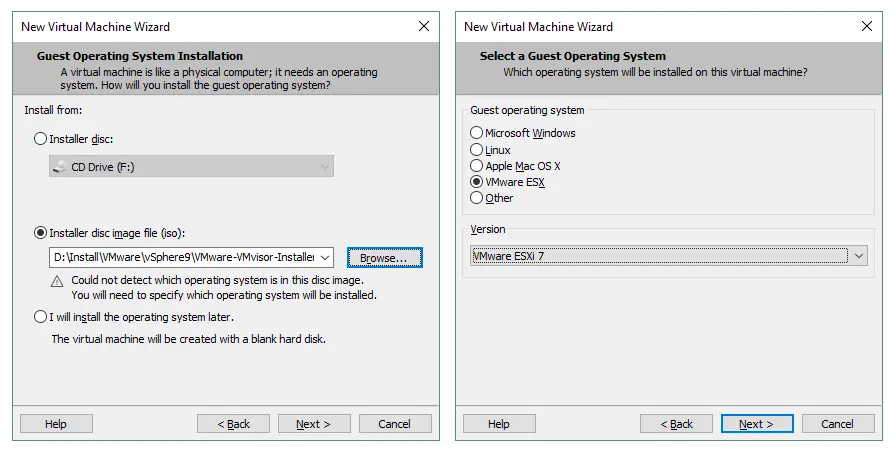
- Guest Operating System Installation. Select the Installer disk image file (iso) and browse the ESXi installer iso file. Click Next.
- Select a Guest Operating System. Select VMware ESX, then select VMware ESXi 7 (or newer) in the drop-down menu and click Next.
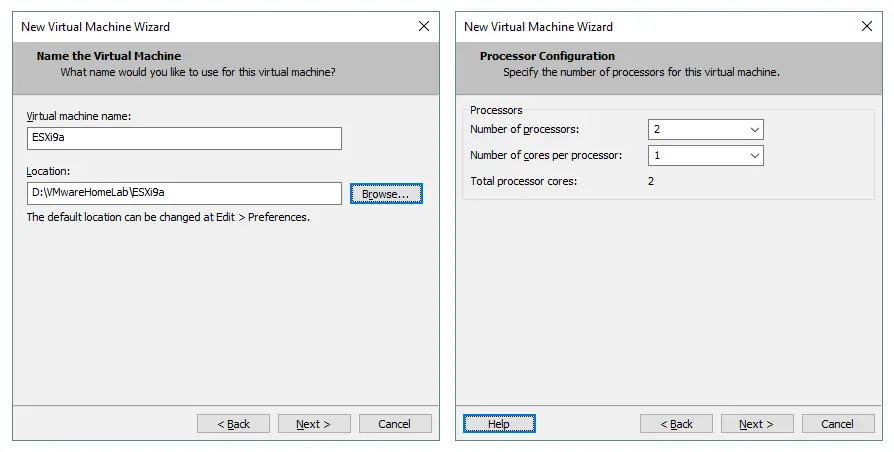
- Name the Virtual Machine. Enter the VM name (for example, ESXi9a). Select the D:VMware Home LabESXi9a directory you created before as the VM location.
- Processor Configuration. Specify the following parameters:
- Number of processors: 2
- Number of cores per processor: 1
If you use 1 CPU with 1 core, the ESXi installer displays an error during installation.
- Memory for the Virtual Machine. Specify an amount of memory equal to 4096 MB. Later, you can edit settings and increase the memory allocation.
- Network Type. Select Use network address translation (NAT).

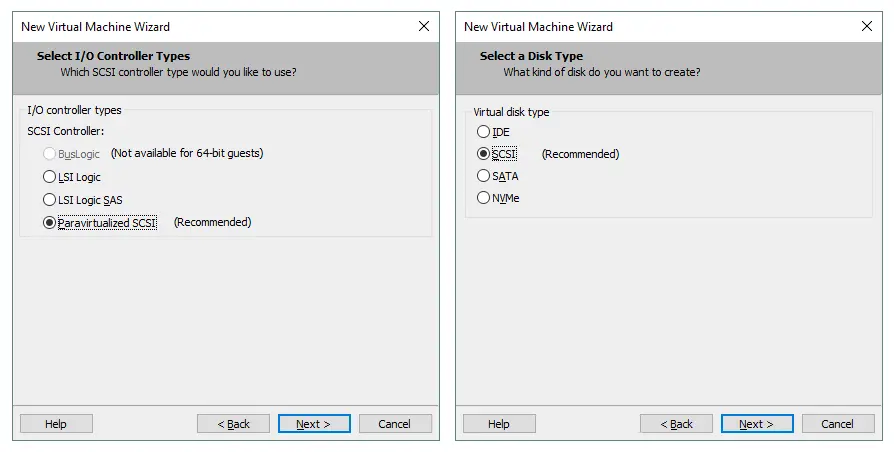
- Select I/O Controller Types. Select Paravirtualized SCSI (Recommended).
- Select a Disk Type. Select SCSI (Recommended) as a disk type.
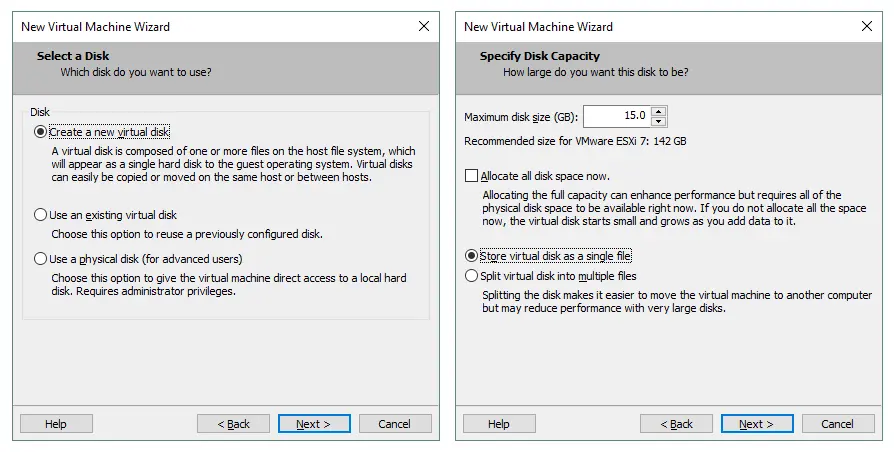
- Select a Disk. Click Create a new virtual disk.
- Specify Disk Capacity. Set maximum disk size to 15 GB. ESXi doesn’t consume much disk space, and a 15 GB disk is enough for ESXi installation. Select Store virtual disk as a single file.
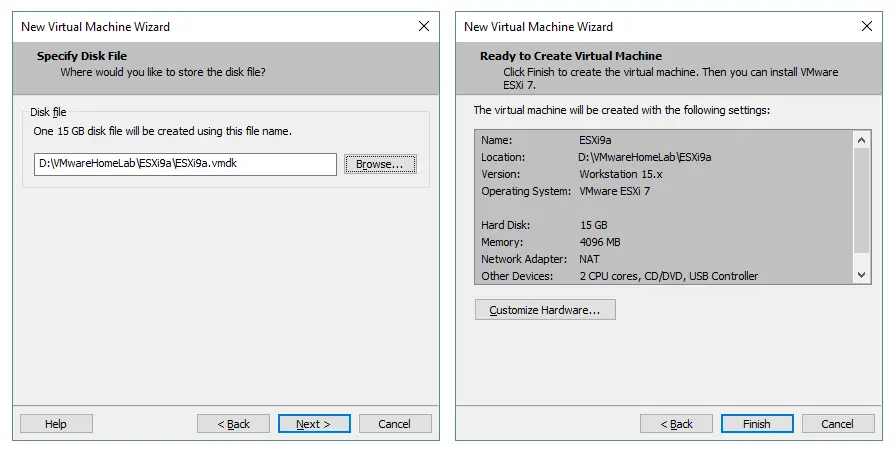
- Specify Disk File. Place your virtual disk in the directory specified as the VM location. In this case, it’s D:VMware Home LabESXi9aESXi9a.vmdk.
- Ready to Create Virtual Machine. Check your VM settings and click Finish to create the VM.
Installing ESXi on the VM
After finishing the configuration, power on the new VM by clicking the “Play” button in VMware Workstation. The VM boots from the ISO image and you can see the ESXi installer interface.
- On the Welcome screen, press Enter.
- Read and accept the End User License Agreement (EULA). Press F11 to continue.
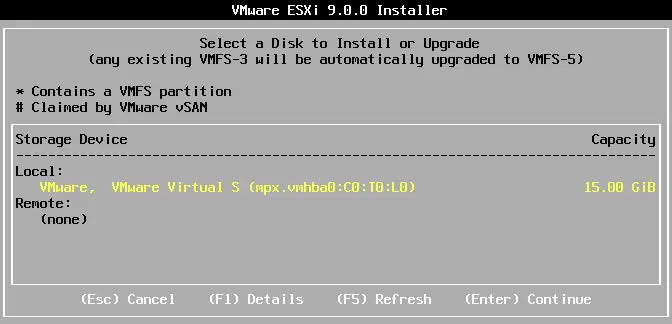
- Select a disk to install or upgrade. Select your 15 GB virtual disk that you created previously.
- Select a keyboard layout. US Default is selected in this particular case.
- Enter and confirm a root password.
- On the Confirm Install screen, press F11 to start the installation.
NOTE: Read our blog post for a detailed interactive ESXi installation with screenshots.
Editing VM settings and configuring the network
Once ESXi is installed, shut down the VM (click VM > Power > Shut Down Guest or press Ctrl+E in the VMware Workstation interface) and prepare it for further network and storage configuration.
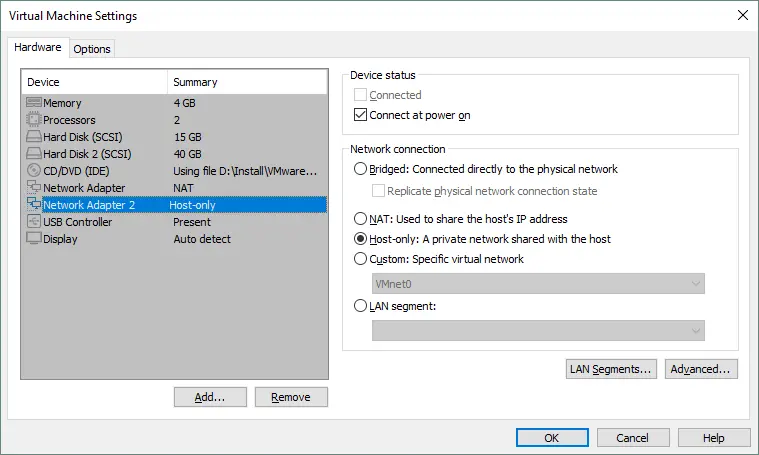
Let’s create the second virtual disk that we’ll use for the VM datastore (later nested VMs can be placed on that storage). You should also create a second virtual network adapter (NIC – Network Interface Controller) that can be used for NIC teaming or for connecting to shared storage. Note that we recommend using a separate storage network for connecting shared storage to ESXi hosts.
Adding a virtual disk
- To add a new virtual disk to a VM, click VM > Settings and in the Virtual Machine Settings window, click Add > Hard Disk.
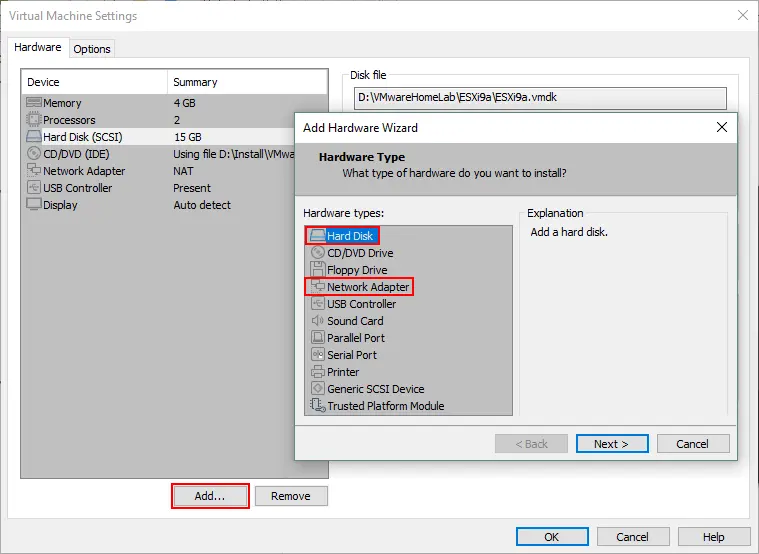
- Choose the virtual disk type: SCSI (Recommended).
- Create a new virtual disk.
- Set the disk size equal to 40 GB and select the “Store virtual disk as a single file” option. Don’t select the “Allocate all disk space now” checkbox if you don’t want to use thick provisioning. You can set the maximum disk size for more than 40 GB if you have enough disk space on your physical computer.
- Specify virtual disk file location. D:VMware Home LabESXi9aESXi9a-0.vmdk is used in the current example because it is convenient to store all VM files in one directory.
Adding a network adapter
To add a second network adapter, click Add > Network Adapter. Let’s select different networks for connecting ESXi hosts with each other (NAT Network) and for connecting ESXi hosts with shared storage (Host-Only Network).
- The NAT network allows VMs to connect with each other, a host machine and for a host to connect to VMs. VMs can access an external network that is accessible by the host.
- The Host-Only network allows VMs to communicate with each other and with the host. The host can also communicate with VMs. VMs don’t have access to external networks and the internet.
You can find a detailed comparison of virtual network types in this blog post.
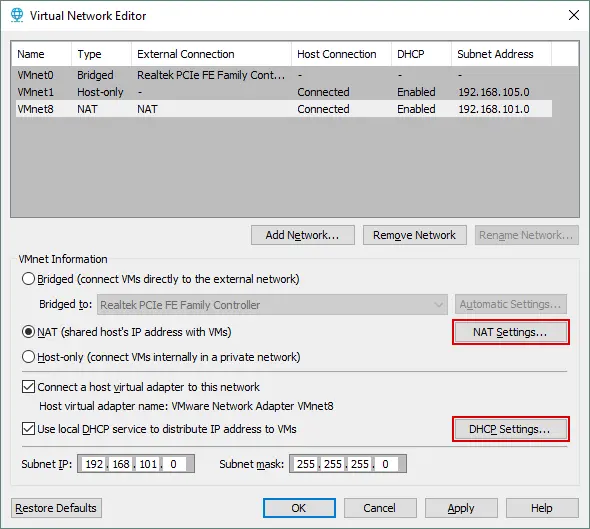
VMware Workstation provides a virtual network editor for configuring virtual networks, including NAT and host-only networks. Moreover, you can create more NAT and host-only networks and assign network addresses, virtual gateways and virtual DHCP servers to them.
The following connection scheme can be used in the VMware ESXi home lab:
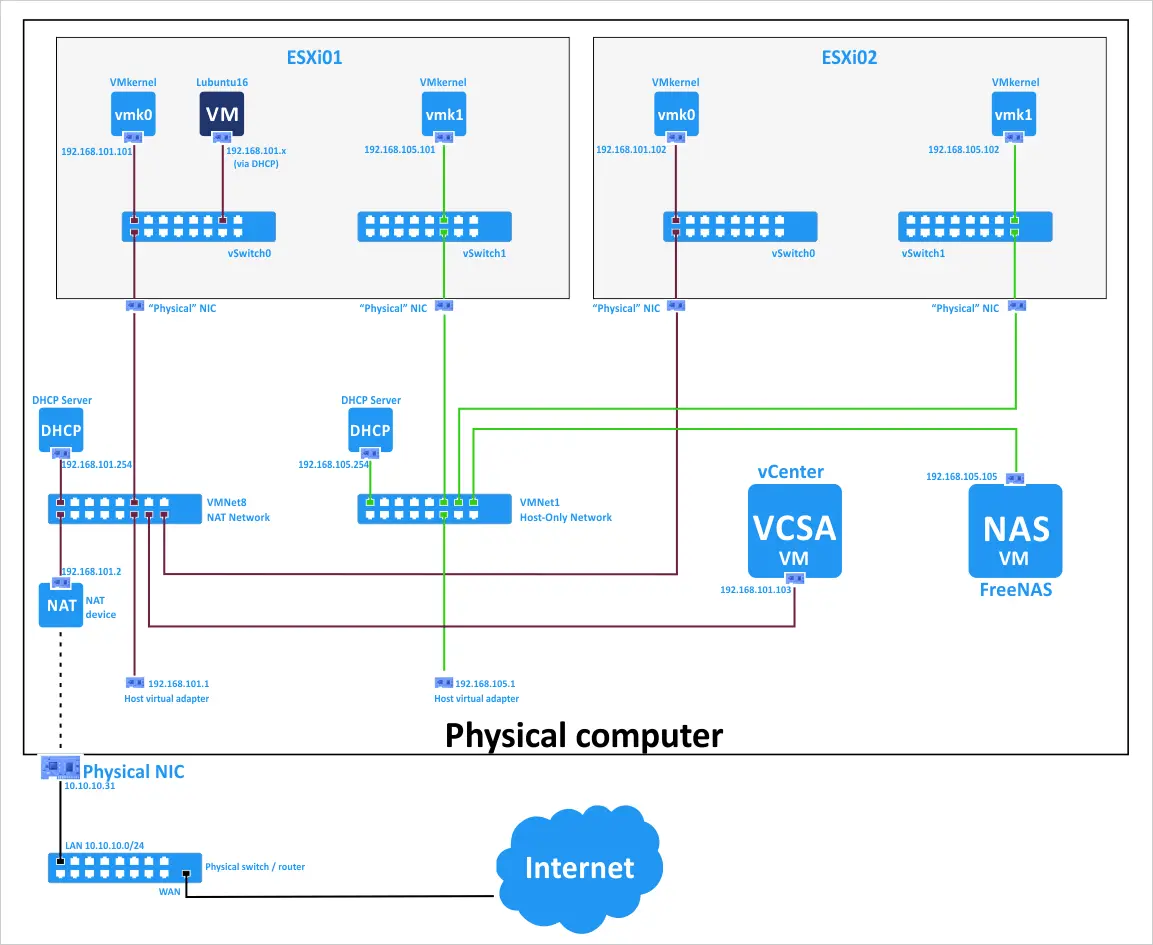
Editing virtual network configuration
- Open the Virtual Network Editor by clicking Edit > Virtual Network Editor. Let’s define the following network configuration:
- VMnet8 (NAT network)
- Network Address: 192.168.101.0/24
- Gateway IP: 192.168.101.2
- DHCP Settings: IP range is 192.168.101.201 – 192.168.101.254; Default lease time settings.
- VMnet1 (Host-only)
- Network Address 192.168.105.0/24
- DHCP Settings: IP range is 192.168.105.201 – 192.168.105.254
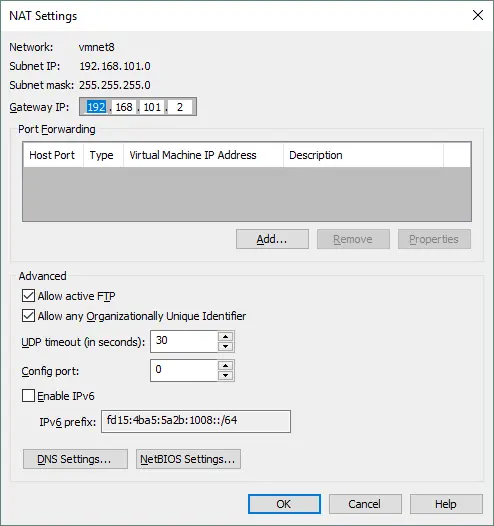
- To edit settings, select the VMnet8 network and hit the NAT Settings button.
- Set the gateway IP address and advanced network settings. Click OK to save the changes.
- Similarly, click the DHCP settings button to edit the DHCP configuration.
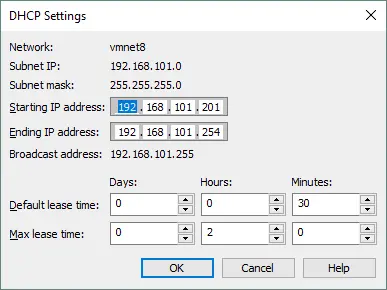
You can also edit DHCP settings for VMnet1 and other networks.
NOTE: You can use other IP addresses in your VMware home labs. If you want to recreate the environment explained in this blog post, you can use the same configuration for more convenience.
Deploying a Second ESXi Host by Copying the VM
We have just created a VM, installed ESXi 9.0, and configured the VM and networks. Let’s create one more ESXi VM by copying the existing VM. You can create the second VM (ESXi9b) from scratch or you can clone the first VM.
- To clone a VM, first open your file manager (for example, Windows Explorer) and go to the directory where your first VM is located. In this case, the directory is D:VMware Home Lab. The directory of the first VM is D:VMware home labESXi9a.
- Create a directory named ESXi9b in the D:VMware Home Lab directory. Shut down your VM running ESXi (ESXi9a). Copy all files from the ESXi9a directory to the ESXi9b directory.
- Rename the virtual disks and VM configuration file in the ESXi9b directory to avoid confusion:
ESXi9a.vmdk → ESXi9b.vmdk
ESXi9a-0.vmdk → ESXi9b-0.vmdk
ESXi9a.vmx → ESXi9b.vmx
- Open the cloned VMX file (which was renamed from ESXi9a.vmx to ESXi9b.vmx). Find all ESXi9a values and replace them with ESXi9b in this VMX configuration file. Then, save the configuration file for the VM clone (cloned VM).
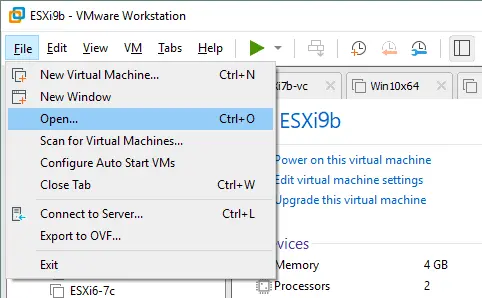
- Open the cloned VM in VMware Workstation. Click File > Open and select the D:VMware Home LabESXi9bESXi9b.vmx file. Go to VM > Settings > Options and ensure that the VM is renamed ESXi9b.
- Power on your second ESXi VM (VM > Power > Power On).
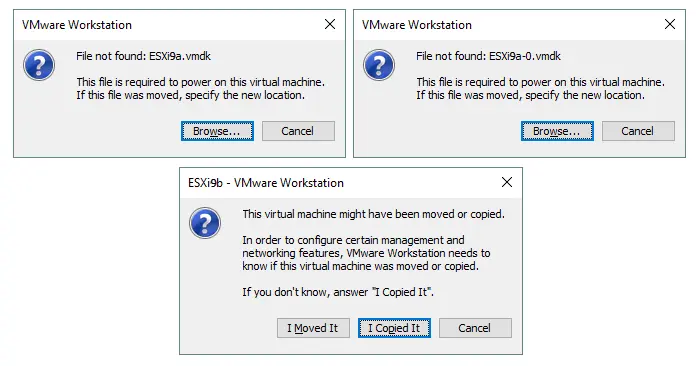
- VMware Workstation warns you that the virtual disk file cannot be found. Select Browse and your D:VMware Home LabESXi9bESXi9b.vmdk file. Click Open. The warning is displayed once more for the second virtual disk. Similarly, select the ESXi9b-0.vmdk file.
- Next, VMware Workstation will warn that this virtual machine might have been removed or copied. Click I Copied It and your second VM should load.
This warning is displayed because the copied VM has the same UUID (Universal Unique Identifier) as the source VM. UUID is generated depending on VM location and is used for generating the VM’s MAC (Media Access Control) address for the virtual network adapter. If you select I Moved It, then the UUID will be preserved. If you select I Copied It, the new UUID will be generated. Each machine must have a unique UUID, which serves as its digital fingerprint. An example of a UUID is 34 5e cb fa fd d4 a1 e1 72 3b 05 62 4d 3a 52 85.
Now, you have two VMs on which ESXi servers are installed.
Basic ESXi Configuration
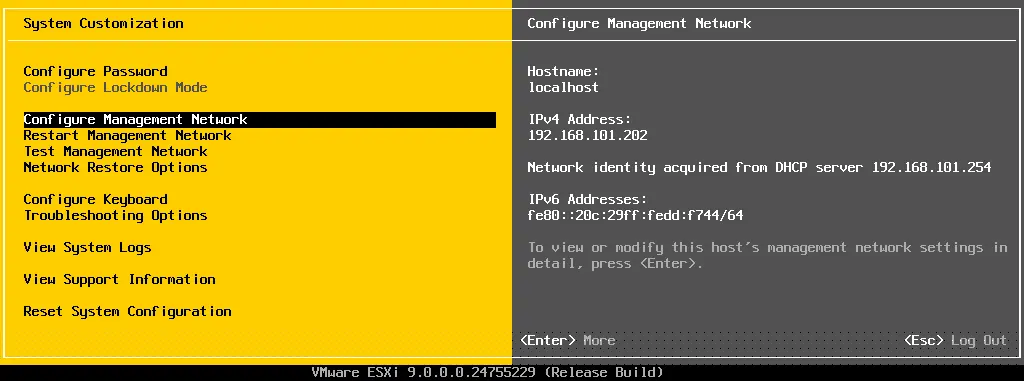
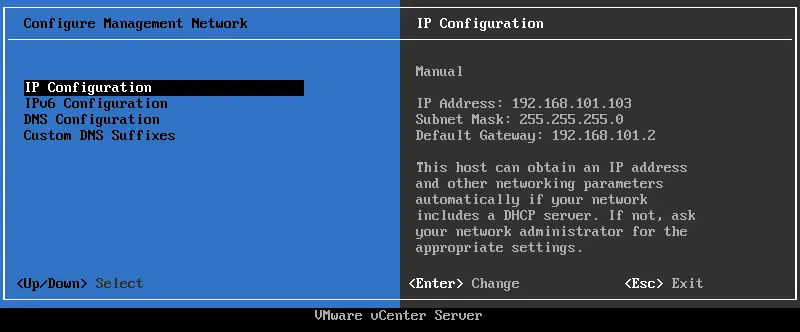
Power on the first VM on which you installed ESXi (ESXi9a) and press F2 to customize the system. As you can see in the screenshot, the virtual DHCP server for the VMnet8 virtual network works properly, and the IP address is obtained automatically (192.168.101.202). However, we recommend that you set IP addresses for servers manually.
- In the System Customization menu, select Configure Management Network and press Enter.
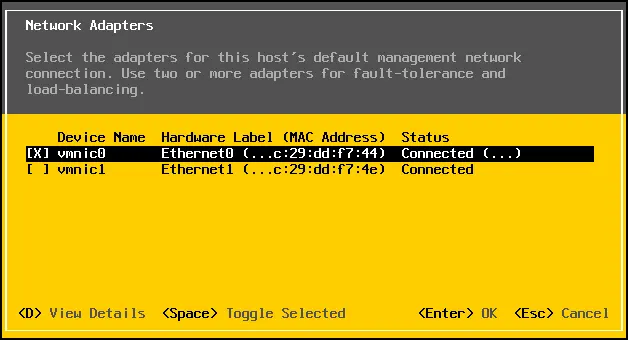
- In the Configure Management Network menu, select the Network Adapters option.

- You can see the second network adapter you have recently added to the VM. It is better to enable the second adapter later in the web interface. Press Esc to return to the Configure Management Network menu.
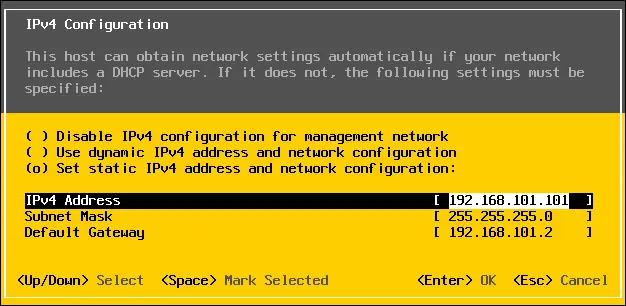
- In the Configure Management Network menu, select IPv4 Configuration. In this menu, select Set static IPv4 address and network configuration.
- IPv4 address: 192.168.101.101
- Subnet Mask: 255.255.255.0
- Default Gateway: 192.168.101.2
- Press Enter to apply the changes (you may need to reboot the host).
NOTE: You can configure the IP settings for the second network adapter later on when preparing to set up shared storage. Disable IPv6 if you are not going to use this network type.
- Restart your ESXi VM after configuring the network settings to apply the changes.
You can change the hostname in System Customization > Configure Management Network > DNS Configuration. In the current example, ESXi01 is the name of the first virtual ESXi host for the ESXi home lab (the default host name is localhost).
Configuring access for remote management
Now, go to the System Customization menu, enter Troubleshooting Options then enable ESXi Shell and SSH. Enabling these options allows you to manage the ESXi host with a local console or remotely via SSH.
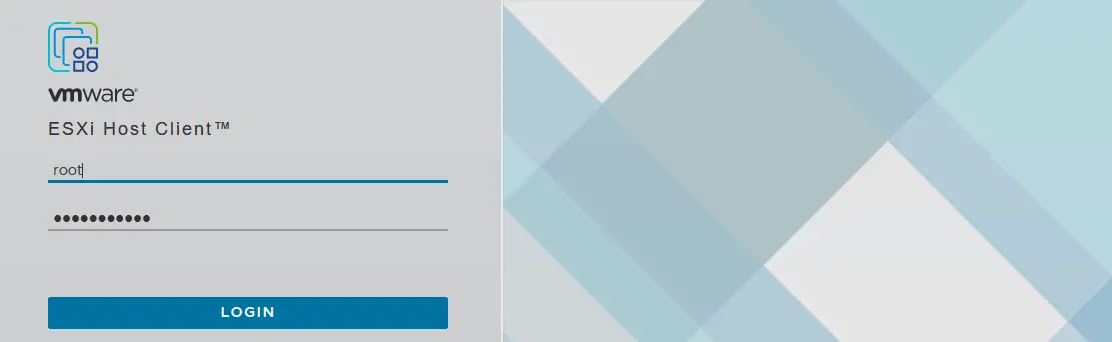
Open your web browser and enter https://192.168.101.101 in the address bar. Confirm the security exception and you will see the login page of VMware Host Client, with which you can manage your ESXi host. Enter the username and password you have specified during ESXi installation.
Creating a new datastore
After logging in, VMware asks if you want to help improve the VMware Host Client. Tick the checkbox if you want and click OK. Let’s create a new datastore that will utilize the second 40 GB virtual disk. This type of datastore is referred to as directly attached storage (DAS). To create a new datastore, select Storage in the Navigator (located in the left pane), then click the New Datastore button.
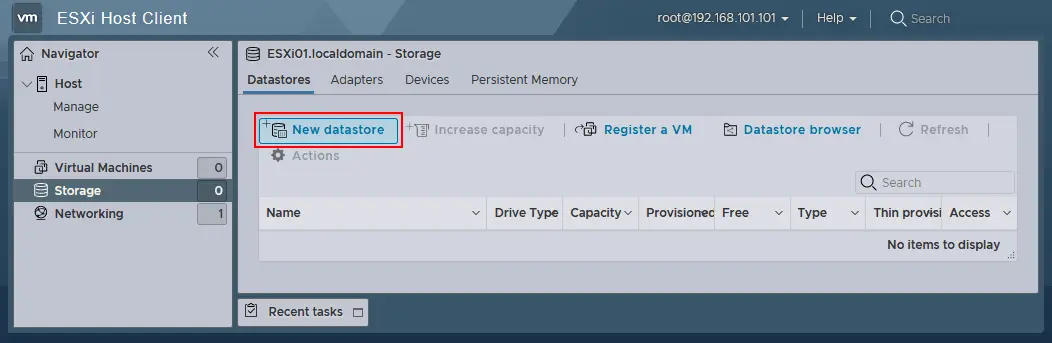
The New datastore wizard opens.
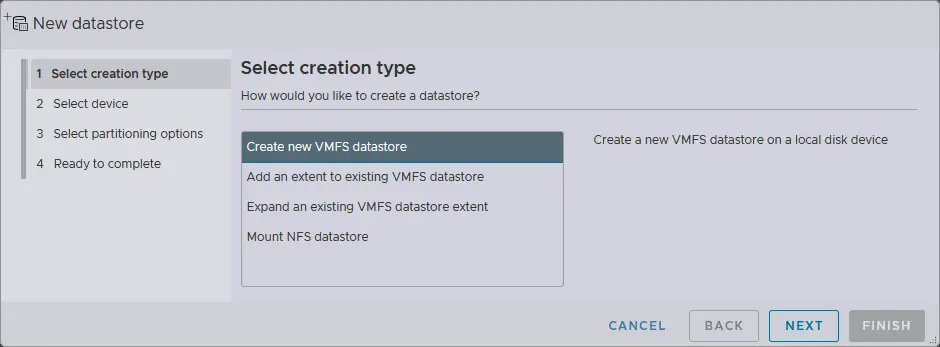
- Select creation type. On this screen, select how you would like to create a datastore. Click Create new VMFS datastore.
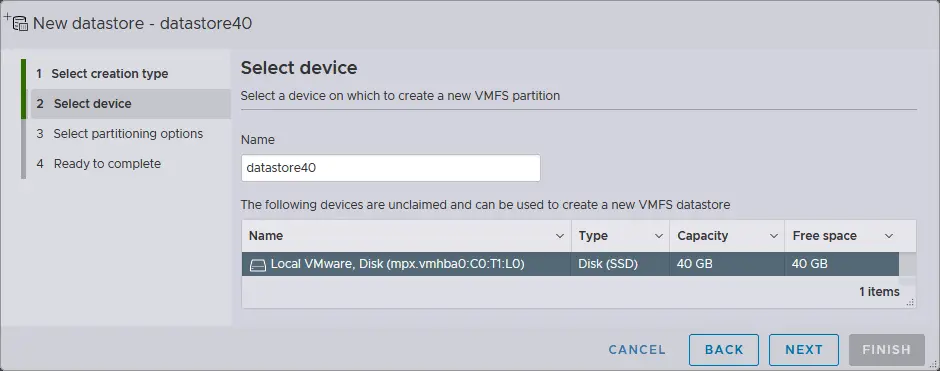
- Select device. At this step, select the device on which you would like to create a new VMFS partition. The 40 GB virtual disk is selected for this purpose. Enter the name of the datastore, for example, datastore40.
- Select partitioning options – Use full disk and VMFS6.
- Ready to complete. Review the datastore configuration summary and select Finish to complete the datastore creation.
The datastore has now been created.
Configuring the network used for shared storage
As you recall, a second NIC (Network Interface Controller) was created for the ESXi VM, but it was not configured. Now it’s time to configure the second network interface that will be used by the ESXi host to connect to the shared network-attached storage.
To establish this connectivity, you must create a new virtual switch and a new VMkernel NIC. A VMkernel NIC is used for connecting ESXi to a specified network by using the vSwitch to which this VMkernel NIC is connected. Read the blog post about VMware vSwitch to learn more.
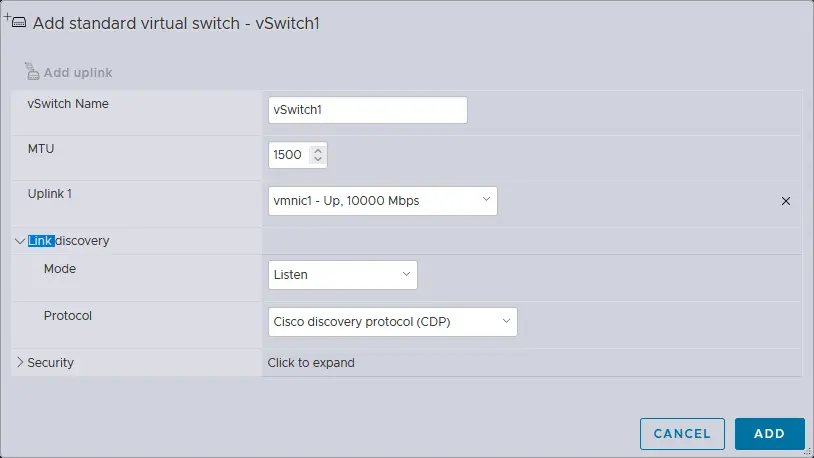
- Open VMware Host Client and go to Networking > Virtual switches. Then choose Add standard virtual switch. Note that a vSwitch0 is created automatically when ESXi is installed.
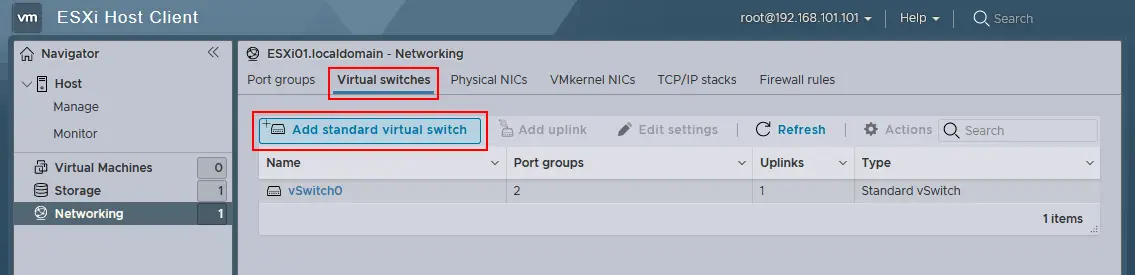
- The Add standard virtual switch window appears. Enter the vSwitch name (for example, vSwitch1). Select vmnic1 in the drop-down menu as Uplink 1. Edit other settings if needed and then click the Add button.
- After creating a new vSwitch, go to Networking > VMkernel NICs > Add VMkernel NIC to create a new VMkernel network adapter.
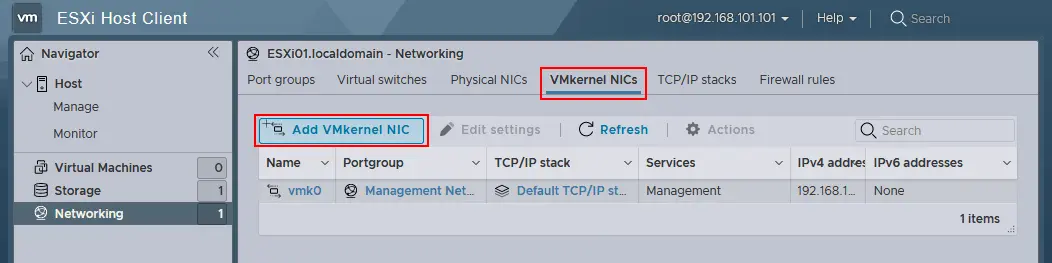
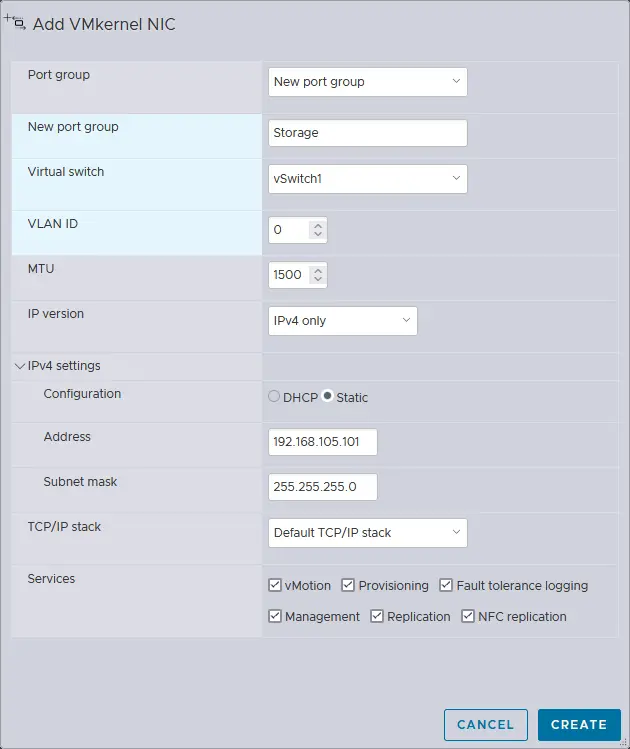
- Define the following parameters in the Add VMkernel NIC window.
- Port group: New port group
- New port group: Storage
- Virtual switch: vSwitch1
- IPv4 Configuration: Static
- Address: 192.168.105.101
- Subnet mask: 255.255.255.0
- Select the checkboxes near the services you want to allow for this VMkernel NIC. You can set the MTU (maximum transmission unit) to 9000 bytes to use Jumbo frames in a storage network.
Click the Create button.
Now you can ping the IP address of the VMkernel (192.168.105.101) from your host on which VMware Workstation is installed. The first ESXi host is configured. Power on your second VM on which the ESXi server is installed (this VM has been cloned recently) and configure your second ESXi host the same way you configured your first ESXi host, apart from the hostname and IP addresses.
The following network parameters are used for the second ESXi in this example.
- 1st network adapter (NAT network): IP address 192.168.101.102, mask 255.255.255.0, gateway 192.168.101.2.
- 2nd network adapter (Host-only network): IP address 192.168.105.102, mask 255.255.255.0.
- Hostname: ESXi02.
Deploying vCenter Server
After configuring two VMs as ESXi hosts, you are ready to deploy VMware vCenter Server to manage your ESXi home lab. Download vCenter Server from VMware’s website. The name of the downloaded file is VMware-VCSA-all-9.0.0.0.24755230.iso in this example.
Open this ISO file or mount it to a virtual CD/DVD drive and copy the VMware-vCenter-Server-Appliance-9.0.0.0.24755230_OVF10.ova from the vcsa directory of the ISO image to a custom directory on your physical machine (vCenter Server appliance is a partially configured distribution built on a Linux basis that is called Photon OS).
Deploying the OVA template
- In the graphical user interface of VMware Workstation, click File > Open and select the extracted VMware-vCenter-Server-Appliance-9.0.0.0.24755230_OVF10.ova file.
NOTE: In a real deployment scenario (not a virtualized lab), vCenter Server Appliance is deployed as a VM on an ESXi host. The installation principle is similar.
- A pop-up window with EULA (End User License Agreement) is displayed (the OVA import wizard opens). Tick the “I accept the terms of the license agreement” checkbox.
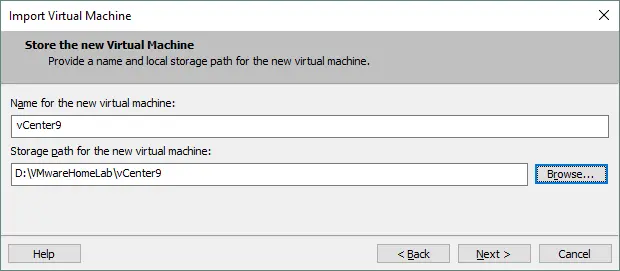
- Create the D:VMware Home LabvCenter9 directory on the computer running VMware Workstation and define this directory as the storage path for the new virtual machine. Enter the name of the new VM (for example, vCenter9).
- Provide a name and storage path for the new virtual machine. The given VM name is vCenter9 and the VM location is the same as the location of previously created VMs – D:VMware Home LabvCenter9.
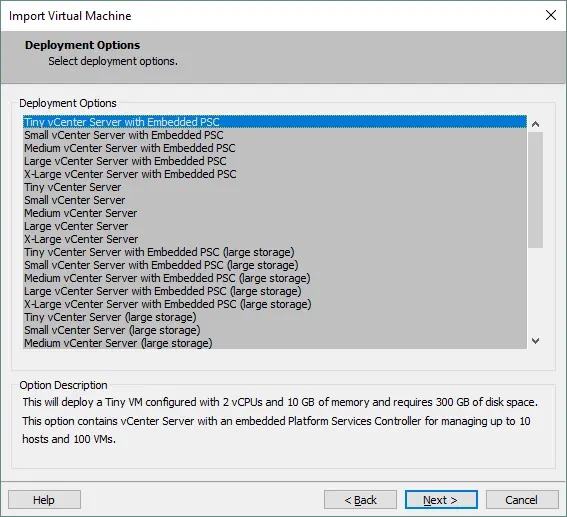
- Select deployment options. At this step, select the Tiny vCenter Server with Embedded PSC option, which is enough for a small ESXi home lab.
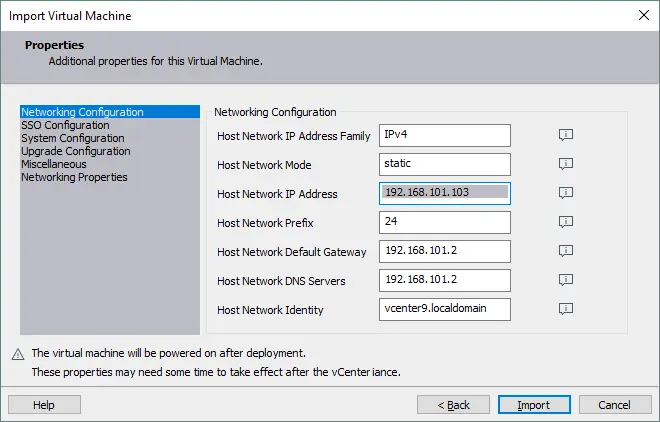
- Set the additional properties for this virtual machine. This screen contains multiple menu entries that must be configured. After configuring one menu entry, click another string to configure the remaining parameters. Drag your mouse over the “i” icon on the right side of the window for useful tips.
- Networking Configuration.
- Host Network IP address Family: IPv4
- Host Network Mode: static
- Host network IP address: 192.168.101.103
- Host Network Prefix: 24. In binary format, the /24 mask is 11111111.11111111.11111111.00000000 (24 ones) which is the same as 255.255.255.0 in decimal format.
- Host Network Default Gateway: 192.168.101.2
- Host Network DNS Servers: 192.168.101.2
- Host Network Identity: vcenter9.localdomain (enter the FQDN – fully qualified domain name).
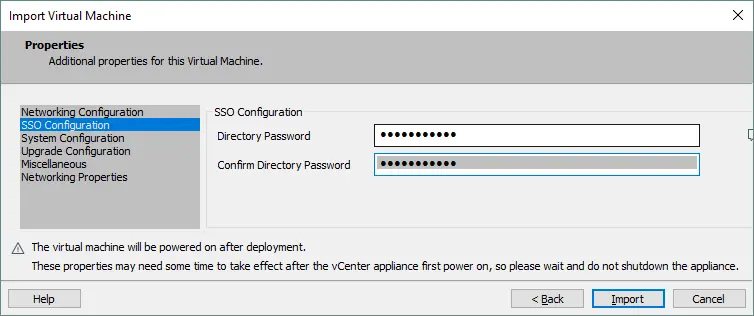
- SSO Configuration. Enter and confirm the password for Single Sign-On.
- System Configuration. Enter and confirm the root password. It will be used for console login.
- Upgrade Configuration. You should configure the parameters of this sub-menu if you want to upgrade the existing VMware vCenter Server. Skip configuring this category of parameters if you deploy a new vCenter instance.
- Miscellaneous. You can skip configuring this category of parameters.
- Networking Properties. Enter the domain name (the same one used by the ESXi host you have deployed). In the current example, the default localdomain name is used.
- Networking Configuration.
- Press Import to start deploying the vCenter VM from the OVA template. After deployment is complete, the VM starts automatically.
- The static IP configuration has already been set up using the OVA deployment wizard. You can check the IP configuration in vCenter DCUI to make sure that network settings are configured correctly inside the VM.
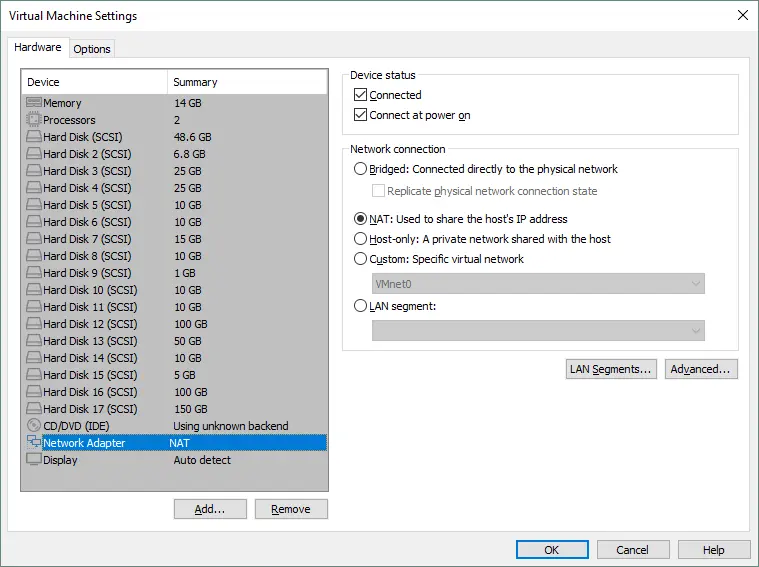
By default, the virtual network adapter of the VM running vCenter can connect to a network that is distinct from your NAT network (for example, your vCenter VM can connect to a VMnet0 Bridged network that is not used by any of your VMs). Check the network settings.
In the VMware Workstation interface, click VM > Settings. In the Hardware tab, select your network adapter and NAT (similar to how you had configured the first and second VMs running ESXi). Then, open the console on your physical machine and ping your vCenter Server IP address (ping 192.168.101.103) to make sure that the network is functioning properly for your VM running vCenter.
Finishing vCenter Deployment
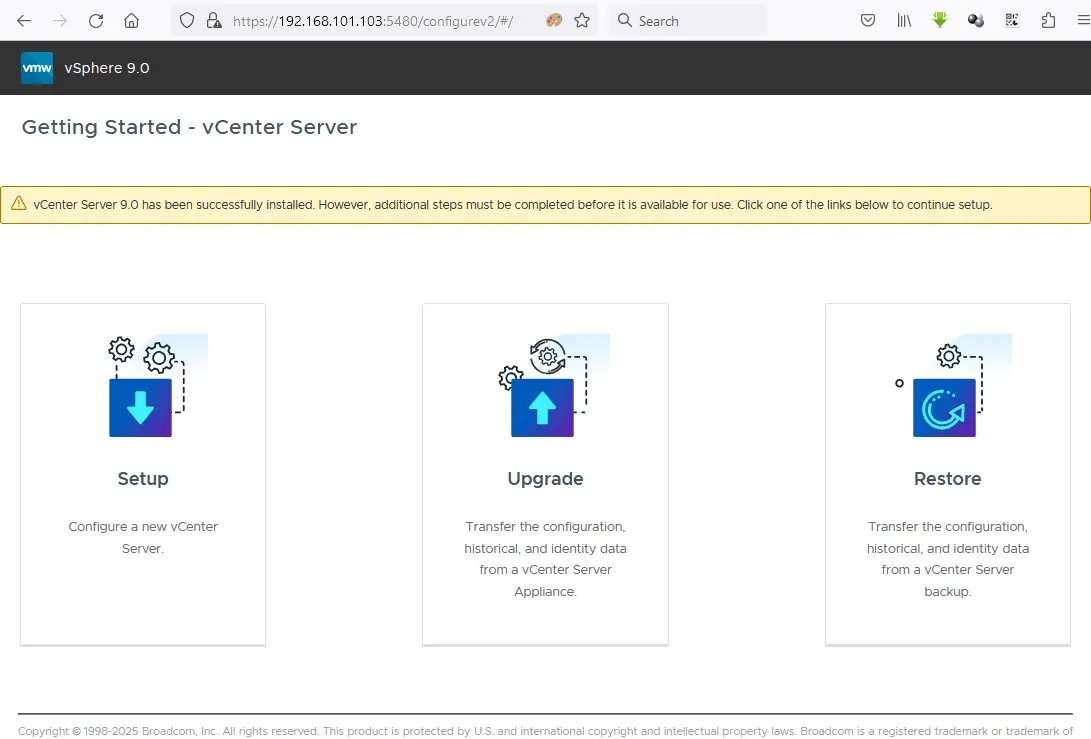
Now that you have deployed your vCenter Server, you should complete the remaining VCSA (vCenter Server Appliance) configuration for your ESXi home lab. Make sure that your VMs running vCenter and ESXi hosts are functioning. Enter the IP address of your vCenter Server in the address bar of the browser (https://192.168.101.103:5480 in this case) to continue configuring vCenter. You can enter a domain name (FQDN) instead of the IP address.
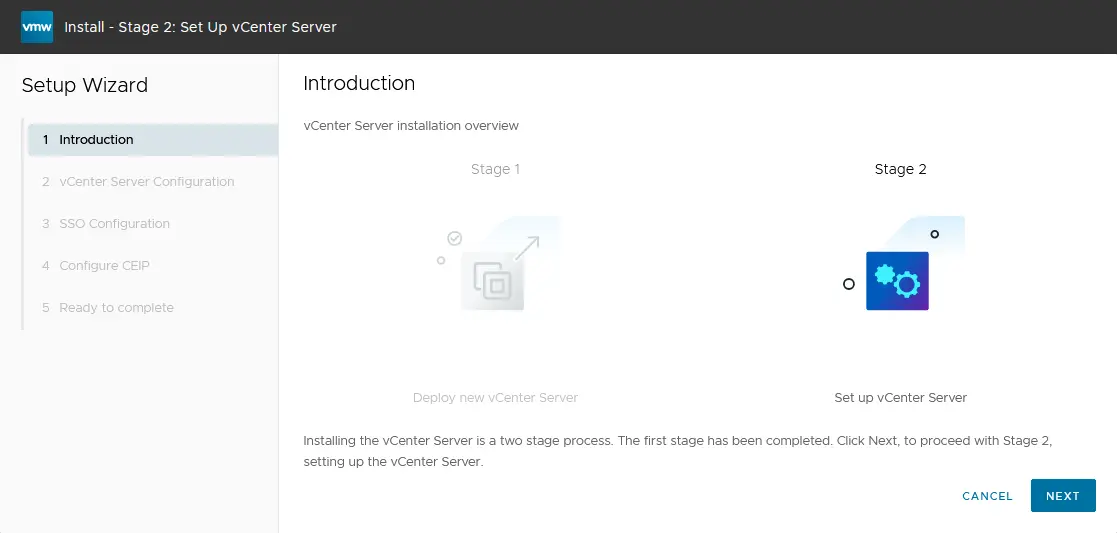
On the Getting Started screen, click the Setup icon to configure this appliance as a new vCenter Server. Then, the Stage 2 installation wizard opens.
- Introduction. Click Next at each step to continue.
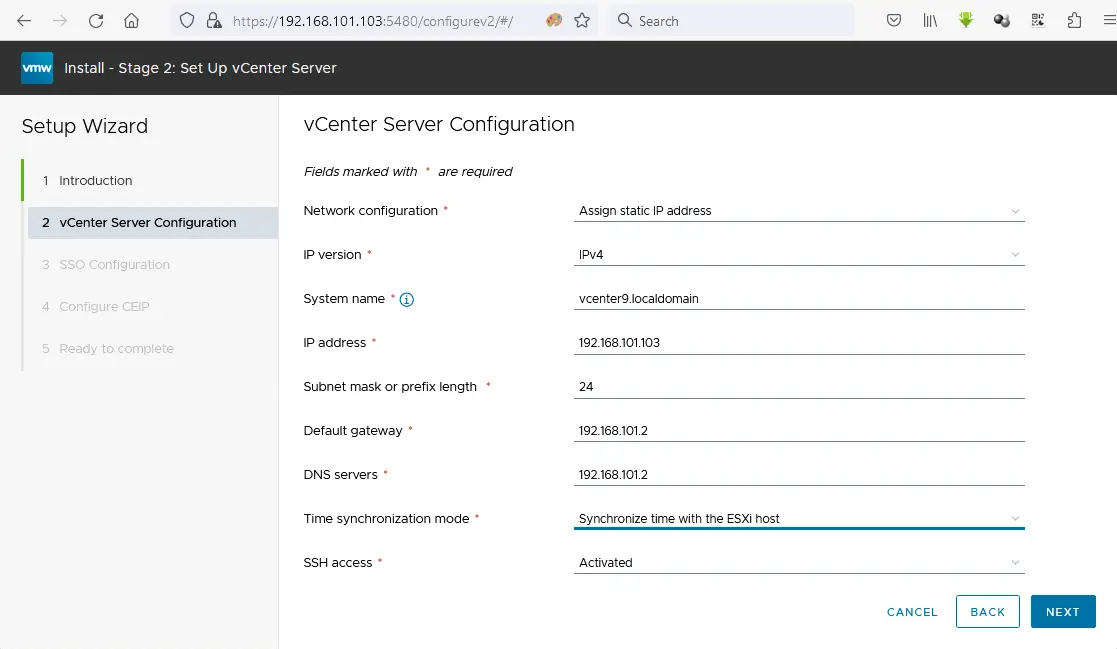
- Appliance configuration. Set the network configuration (see the screenshot below). You can see the network configuration you have set while deploying the OVA template. Edit the settings if necessary.
- Network configuration: Assign static IP address
- IP version: IPv4
- System name: vcenter9.localdomain
- IP address: 192.168.101.103
- Subnet mask or prefix length: 255.255.255.0
- Default gateway: 192.168.101.2
- DNS servers: 192.168.101.2
- Time synchronization mode: Synchronize time with the ESXi host
- SSH access: Activated
If an endless loop occurs and the installation is stuck, try entering the IP address instead of the FQDN in the system name line. However, it is better to make resolving hostnames work.
- SSO configuration. Click Create a new SSO domain. You can use the default vsphere.local domain name. Set the Single Sign-On password for administrator and confirm it.
- Configure CEIP. Tick the checkbox if you want to join the VMware Customer Experience Program.
- Ready to complete. Review your settings and click Finish to finalize the deployment of vCenter. Check the progress bar and wait until the installation process finishes.
NOTE: During vCenter installation, issues may occur. Discover some of the most common errors you may encounter and how to resolve them.
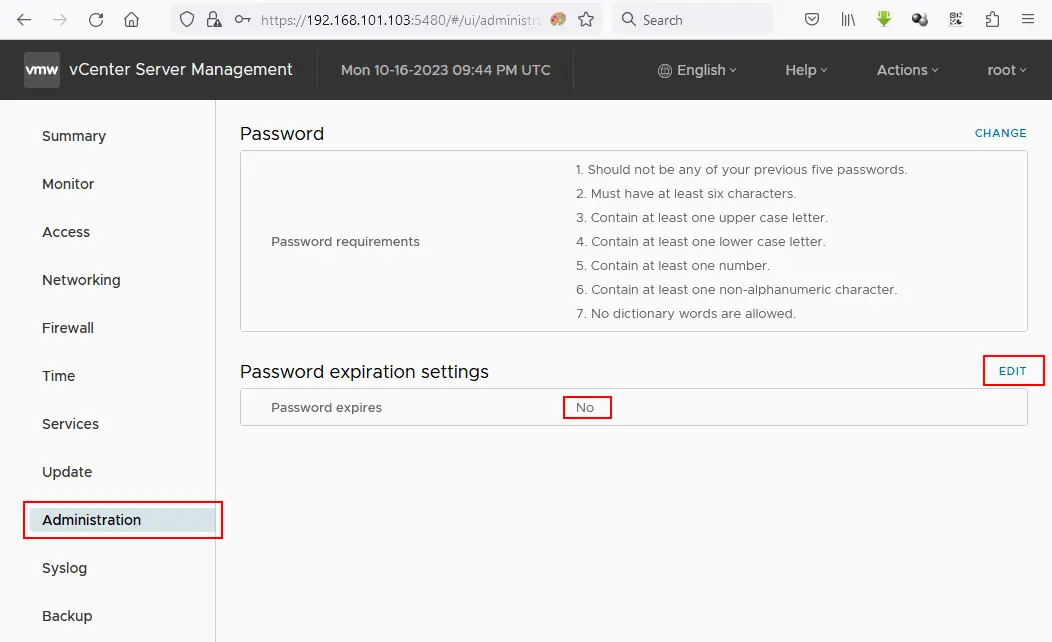
Password expiration
Set the root password expiration date for vCenter Server Management. We set the password not to expire. If you forget to change the password or edit this setting before the password expires, you may encounter issues when logging in to the vCenter Server Management web interface and attempting to change the expired password.
To set the expiration date:
- Open the vCenter Server Management web interface. We open 192.168.101.103:5480 in a web browser.
- Go to Administration and in the Password expiration settings section, click Edit.
- Click No in the Password expiration settings and click Save.
Centralized vSphere management with vCenter
Now, you can log in to vCenter with VMware vSphere Client. Enter the IP address (or the domain name) of your vCenter Server into the address bar of your web browser (https://192.168.101.103 in this case). The introduction web page loads; click the option: Launch vSphere Client (HTML5).
Let’s use the HTML5 vSphere Client. On the VMware Single Sign-On page, enter the username (administrator@vsphere.local) and the password you have previously specified.
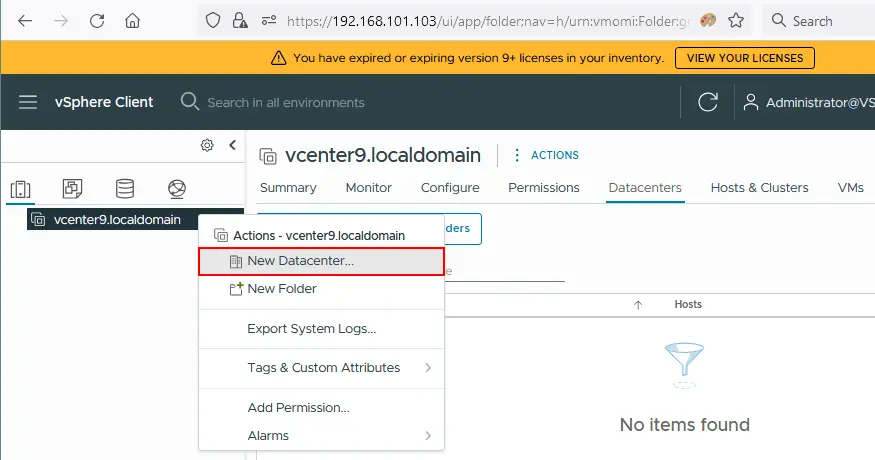
Create a new datacenter
Once logged in to VMware vSphere Client, you will see nothing in the vCenter inventory. First, add a new datacenter that serves as a logical container (directory) for your hosts and clusters.
- To add a new datacenter, click Actions > New Datacenter.
- Enter the datacenter name (for example, Datacenter1).
Adding ESXi hosts to the inventory
Add your first ESXi host to the datacenter. Right-click your datacenter name and click Add Host in the context menu. Your VM running ESXi must be powered on.
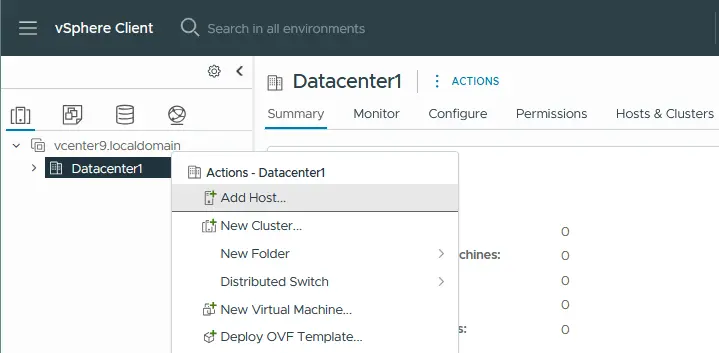
The Add Host wizard opens.
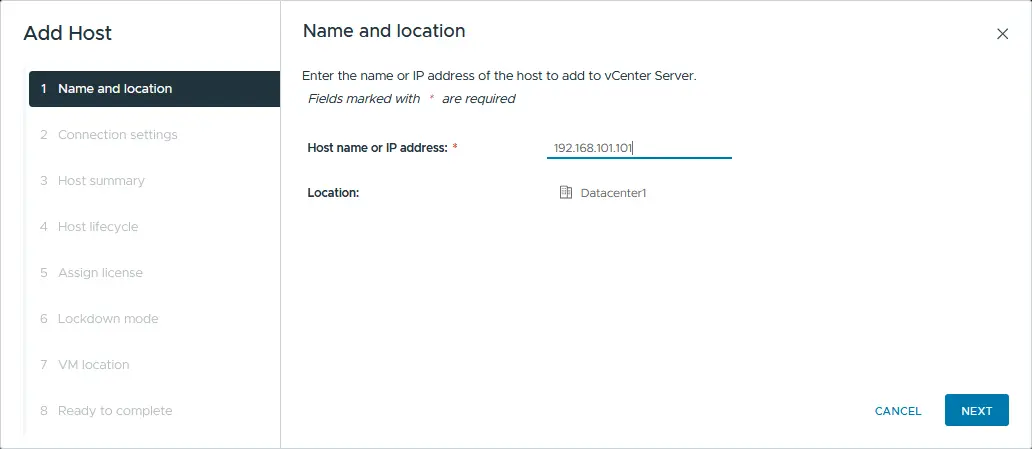
- Name and location. Enter the IP address of the ESXi host you want to add. In our example, the IP address of the added host is 192.168.101.101.
- Connection settings. Select the username and password you have specified during ESXi installation (the root user is used here). Hit Yes if a certificate security alert is displayed.
- Host summary. Review the summary of the host and click Next.
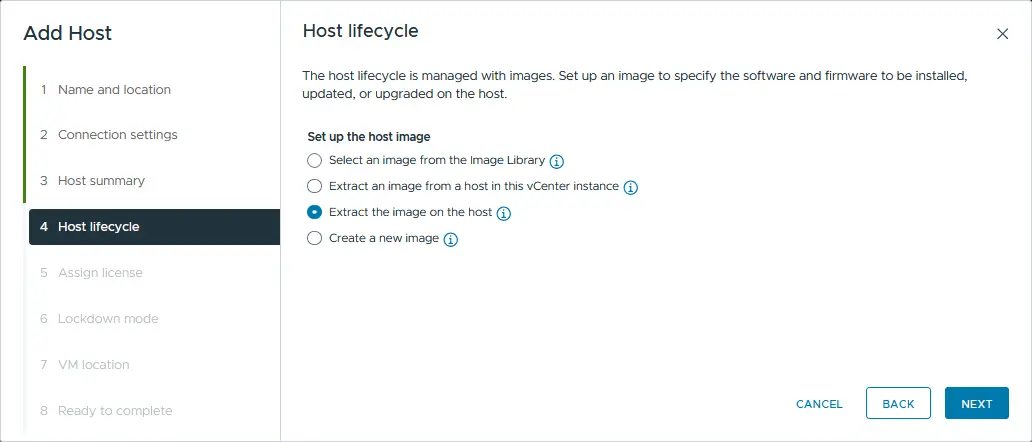
- Host lifecycle. You can only VMware vSphere Lifecycle Manager images when updating ESXi hosts in vSphere 9.0. The classic method of using baselines for patching hosts is no longer supported. All hosts and clusters must now be managed using the image-based lifecycle workflow for updates. Select one of the host lifecycle options, for example, Extract image on the host.
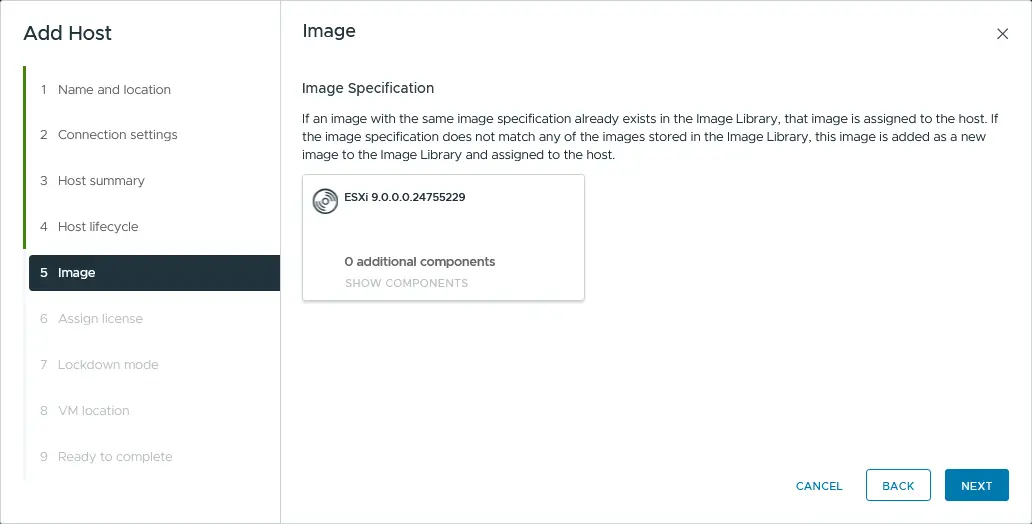
Check the image and click Next.
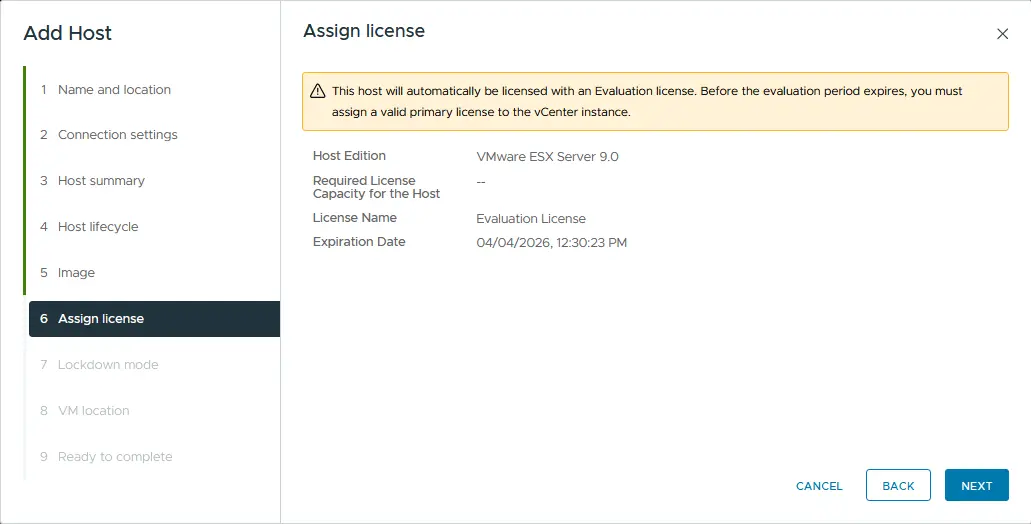
- Assign the license. In the ESXi home lab in this blog post, the 60-day evaluation license is used for all VMware vSphere products. Hence, you don’t need to change anything on this screen.
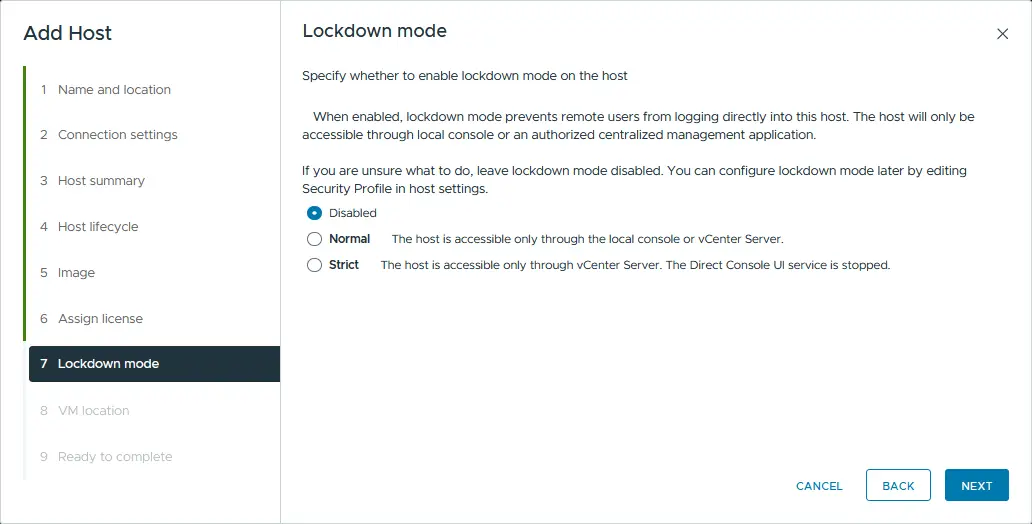
- Lockdown Mode. Select the Disabled option to be able to manage the ESXi host without vCenter Server.
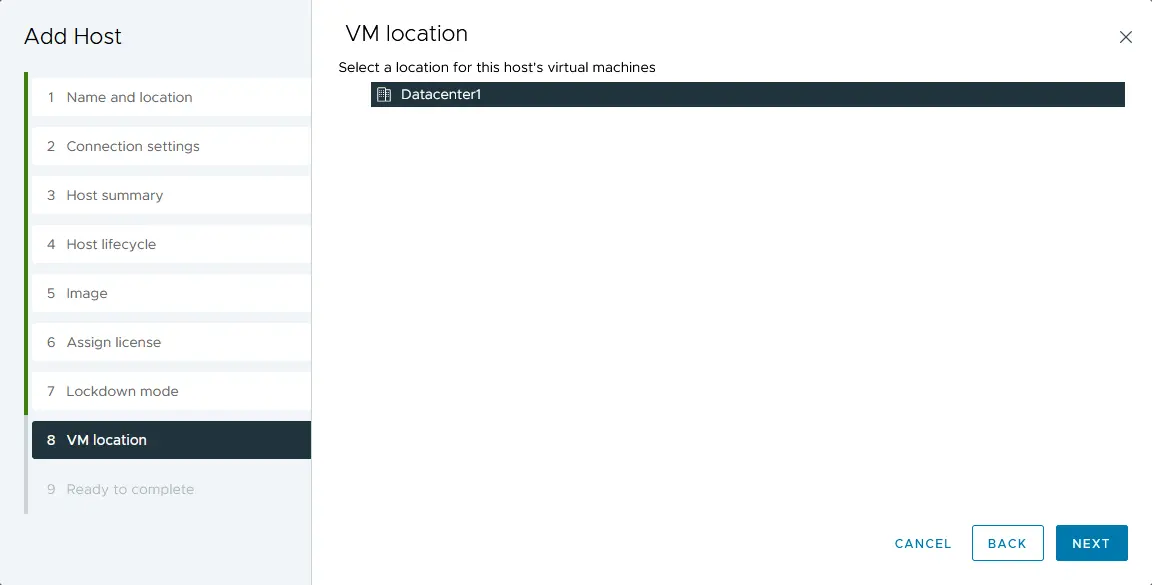
- VM location. Select the datacenter where your VMs will be stored after creation. As there is only one datacenter at this moment, you should not make any changes on this screen.
- Ready to complete. Check the configuration summary and click Finish to add the host.
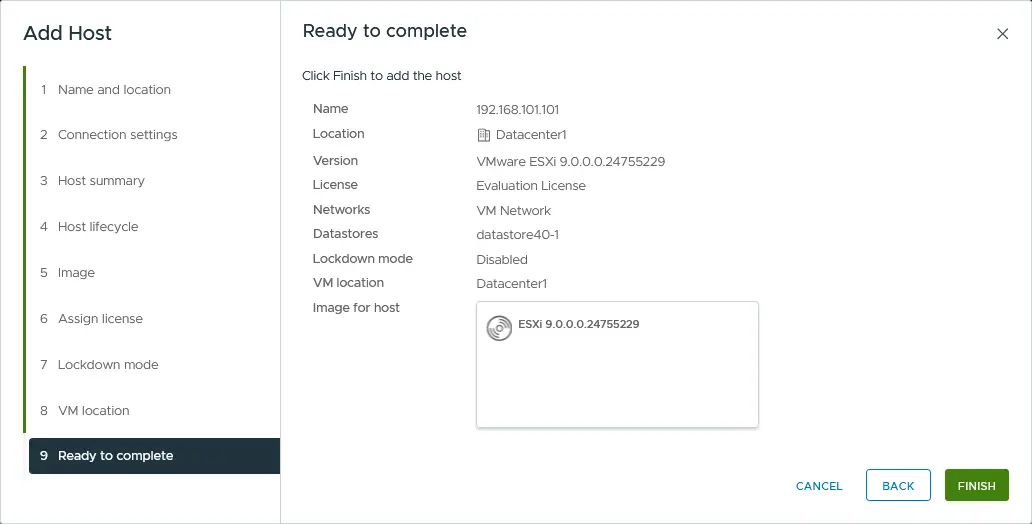
Wait for a few seconds until your ESXi host is connected to vCenter Server. ESXi01 is now added to the vCenter Server inventory. Repeat these steps and add the second ESXi host (ESXi02) to your vCenter.
Let’s create a new virtual machine on the virtual ESXi host for the VMware home lab. This will be a nested VM.
NOTE: There are three methods for creating a new VM:
- In vCenter by using VMware vSphere Client
- Using VMware Host client (creating a new VM by using standalone ESXi host managing tools)
- By connecting to a vCenter or ESXi host in the interface of VMware Workstation
Deploying a Nested VM on a Virtual ESXi Host
Insert the ISO installation image of the operating system you want to install on your virtual ESXi host into the virtual CD/DVD drive of the VM running ESXi. In this example, the Lubuntu 24.04 64-bit installer can be used because this Ubuntu-based Linux distribution is lightweight (this is important when your VMware home lab hardware resources are limited).
To insert the installation ISO image into a virtual optical drive:
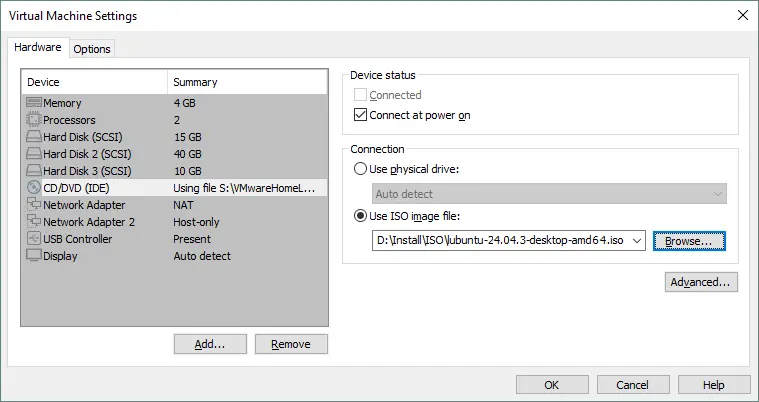
- Select your VM running ESXi (ESXi9a in this case), and click VM > Settings in the VMware Workstation interface.
- In the Virtual Machine Settings window, select CD/DVD, select the Use ISO image file option and select the ISO bootable installation image (click Browse to navigate your file system).
When the ISO installation media is inserted into the optical drive of your virtual ESXi host, open VMware vSphere Client and select your ESXi host in the vCenter inventory. Right-click the ESXi host and, in the Actions menu, click New Virtual Machine.
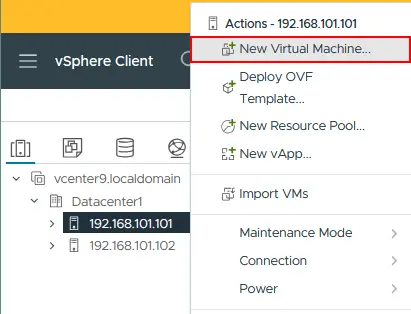
The New Virtual Machine Wizard opens:
- Select a creation type. Choose Create a new virtual machine.
- Select a name and folder. Enter your virtual machine name (for example, Lubuntu) and select your datacenter (Datacenter1 is the only datacenter available at this moment in this example).
- Select a compute resource. Select your first ESXi host (ESXi01 with the IP address 192.168.101.101 is selected in this example).
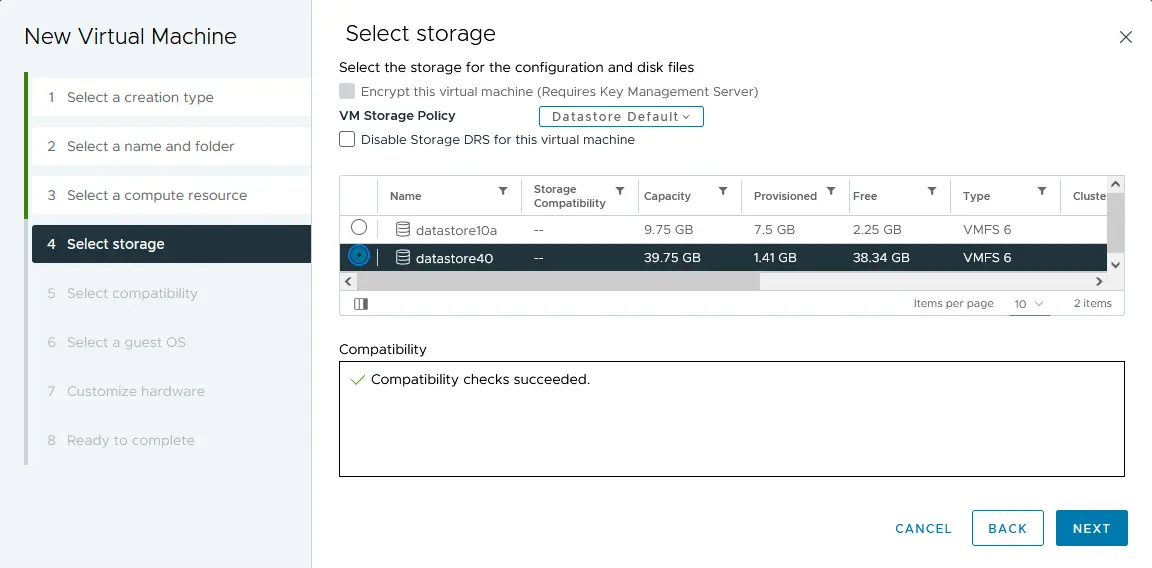
- Select storage. Select the datastore you have created when configuring the ESXi host. In this case, datastore40 is selected.
- Select compatibility. If you have ESXi hosts with versions older than 9.0 (8.0, 7.0, 6.7, 6.5, etc.), you should select the compatibility with the oldest version of ESXi present in your virtual environment. Let’s choose ESXi 7.0 and later compatibility for this example.
- Select a guest OS. As Lubuntu 24 64-bit is used as the guest OS for the deployed VM, the Guest OS family must be Linux and the Guest OS version must be Ubuntu Linux (64-bit).
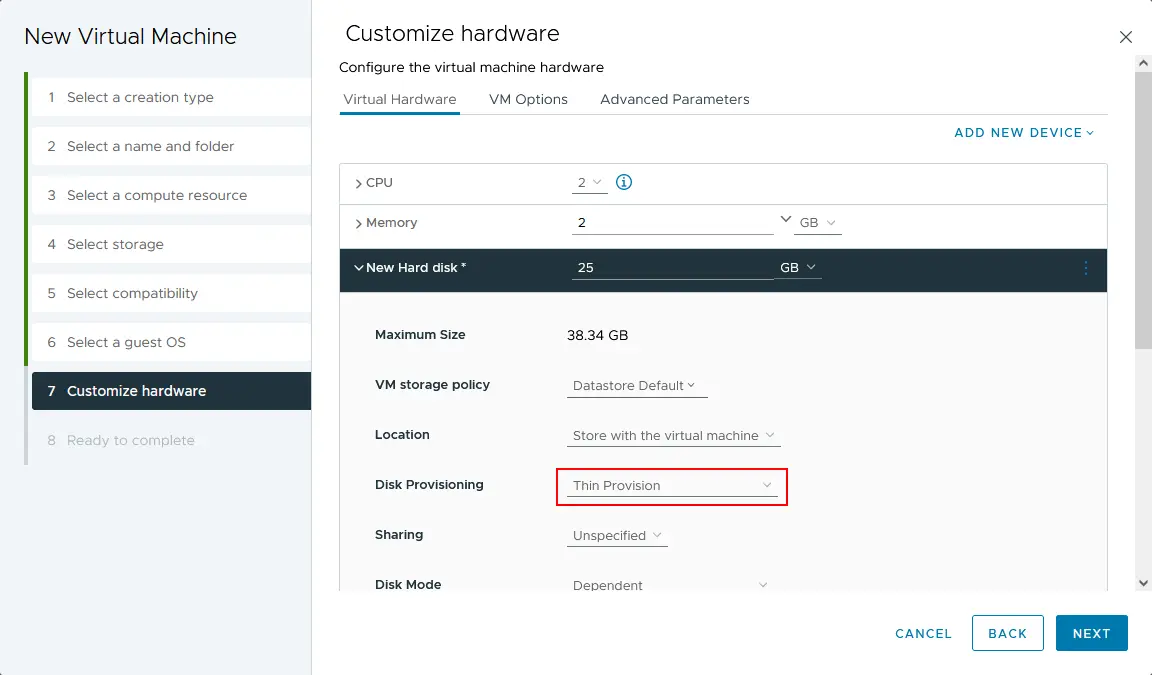
- Customize hardware. This step includes several settings. Edit the settings as follows:
- CPU: 1
- Memory: 2 GB
- New Hard Disk: 25 GB, Thin Provision (click your new hard disk to expand the list of settings).
- New CD/DVD Drive: Host Device, Connect at power on.
- Ready to complete. Verify your new VM configuration and click Finish.
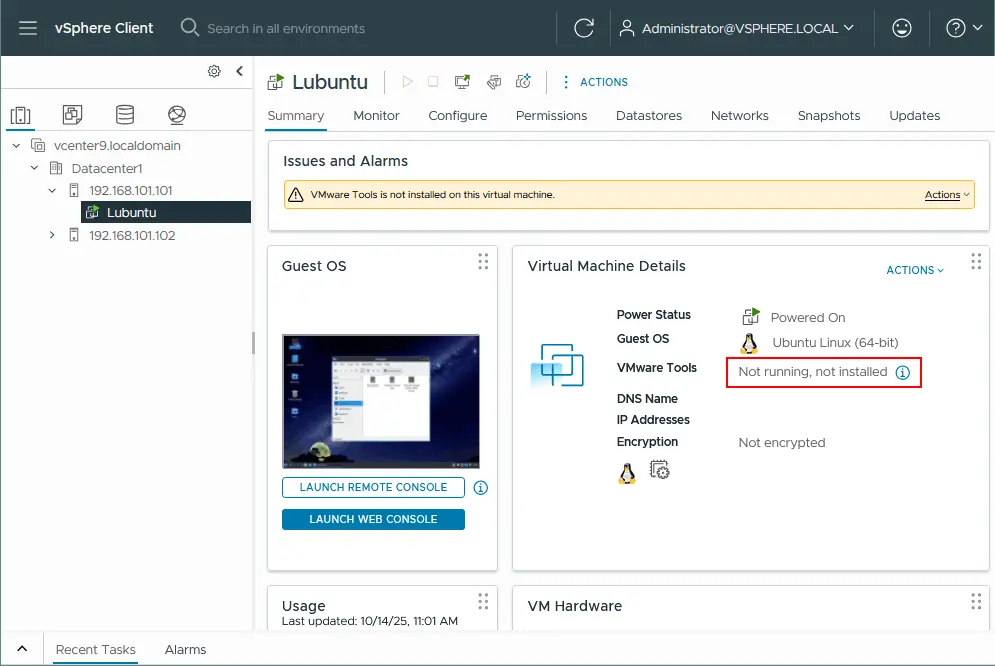
Your VM has been created. To install a guest OS, select and start the VM (Actions > Power > Power On). Select Launch Web Console to see the image displayed by the “virtual monitor” connected to the VM. Install Lubuntu Linux on the VM as usual. After installing Linux, install VMware Tools on your guest OS. Open Terminal and verify if your Linux has internet access with the following commands:
ifconfig
ping www.vmware.com
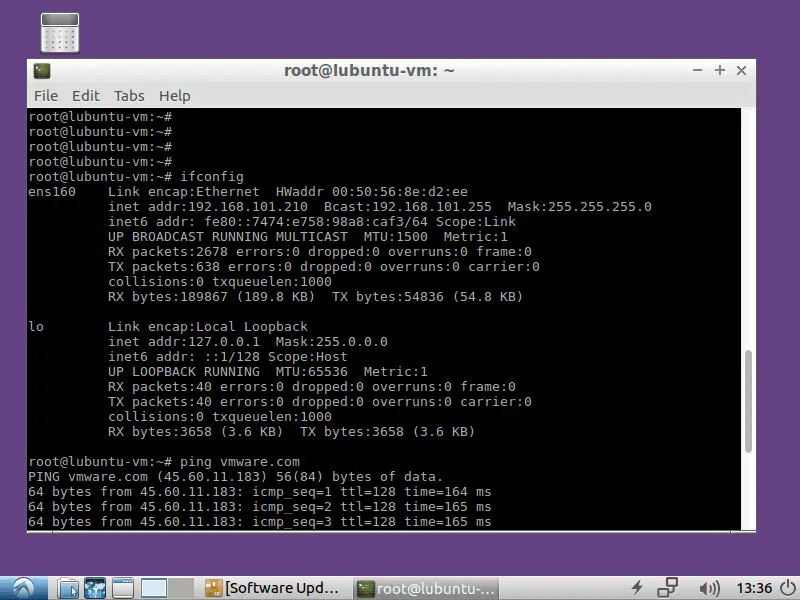
We can see that the virtual network adapter that obtained the IP address via DHCP and the internet connection work properly for this nested VM running in the VMware ESXi lab. Install VMware Tools from online repositories by using the commands below.
For Linux with a command line interface only:
apt-get install open-vm-tools
To install VMware Tools on Linux with the GUI:
apt-get install open-vm-tools-desktop
The command must be executed with root privileges. Answer the questions provided by the console wizard of the VMware Tools installer to complete the installation. Sometimes, you need to reboot the VM after installing VMware Tools. Refresh the web page of the VMware vSphere client in your browser, and you should see the VMware Tools version and running status.
NOTE: In addition to the Web Console, you can connect to the VM with VMware Workstation. The advantage of using VMware Workstation is that you can set a higher resolution to be displayed by the VM running on an ESXi host remotely (the maximum resolution displayed in the Web Console of VMware vSphere Client is 1152 X 864). To connect to a remote VM running on an ESXi host, you should connect to the ESXi server or vCenter that manages that particular ESXi server by clicking File > Connect to server in the interface of VMware Workstation.
Now, most of the components of the VMware home lab are configured:
- Virtual networks
- ESXi01
- ESXi02
- vCenter
- A guest Linux VM (a nested VM) running on ESXi01.
NOTE: You can check how to migrate a VM from one ESXi host to another by using vCenter Server.
Connecting Shared iSCSI Storage to an ESXi Host
Connecting shared iSCSI storage is the final stage of the VMware lab setup for home. iSCSI protocol provides block-level access to the shared storage by carrying SCSI instructions over a TCP/IP network. An ESXi host can access data at the block level, similarly to how it accesses directly attached storage. The iSCSI protocol is widely used because it’s affordable (many NAS devices support iSCSI) and easy to set up when compared with Fibre Channel SAN systems. You can attach the iSCSI datastore to an ESXi host when directly attached storage is full or when you need to deploy a cluster.
Installing TrueNAS
At this stage, you need to install TrueNAS Core (previously known as FreeNAS) on a VM and use it to create an iSCSI target, which you should connect as a shared datastore to the ESXi host. Check this blog to learn how to install and set up TrueNAS when building a VMware Home Lab.
Adding a new iSCSI datastore to an ESXi host
- Open VMware Host Client and log in to one of your ESXi hosts running on VMs (for example, ESXi02 – https://192.168.101.102). Enter the IP address of your ESXi host in the address bar of your web browser.
- In the Navigator pane, go to Storage, then click the Adapters tab in the main part of the window. You should see the existing storage adapters (disk controllers).
First, you need to add a software iSCSI adapter.
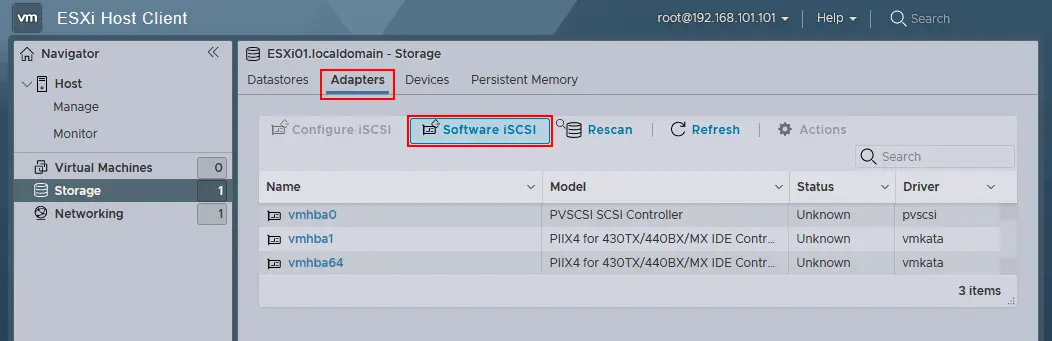
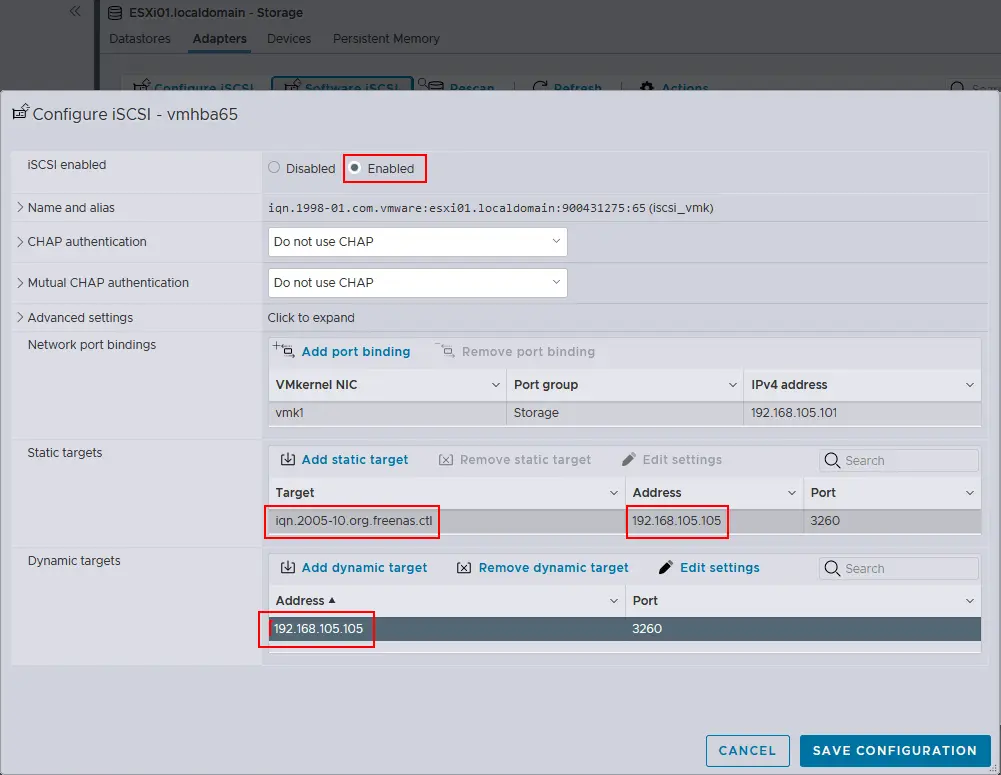
- Click Software iSCSI in the Adapters tab. In the configure iSCSI window, set the following parameters:
- iSCSI enabled: Enabled
- Static targets. Target: iqn.2005-10.org.freenas.ctl (the name you memorized after configuring the iSCSI Target in FreeNAS). Address: 192.168.105.105 (the IP address of your FreeNAS machine). Port 3260 (a default TCP port number used for iSCSI connection).
- Dynamic targets. Address 192.168.105.105. Port 3260.
Click Add port binding, select vmk1 – the network adapter for accessing shared storage, and enter the IP address of this network adapter (192.168.105.101 for ESXi01 in this case).
Click Save configuration to create a new iSCSI adapter.
NOTE: As you recall, in the section about configuring ESXi hosts (at the beginning of this blog post), the host-only network 192.168.105.0/24 was configured for each ESXi, especially for connecting to shared storage.
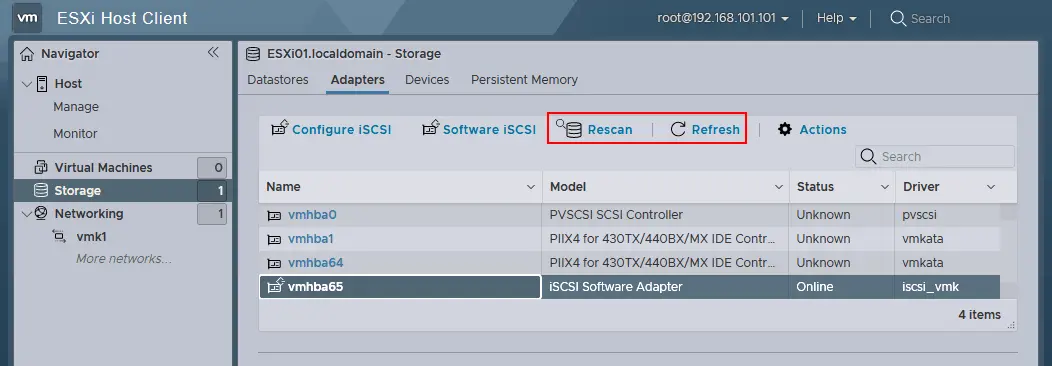
- In the Adapters tab, click Rescan and Refresh. After that, you will see the new iSCSI software adapter that you created earlier.
Now let’s add a shared iSCSI datastore to your ESXi host. Open the Datastores tab and click New datastore (similar to how you added a local 40 GB datastore to your ESXi hosts). The wizard window appears.
- Select creation type. Click Create a new VMFS datastore.
- Select device. Select the device on which to create a new VMFS partition. Enter a name, for example, datastore-iscsi. Select your TrueNAS iSCSI Disk from the list of unclaimed devices. Then click Next.
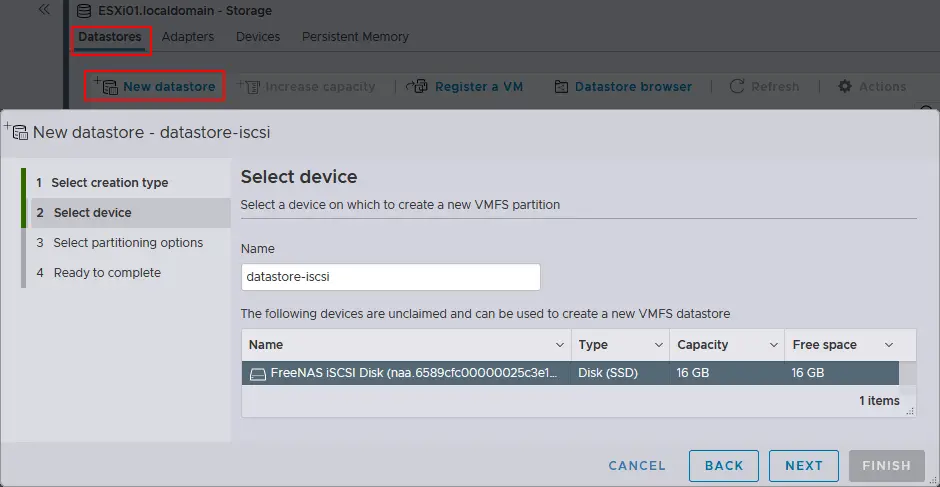
- Select partitioning options. Select the Use full disk option and the VMFS6 file system. Click Next.
- Ready to complete. Check the datastore settings and select Finish to create the datastore.
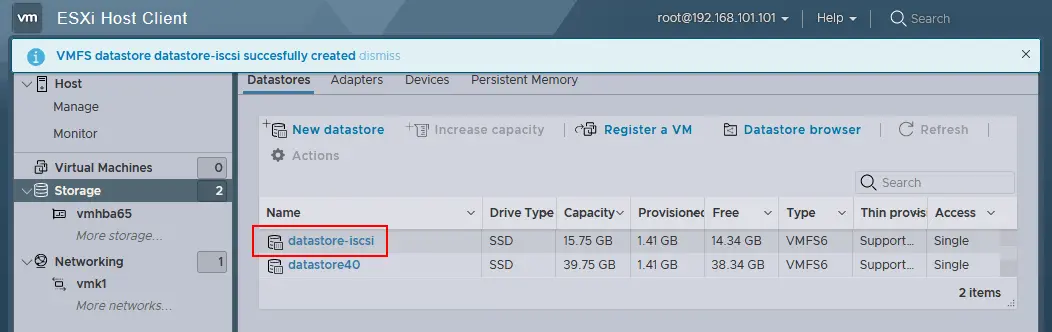
Now, the second ESXi host is configured to use a shared iSCSI datastore. This datastore is displayed in the Datastores tab of the Storage section in the VMware Host Client interface(see the screenshot below). You can use this datastore like you use your directly attached datastore. Make sure that your NAS device on which the iSCSI target is configured (the VM running TrueNAS in this case) is running before powering on ESXi hosts.
Repeat these steps and add the shared datastore that you created on TrueNAS to your other ESXi host. After that, your vSphere configuration will be almost ready to deploy a cluster.
Other Experiments You Can Conduct in Your VMware Home Lab
At this point, you have a fully functional VMware home lab with two ESXi hosts (one of which runs a nested Linux VM), vCenter Server and FreeNAS (used as an iSCSI target).
We didn’t cover all the features and possibilities above, as you can perform many more operations that may be used in a production environment, for example:
- Migrate your nested VM (Lubuntu24 in this case) from directly attached storage to shared storage (datastore40-2 > datastore-iscsi) using Storage vMotion.
- Deploy High Availability (HA) and Distributed Resource Scheduller (DRS) cluster.
- Install VMware PowerCLI to experience all the advantages of scripting and automation that VMware provides.
- Configure VMware vSAN.
- Create VM templates and deploy VMs from these templates.
Conclusion
A VMware Home Lab offers a practical way to deepen your understanding of virtualization and explore advanced configurations at your own pace. With the proper hardware, a clear setup process and tools like VMware Workstation, ESXi and vCenter Server, you can simulate many capabilities of an enterprise environment. This setup allows you to practice deployments, test new features and experiment with scenarios that would be risky or costly elsewhere.