How to Convert VHD to VMDK: A Step-By-Step Guide
VMware vSphere and Microsoft Hyper-V are two of the most popular virtualization platforms. Each solution uses different virtual disk file formats for virtual machines. This means you need to convert virtual disk files when moving VMs between VMware and Hyper-V. For example, you may need to migrate VMs between hypervisors for testing. In other cases, you may need to change the format if you’ve chosen the wrong one when creating the VM.
Hyper-V uses VHD and VHDX for VMs, while VMware uses VMDK. Read this post to learn how to migrate VMs from Hyper-V to a VMware environment by converting a VHD file into a VMDK.
Virtual Disk Formats
VHD refers to the disk image format introduced as the virtual disk format for virtual machines in Connectix Virtual PC. Later, Microsoft acquired Virtual PC and continued to develop this virtualization product. Then, Microsoft presented Hyper-V as an alternative to Microsoft Virtual PC. The main VHD features are:
- The maximum supported size of VHD files is 2 TB (2^32*512 bytes), where 32 bits represent the quantity and 512 bytes represent the sector size.
- VirtualBox also supports the VHD format of virtual disks, which is still used in the Microsoft Azure Cloud.
- Generation 1 Hyper-V VMs can use only virtual disks of the VHD format.
VHDX is the new version of the virtual disk format provided by Microsoft, which is the successor of the VHD format. The VHDX format has a wide range of applications, including virtual disks for Hyper-V virtual machines and Microsoft Cluster Shared Volumes. VHDX is a semi-open file format, and you can download the file format specification from Microsoft’s website to create your own applications that work with VHDX files. The main VHDX features are:
- The maximum disk capacity is 64 TB, compared to the 2 TB limit for VHD.
- Supports 4-KB sectors.
- It is better protected against failures caused by power loss, compared to VHD disks.
Generation 2 VMs support using both VHDX and VHD virtual disks. However, Azure VMs can only use virtual disks in the VHD format. VHDX virtual disks can be created in the Disk Management window in Windows 10 and Windows Server 2016. VHDX images can also be mounted (attached) as a disk drive, displayed in Windows Explorer (My Computer) in the latest Windows versions, thanks to the built-in VHDX driver.
VMDK is an open format of virtual disk images used by VMware hypervisors, VirtualBox, QEMU etc., and is not supported by Hyper-V. VMDK image files can be regarded as containers to store data, similar to physical hard disks, and have high compatibility with diverse virtualization software. The maximum size of the VMDK virtual disk has been increased from 2 TB to 62 TB.
VMDK virtual disks can be divided into the following types and variations: monolithic, split, sparse, flat, as well as thin-provisioned and thick-provisioned. Delta VMDK disks are created when taking VM snapshots. VMDK files can be mapped (mounted) to the specified mount point on your host machine if VMware Workstation is installed. A high level of reliability is provided. 4-KB native sectors are supported for VMDK virtual disks, which are used by the latest versions of VMware products with VMFS6 (Virtual Machine File System 6).
Check the VHD Content Before You Convert VHD to VMDK
This is an optional step that allows you to verify the health of a source VHD or VHDX virtual disk and view the contained files. This approach prevents you from being confused and wasting time on converting the wrong virtual disk. If you want only to extract files from VHD images, this section is what you need. VHD files can be mounted to a directory on Linux and can be mapped to a specified drive letter in Windows.
How to open VHDX in Linux
In Linux, VHD and VHDX files can be mounted to a specified directory (mount point) in the console by using libguestfs tools. Thus, you can view the contents of VHD and VHDX files in Linux before you start to convert VHD to VMDK. Let’s explore how to view the content of VHD and VHDX virtual disk images in Linux.
Install the needed package:
sudo apt-get install libguestfs-tools
Create the directory to which you want to mount the VHD or VHDX images, for example, /mnt/vhd/:
sudo mkdir /mnt/vhd/
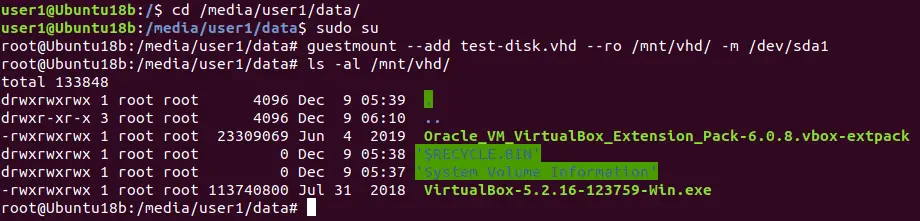
Run the command to mount a VHD disk image to the specified directory. We are in the directory where the required VHD file is located, and run the command as root:
guestmount --add test-disk.vhd --ro /mnt/vhd/ -m /dev/sda1
Where:
-add – opens a virtual disk.
--ro – a virtual disk is mounted in read-only mode.
/mnt/vhd/ is the path to the VHD file you want to mount.
-m /dev/sda1/ is the name of the partition existing on the VHD virtual disk. There is one NTFS partition on the VHD virtual disk used in this example.
You can see all available commands by running guestmount --help
Note: If you run the command in another directory, specify the full path to your VHD file, for example: guestmount --add /media/user1/data/test-disk.vhd --ro /mnt/vhd/ -m /dev/sda1
Check the contents of the mounted VHD image:
ls -al /mnt/vhd/
To unmount the virtual disk, use the command:
guestunmount /mnt/vhd/
Similarly, you can mount VHDX files to the /mnt/vhd/ directory created previously, and copy content from the mounted virtual disk:
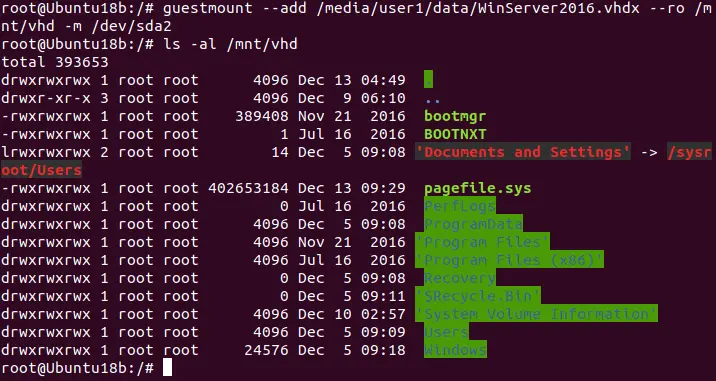
guestmount --add /media/user1/data/WinServer2016.vhdx --ro /mnt/vhd -m /dev/sda2
Where: /dev/sda2 is used because /dev/sda1/ is the service partition created by the Windows installer by default.
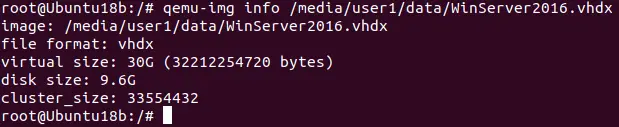
You can see the contents of the Windows system partition (disk C:) of the VHDX virtual disk in the Linux console (see the screenshot below).
How to open VHD in Windows
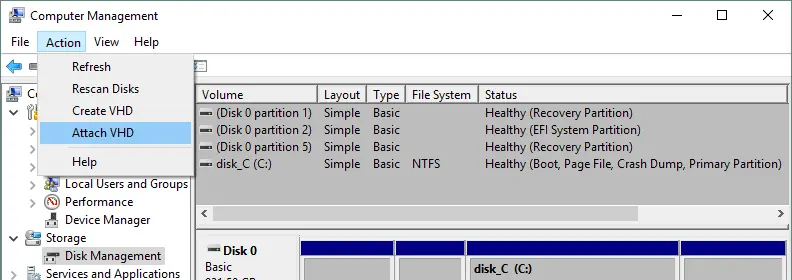
- Open the Computer Management window (right-click My Computer and select Manage in the context menu).

- In the Computer Management window, select Disk Management, then click Action > Attach VHD.
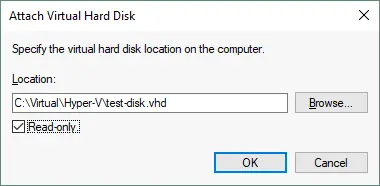
- In the pop-up window, define the path to your VHD or VHDX file. Tick the Read-only checkbox if you don’t want to write data to the virtual disk. This option also protects data stored on the virtual disk against accidental corruption.
- The disk is now mounted and displayed in the Disk Management window and in Windows Explorer (the drive X: in this case).
Note: Windows can only determine partitions with supported file systems: NTFS, FAT32, exFAT and ReFS. If your virtual disk contains Linux partitions with ext3, ext4, and other file systems, you will not be able to view the content of VHD or VHDX files mounted to your Windows system without third-party tools.
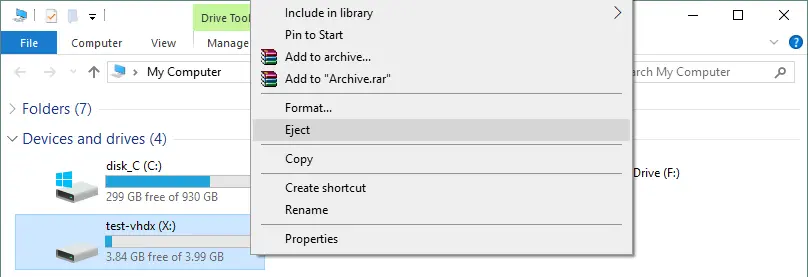
To unmount a VHD or VHDX virtual disk from your Windows system, open Windows Explorer, right-click the drive letter assigned to your virtual disk, and in the context menu, click Eject.
Now, after checking the content of the VHD (VHDX) virtual disk and ensuring that it is the correct disk, you can proceed with converting it to VMDK. There are two highly affordable methods to convert VHD to VMDK – using qemu-img and using VBoxManage. Both solutions are free to use and are explained below.
How to Convert VHD to VMDK with qemu-img
QEMU is an open source machine emulation and virtualization platform. Qemu-img is a utility of the QEMU software kit that can be used to convert virtual disks from one format to another. Qemu-img can be used to convert VHD to VMDK, and using this utility is the first method we will discuss. Qemu-img can be run in both Windows and Linux operating systems.
Using qemu-img in Linux
Ubuntu Linux is used in this example to run qemu-img.
- First, install qemu-img from the online software repositories:
sudo apt-get install qemu-utils - Go to the directory where virtual disk images are stored (in this example, VHD and VHDX virtual disk files are stored in /media/user1/data/):
cd /media/user1/data/
Check the VHDX file
- View the VHD image information after running sudo su to get the root privileges:
qemu-img info test-disk.vhd

Similarly, you can check the information about the VHDX virtual disk:
qemu-img info /media/user1/data/WinServer2016.vhdx
Convert VHD to VMDK in Linux
- In order to convert VHD to VMDK with qemu-img in Linux, run the command as root:
qemu-img convert /media/user1/data/WinServer2016.vhdx -O vmdk /media/user1/data/WinServer2016qemu.vmdk -pWhere:
-O– define the output file format-p– show the progress barWait until the conversion process is finished.
Using qemu-img in Windows
- Download qemu-img from the official website (32-bit and 64-bit installers are available to download). In the current example, qemu-img-win-x64-2_3_0 is used.
- Extract files from the downloaded archive, for example, to C:Programsqemu-img.
- Launch the Windows command line (CMD) – Press Windows+R to open the “Run” box. Type “cmd” into the box and press Ctrl+Shift+Enter to run the command as an administrator:
cd C:Programsqemu-imgThe commands of qemu-img in Linux and Windows are identical.
Convert VHD to VMDK in Windows
Run CMD as administrator and go to the directory where qemu-img is installed.
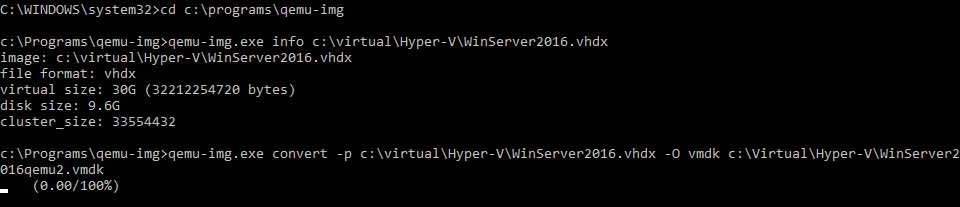
- View the virtual disk information:
qemu-img.exe info c:VirtualHyper-Vtest-disk.vhd - Convert the VHD disk image to the VMDK format:
qemu-img.exe convert -p c:VirtualHyper-Vtest-disk.vhd -O vmdk c:VirtualHyper-Vtest-disk.vmdkWhere:
-p– show progress-O– the output fileWait until the conversion process is finished.
How to Convert VHD to VMDK with VBoxManage
VBoxManage is the command-line interface (CLI) for managing the VirtualBox hypervisor and virtual machines. VBoxManage is a multi-platform tool that is installed when you install VirtualBox (as you recall, VirtualBox is a multi-platform virtualization solution). One of VBoxManage‘s most attractive features is its ability to convert multiple virtual disk formats. You can convert VHD to VMDK using VBoxManage.
If you use Windows as the host operating system, run CMD as Administrator and go to the installation directory of VirtualBox to run VBoxManage. In the current example, VirtualBox is installed in the default directory.
cd C:Program FilesOracleVirtualBox
You can add the installation path of VirtualBox to the Path environment variable to avoid manually navigating to the VirtualBox installation directory each time you want to run VBoxManage.
Run the command to convert Hyper-V VHD to VMware VMDK as follows:
VBoxManage clonehd --format vmdk C:virtualHyper-VWinServer2016.vhdx С:virtualHyper-VWinServer2016vbox.vmdk
The syntax is straightforward – you set the destination virtual disk format (VMDK) and define the source VHDX file and destination VMDK file names.
Wait until the conversion process is finished.

If you use Linux on your machine where VirtualBox is installed, use the identical commands (but keep in mind the structure of Linux partitions and directories).
Creating a VMware VM by Using the Converted Virtual Disk
Converting a VHD to a VMDK enables the conversion of Hyper-V virtual machines to VMware virtual machines. You need to import the converted virtual disk into your manually created VMware VMs to complete the process. This approach can be used for VMs running on VMware Workstation and VMware ESXi. The remaining details of how to convert Hyper-V to VMware are explained in this section.
VMware Workstation
If you want to create a virtual machine using a virtual disk converted from the VHD (VHDX) format to the VMDK format in VMware Workstation, just create a new VM (or open an existing VM if you want to add a converted virtual disk as an additional virtual disk) and select that you wish to use an existing virtual disk.
Let’s create a new VM in VMware Workstation. Hit File > New virtual machine.
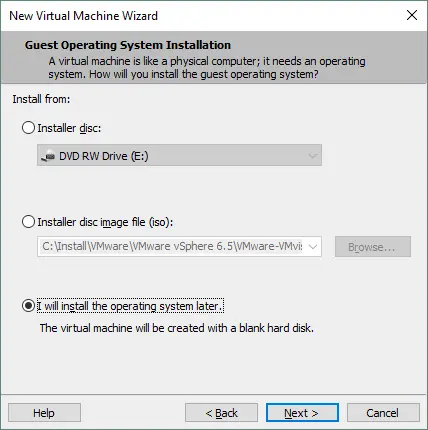
See a detailed explanation of how to create a new VMware Workstation VM in the blog post about VMware Home Lab. In this section of today’s blog post, the emphasis is on the steps needed for importing a converted VHD virtual disk to the VMware Workstation VM. Hence, you should pay special attention to the following steps:
- Select “I will install an operating system later,” and choose the version of the guest OS (operating system) that was installed on the source Hyper-V VM whose virtual disk you have converted (Windows Server 2016 in this case). If you are using an older version of VMware Workstation, select Windows 10 as the guest OS version.
The VM name is Win2016converted in our example. The files of the new VM are stored in C:VirtualWin2016converted.
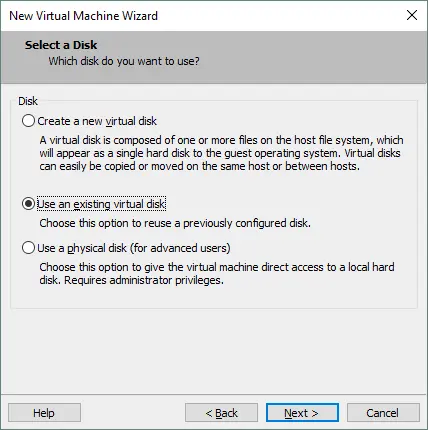
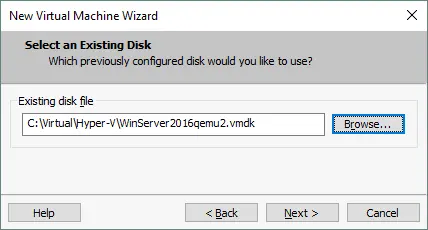
- Select “Use an existing virtual disk” at the Select a Disk step.
- Specify a path to the existing VMDK file or browse for the file. In this case, the path to the VMDK file is:
C:VirtualHyper-VWinServer2016qemu2.vmdk
- If the dialog window appears and suggests converting an existing virtual disk to a newer format, the choice is yours. You should convert a virtual disk to a newer format if you don’t plan to use this virtual disk for virtual machines of older VM versions (which have older virtual hardware).
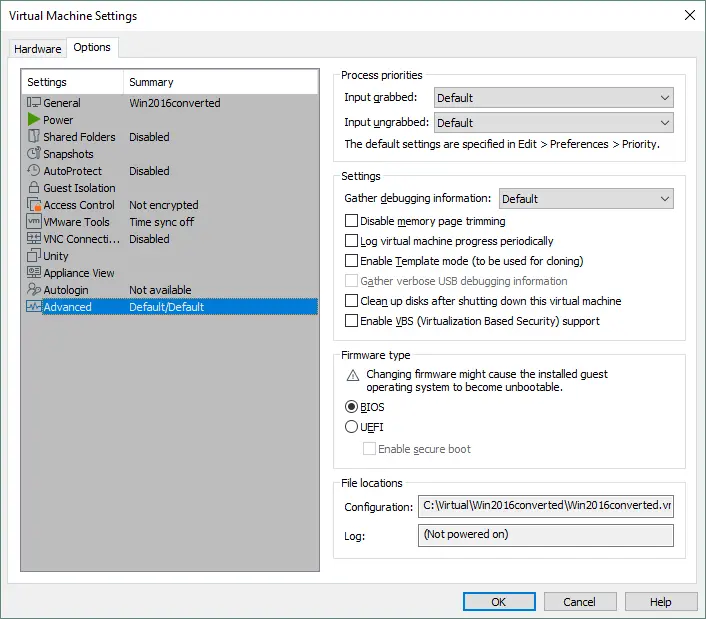
- Select BIOS as the firmware type in VM options if your source Hyper-V VM was configured to use BIOS. Otherwise, the VMware VM to which you have attached a virtual disk converted from the Hyper-V format to the VMware format will not boot. After a VM is created, you can check this setting by going to VM > Settings, selecting the Options tab > Advanced.
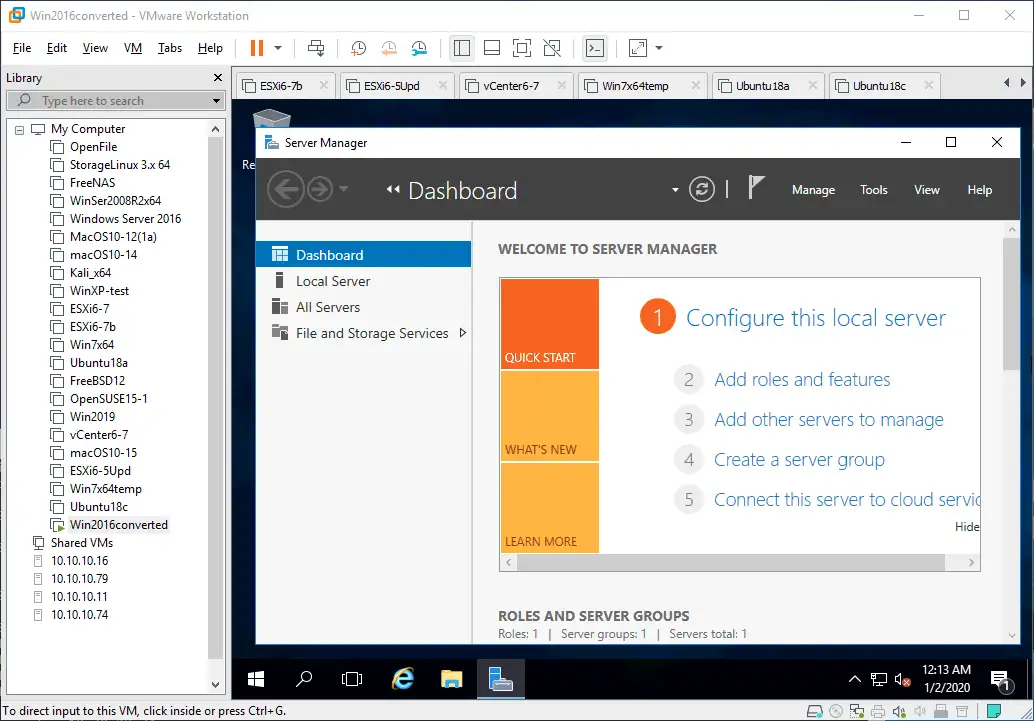
Now your VM should boot correctly. After your guest OS is booted, install VMware Tools.
VMware ESXi
You can also convert VHD to VMDK and import the converted virtual disk into a VMware VM running on an ESXi host. However, the VMware virtual disk format used by VMware Workstation and VMware ESXi differs. A virtual disk in the VMware Workstation format has a disk descriptor built into a single VMDK file. A virtual disk of the ESXi format consists of two separate files – a data file (.vmdk) and a disk descriptor file (-flat.vmdk). In order to use a virtual disk that you have converted from the Hyper-V format with qemu-img or VBoxManage for a VM running on ESXi, you have to convert that virtual disk from the Workstation format to the ESXi format. Otherwise, you will get the error: “Unsupported or invalid disk type 2”.

Let’s find out how to use a virtual disk converted from the VHD format for a VM running on ESXi.
Converting VMDK to the ESXi format
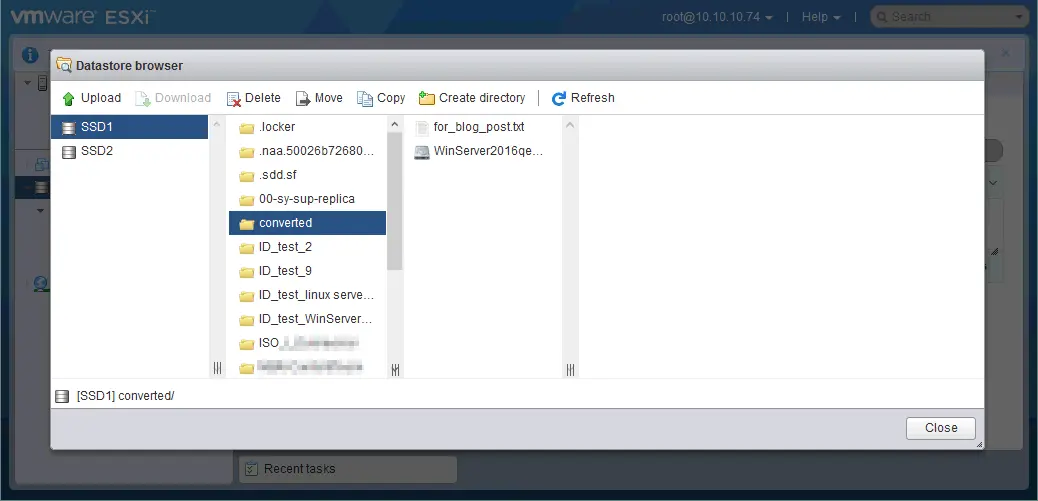
- Upload the converted VMDK file to the datastore connected to an ESXi host. Use an SCP/SFTP client, the web interface of VMware Host Client or VMware vSphere Client to upload the converted virtual disk vmdk file to the ESXi datastore.
In our example, the WinServer2016qemu.vmdk file is uploaded to the SSD1 datastore, which is attached to the ESXi host with the IP address 10.10.10.74.
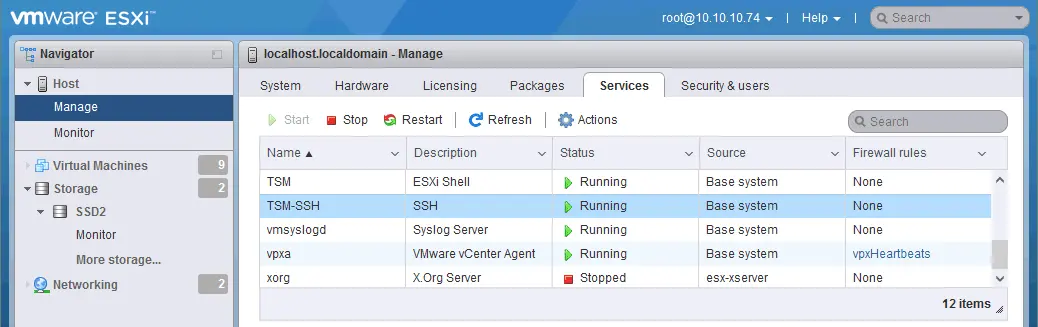
- Make sure that SSH access is enabled on your ESXi host (Manage > Services > TSM-SSH).
- Connect to your ESXi host via SSH by using an SSH client (for example, PuTTY).
- Go to the directory where the VMDK virtual disk file converted from the Hyper-V VHD format is stored (in this example, the vmdk file is stored in /vmfs/volumes/SSD1/converted/):
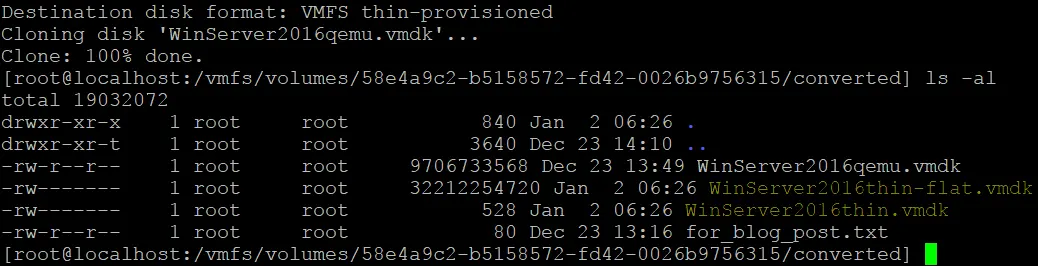
cd /vmfs/volumes/SSD1/converted/ - Use vmkfstools to convert a virtual disk in Workstation format to a virtual disk in ESXi format. In our example, a thin-provisioned virtual disk of the ESXi format is the destination virtual disk type. Run commands as root.
vmkfstools -i WinServer2016qemu.vmdk WinServer2016thin.vmdk -d thin
As you can see on the screenshot, the post conversion of VMDK from the Workstation format to the ESXi format with vmkfstools has completed successfully and two new files have been created:
WinServer2016thin-flat.vmdk
WinServer2016thin.vmdk
Importing a VMDK disk to a VM on ESXi
Open VMware Host Client (it is optimal to use VMware vSphere Client if vCenter is deployed, but you can use VMware Host Client in almost all cases, including a scenario with ESXi Free Edition). The same workflow applies to VMware vSphere/ESXi versions 6.5 to 9.0.
In the web interface of VMware Host Client, select Virtual Machines and hit Create/Register VM.
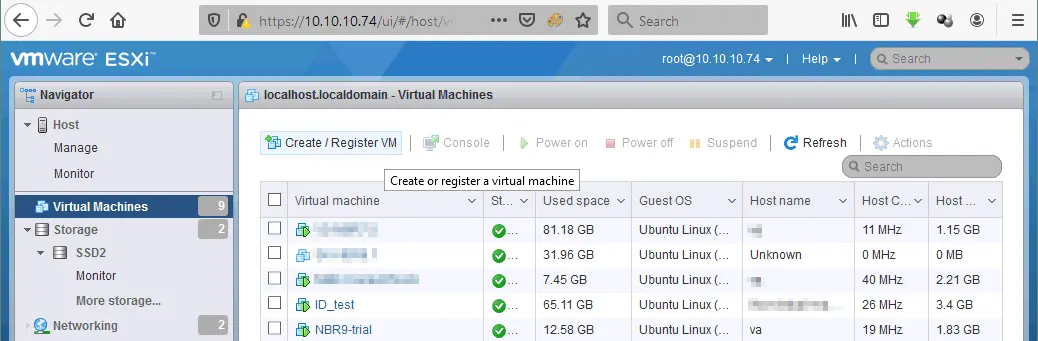
The new virtual machine wizard is opened.
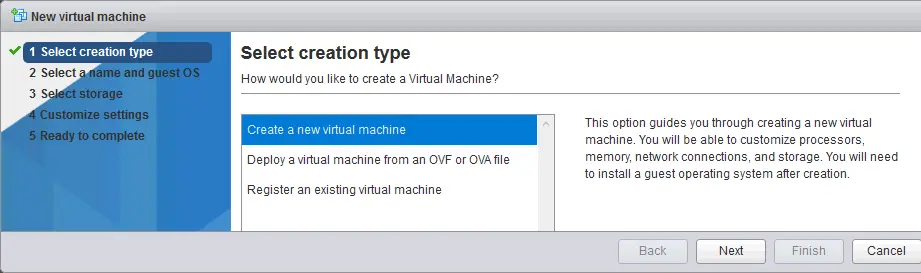
- Select creation type. Hit Create a new virtual machine. Click Next on each step to continue.
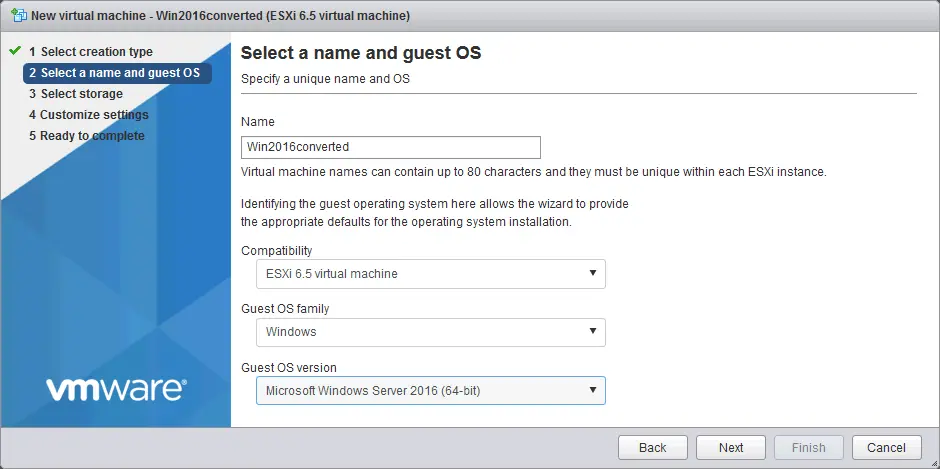
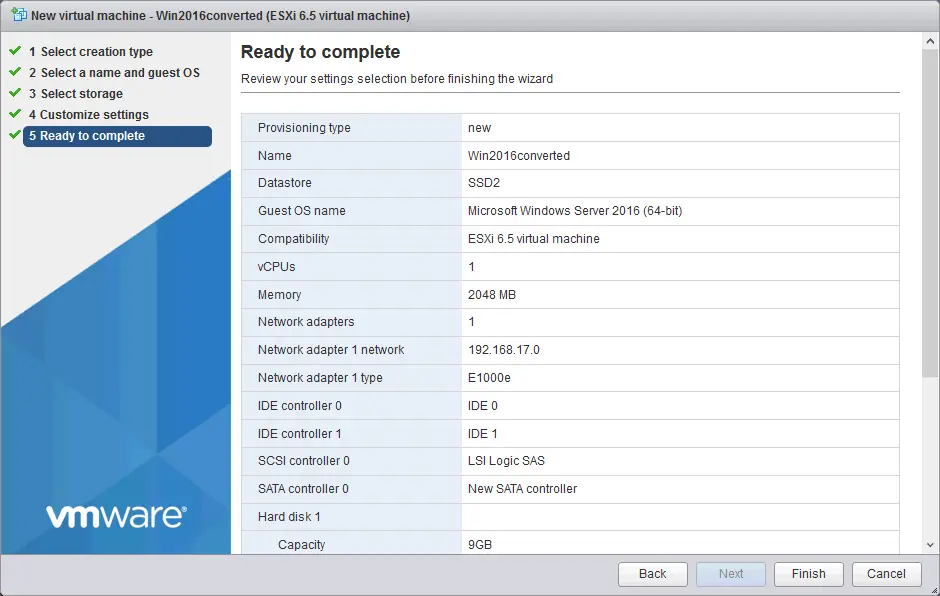
- Select a name and guest OS. Select the VM version, guest OS family and guest OS version. In this example, the VM name is Win2016converted. The VM is compatible with ESXi 6.5 or later. The guest OS family is Windows, and the guest OS version is Microsoft Windows 2016 (64-bit).
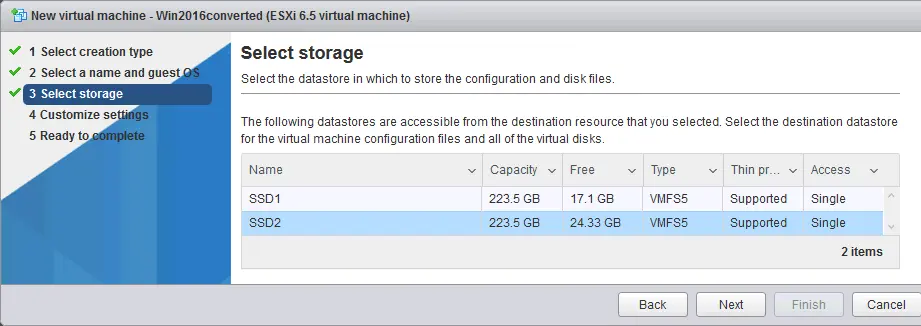
- Select storage. Select the datastore where you want to store the VM files. The name of the datastore used in this example is SSD2.
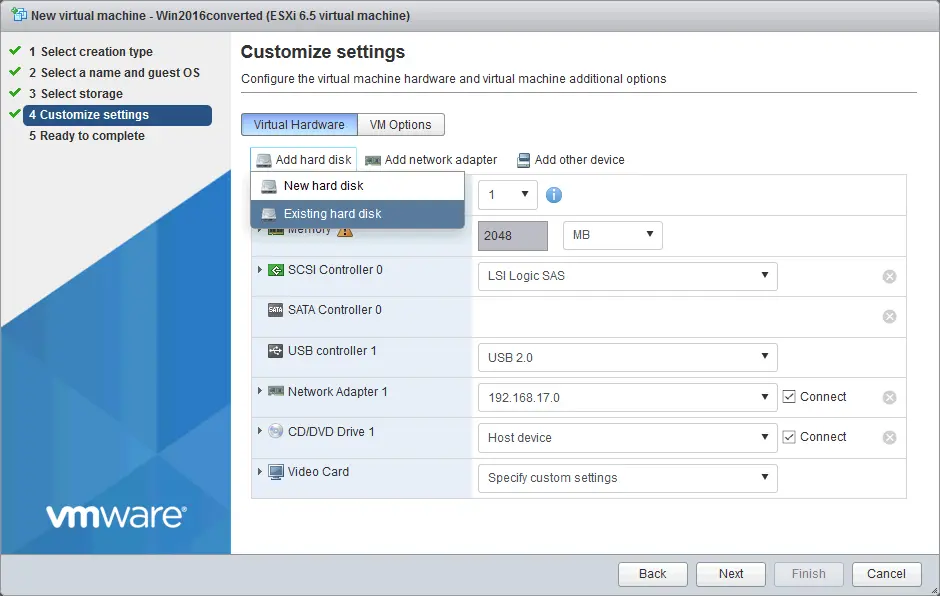
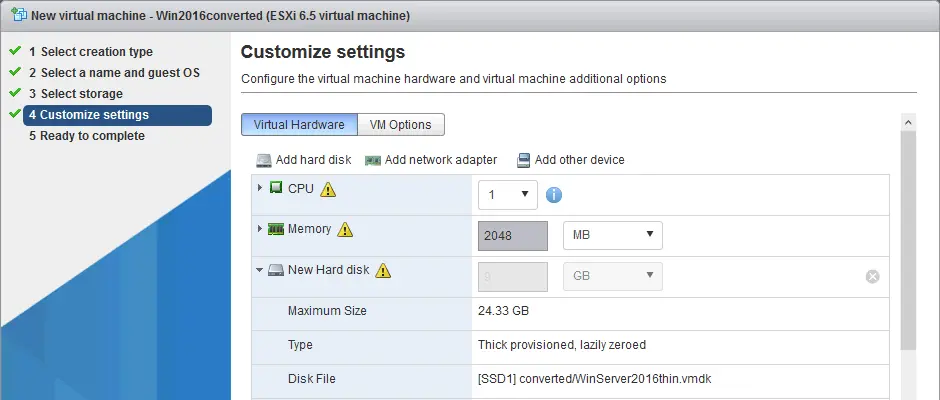
- Customize settings. This step is the most important in our case. Delete the virtual disk that was created by default with the new VM. Then, click Add hard disk > Existing hard disk.
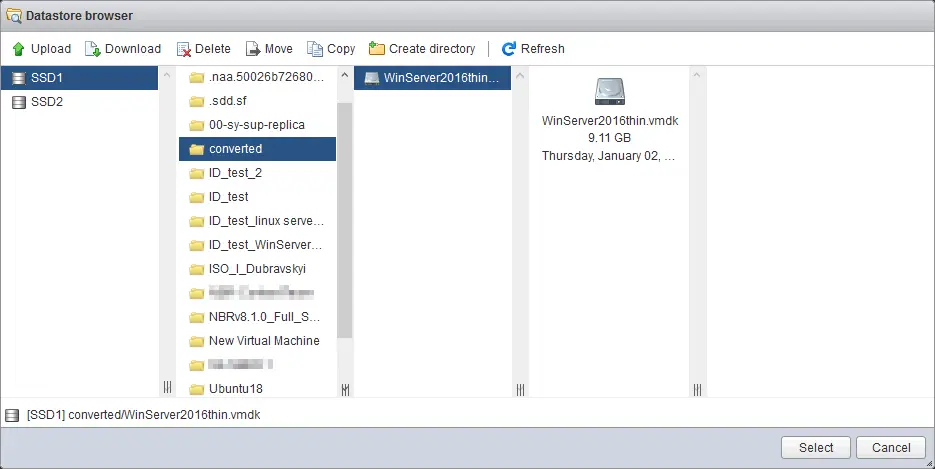
In the datastore browser, select the virtual disk that you converted from VHD to VMDK, and then from the VMware Workstation format to the VMware ESXi format (thin-provisioned). As you may recall, your converted virtual disk consists of two files (.vmdk and -flat.vmdk), but in the datastore browser, only one vmdk file is displayed. Don’t worry—this is a feature of VMware Host Client. Both files copied to the ESXi datastore are present. You may check them in the ESXi console or by connecting via SSH. In the current example, you can see that the current size of the virtual disk is 9.11 GB, but the maximum provisioned size of this disk is 30 GB.
After adding the converted VMDK virtual disk, you can see the inactive field where the 9-GB size (the current size) of the 30-GB virtual disk is displayed.
- Ready to complete. On this step, you can check your settings. If everything is correct, hit Finish to create a new VM.
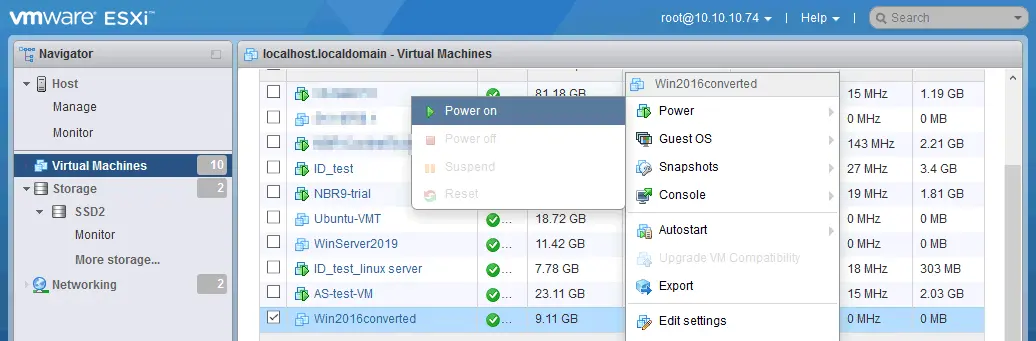
Now, you can power on the VM (right-click the VM name and in the context menu select Power > Power On).
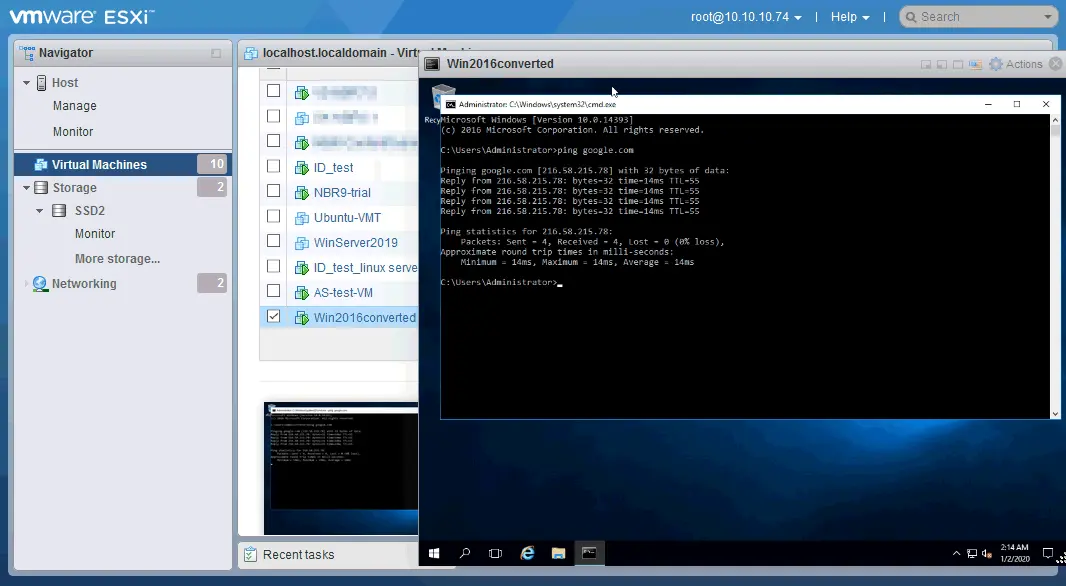
The VM with the converted virtual disk has started properly and the network is functioning correctly. Now you can install VMware Tools on the guest OS.
Conclusion
If you would like to convert Hyper-V virtual machines to VMware, you can convert VHD to VMDK and then attach the converted VMDK virtual disk to a new VMware VM. Qemu-img can be used as a VHD to VMDK converter and VBoxManage can be used as an alternative. Both solutions are free and multi-platform, allowing you to convert Hyper-V VHD to VMware VMDK on different operating systems. Be aware that if you want to use a virtual disk converted with qemu-img or VBoxManage for ESXi VMs, you should convert the VMDK virtual disk from the Workstation format to the ESXi format with vmkfstools in the ESXi command line.
If you want to use semi-automated or fully automated tools to convert the entire Hyper-V VM to the VMware VM, you can use free VMware vCenter Converter Standalone. Regardless of the hypervisor you use, data protection is essential. NAKIVO Backup & Replication provides the Cross-Platform Recovery feature, which allows you to convert VHD disks from VM backups to VMDK disks and restore Hyper-V VMs to VMware hypervisors.