How to Perform P2V and V2V Migration with VMware Converter
Creating and configuring a new virtual machine from scratch can be time-consuming, especially when migrating existing workloads. Instead of rebuilding servers manually, you can use VMware vCenter Converter Standalone to perform a physical-to-virtual (P2V) migration and convert a physical machine directly into a VMware virtual machine (VM).
The VMware converter also supports virtual-to-virtual (V2V) migrations, including converting Hyper-V VMs to VMware VMs and moving VMware VMs between different formats. Read this post to learn how to perform P2V and V2V migrations step by step using VMware vCenter Converter.
What Is VMware Converter?
VMware vCenter Converter Standalone is a free application that can be downloaded from the VMware website and installed on Windows. It can convert supported types of machines to VMware virtual machines.
The VMware vCenter Converter Standalone featured in this blog post is called “Standalone” because it can be installed on the operating system of a custom machine. There are two other types of VMware Converter, which are not currently supported:
- VMware Converter Enterprise Add-on for vCenter can be installed as an add-on to vCenter Server.
- VMware Converter Enterprise Cold Clone CD was included in Virtual Infrastructure 3 Enterprise as the ISO image. It can be used to boot from the CD and perform a cold migration.
VMware vCenter Converter Standalone consists of the following components:
- Converter Standalone Server is the main component that manages all conversion tasks and handles connections between other components.
- Converter Standalone Agent is the component that allows you to convert the machine on which the agent is installed. If you install the agent on your local machine when you install VMware Converter, you will be able to convert your physical machine to a VM.
- Converter Standalone Client is the component that allows you to connect to the remote VMware Converter Standalone Server and manage conversion tasks on that remote machine. The client provides the graphical user interface of VMware Converter.
You can select the components to install when you run the installer of VMware Converter. There are two available options:
- Local Installation. All three components are installed on the local machine (server, agent and client).
- Client-server installation (advanced). You can select the converter components you wish to install.
VMware vCenter Converter Standalone can also be used to reconfigure existing virtual machines on ESXi hosts.
Only VMware vCenter Converter Standalone is considered below in this blog post, and sometimes can be referred to simply as VMware Converter for more convenience.
Supported Types of Migration
VMware vCenter Converter Standalone can convert the machine types listed in the table below.
| Powered On | Remote Windows machine | Source |
| Remote Linux machine | Source | |
| This machine (the machine on which the converter is installed) | Source | |
| Powered Off | VMware Infrastructure virtual machine (a VM running on an ESXi host) | Source/Destination |
| VMware Workstation or other* virtual machine | Source/Destination | |
| Hyper-V Server virtual machine | Source |
*This includes virtual machines that can run on VMware Workstation, VMware Player and VMware Fusion.
Hot and Cold Migration
Hot migration is the process of converting a machine that is in the powered-on state. It is not recommended for converting Active Directory Domain Controllers. You should stop all applications and services that write data on disks before starting hot migration.
Cold migration is the migration of a source machine that is in the powered-off state. It is recommended for converting MS Exchange servers, database servers such as Oracle or MS SQL and other servers on which data is dynamically changed when the server is powered on (to preserve data consistency).
If the data on disks remains static, you can perform hot migration. Cold migration of physical servers can be performed if you boot from the live CD and run the process of converting a physical machine, including disk drives and the operating system.
Requirements
Below is the list of requirements to use VMware vCenter Converter Standalone:
- A supported version of Windows to install VMware vCenter Converter Standalone. The converter can be installed on Windows only.
- The operating system on the machine that you want to convert must be supported by the version of VMware Converter that you are using.
- Supported firmware interfaces – UEFI and BIOS.
- Supported source disk formats – MBR (Master Boot Record) and GPT (GUID Partition Table).
- Screen resolution 1024×768 or higher to display the interface of VMware Converter.
- A network connection. Required ports must be opened for each connection type:
- Converter server to powered-on source Windows machine: TCP 445, 139, 9089; UDP 137, 138
- Converter server to vCenter: TCP 443
- Converter client to vCenter: TCP 443
- Converter server to destination ESXi host: TCP 902
- Powered-on source machine to ESXi host: TCP 443, 902
- Converter server to a powered-on Linux machine: TCP 22 (if the port listened by the SSH server is not changed)
- Helper virtual machine to a powered-on source Linux machine: TCP 22 (if the port number is not changed)
P2V Windows Migration with VMware Converter
Let’s see how to convert a physical Windows Server to a VMware virtual machine that runs on an ESXi host managed by vCenter. In the current example, VMware Converter 9.0 is installed on Windows 10, and the destination ESXi host and vCenter version is 9.0. The source physical machine is running Windows Server 2022.
The workflow for other versions of VMware Converter, such as 6.2, 6.4 and 6.6, is the same. The difference is in the list of supported operating systems and vCenter versions.
You can learn how to install VMware Converter in this blog post.
NOTE: If you want to convert a physical Linux Server to a VMware vSphere VM, read this blog post about hot P2V Linux migration. If you need to perform a cold P2V migration of a Linux machine, consider the second method (Method 2 – VMware P2V Linux Conversion without VMware Converter), but boot from a live DVD such as Ubuntu installation media.
Before you begin, make sure you turn off file sharing, firewalls (must not block file/printer sharing and required ports), antivirus, User Access Control (UAC) and stop all possible applications and services.
- Run VMware vCenter Converter as an administrator.
- Click Convert machine.
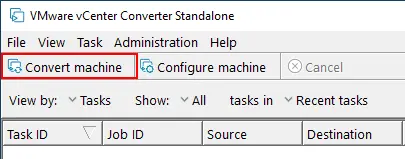
The conversion wizard opens.
- Source System. Select a source machine. Since you are converting a physical Windows Server, select Powered on, choose Remote Windows machine as the source type and specify the IP address or DNS name, the user name and password. Then, hit View source details.
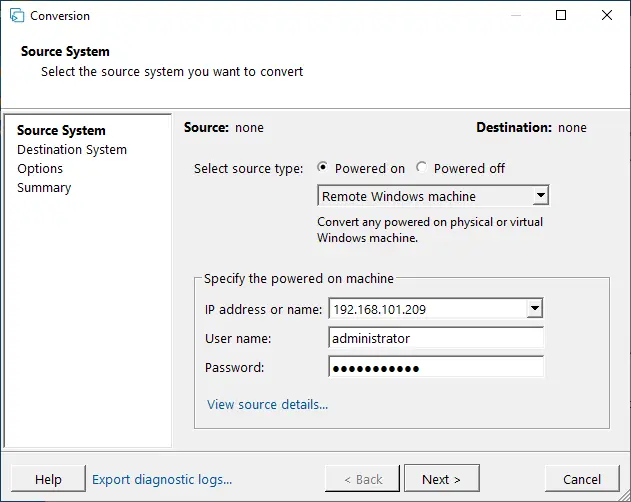
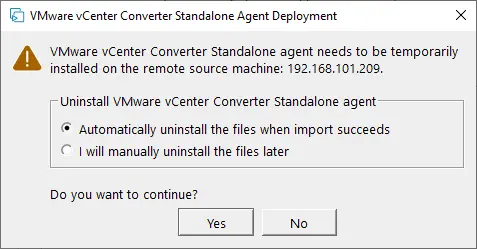
VMware vCenter Converter Standalone agent must be deployed on the remote Windows machine in this case. You should select whether to uninstall the agent files when the import succeeds automatically or not. Then hit Yes to continue.
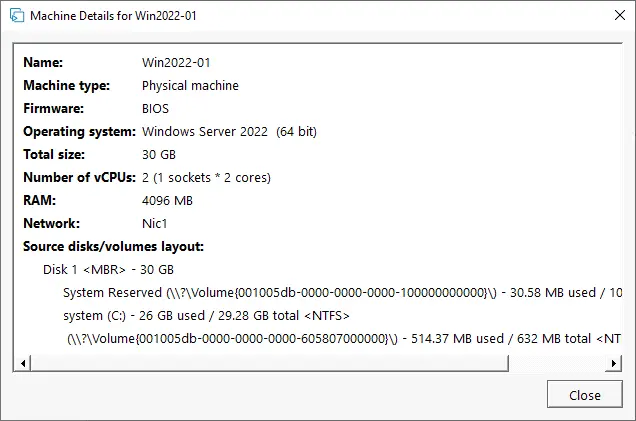
Once the agent is installed, you can view source details. Notice that VMware Converter 6.2 recognizes Windows Server 2019 as Windows 10 Server 64-bit. Hit Close, then click Next in the Source System window.
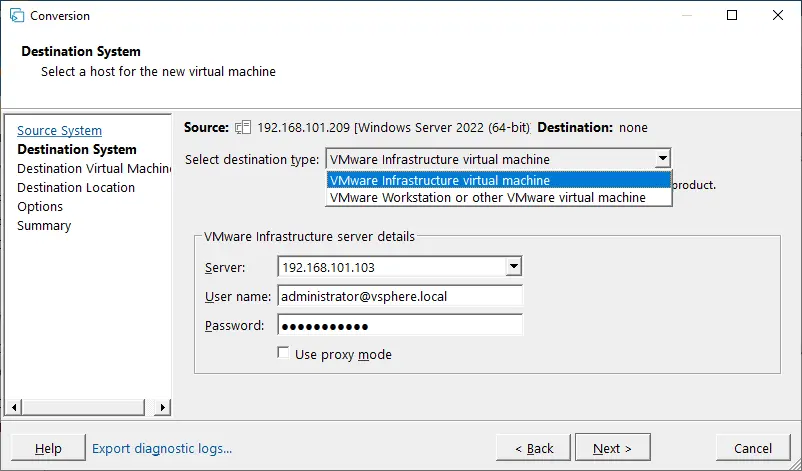
- Destination System. Select the destination type. It can be VMware Infrastructure virtual machine or VMware Workstation virtual machine (that can run on VMware Player and VMware Fusion). In this example, VMware Infrastructure virtual machine must be selected. If the ESXi host is managed by vCenter Server, you have to enter the IP address or DNS name of vCenter Server in addition to the username and password of the user who has administrative privileges on vCenter Server.
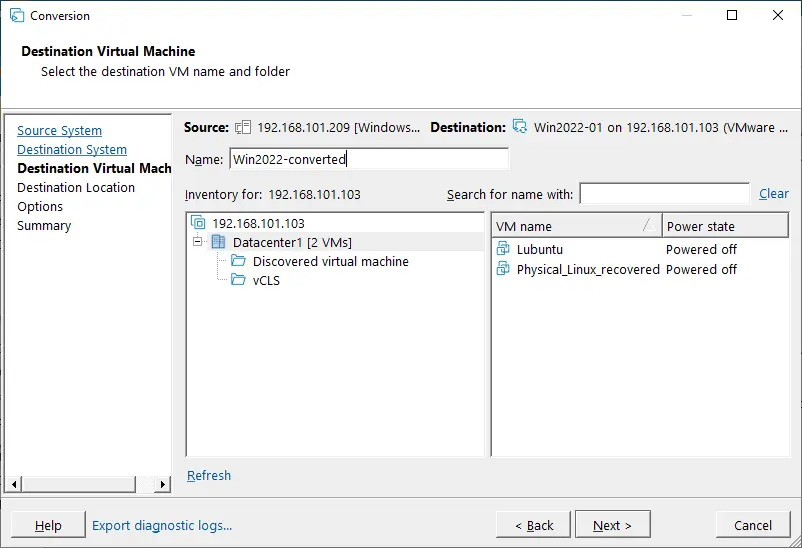
- Destination Virtual Machine. Select the datacenter and VM folder on vCenter to store the destination VM.
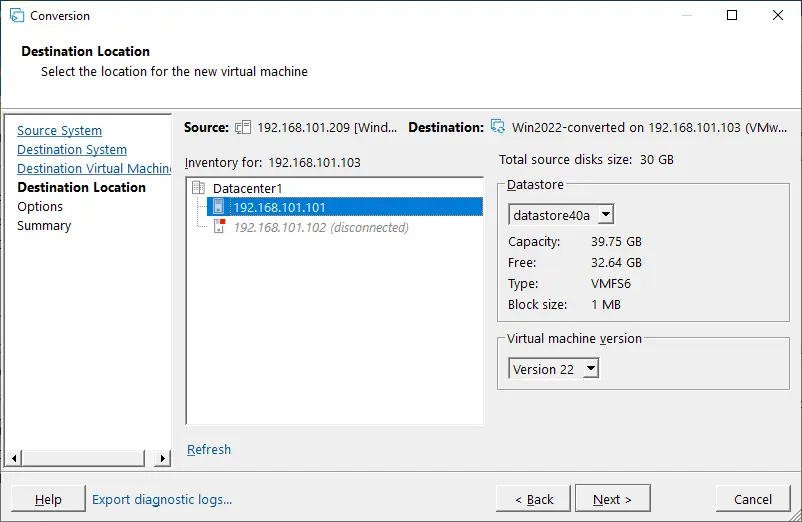
- Destination Location. Select the ESXi host, cluster or resource pool that is connected to the selected datacenter, and select the datastore available on that ESXi host. There must be enough free space on the selected datastore. If a modern operating system is installed on the source machine, you can select the latest available virtual machine version (hardware version) for the destination VM. The virtual machine version that can be selected also depends on the version of the destination ESXi host. For higher compatibility between hosts, you can choose one of the previous hardware versions.
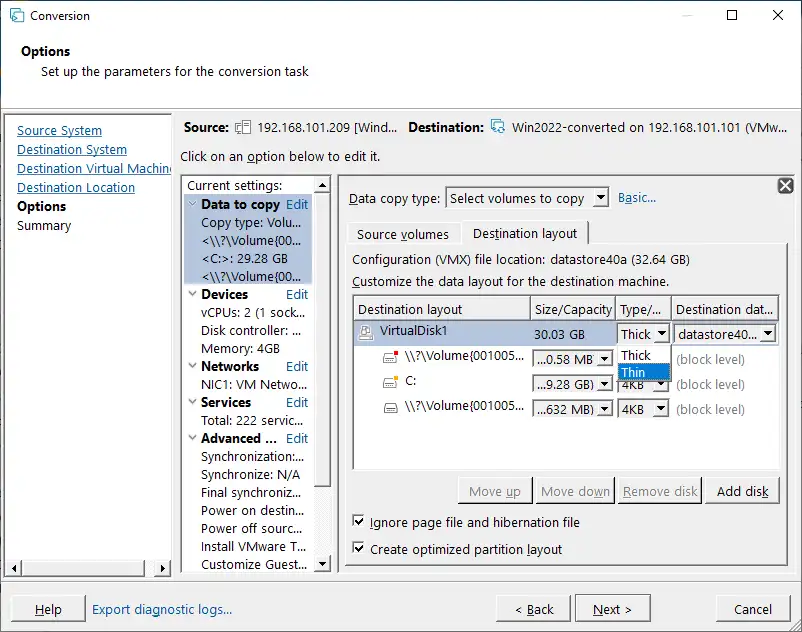
- Options. This step allows you to select the following options for the destination VM:
- Data to copy. Select which disks and volumes you want to copy. You can choose thick or thin provisioning type for the destination virtual disks (you should select advanced view) and resize volumes if needed. In this example, a physical disk that contains two volumes is converted to a thin-provisioned virtual disk. It is recommended that you tick the following checkboxes:
- Ignore page file and hibernation file
- Create optimized partition layout
- Devices. You can select the number of virtual processors, processor cores, virtual disk controllers and memory size.
- Networks. Choose the networks to which the VM’s virtual network adapters will be connected.
- Services. On the Source Services tab, you can select which running services on the source Windows machine to stop before starting the P2V conversion. On the Destination Services tab, you can select the startup mode for services on the destination VM.
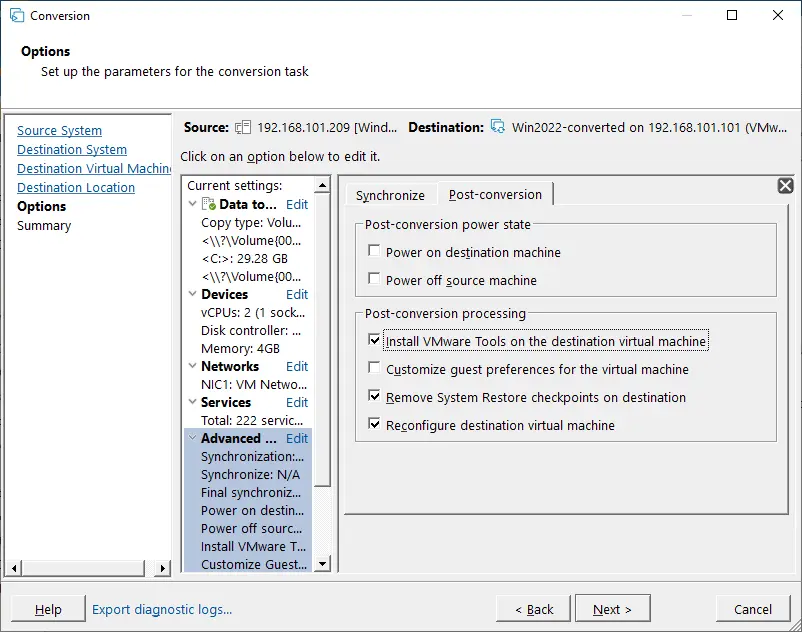
- Advanced options. There are two tabs – Synchronize and Post-conversion. In the Post-conversion tab, you can set the power state for the source and destination machines after the conversion is finished. The Post-conversion processing options are:
- Install VMware Tools on the destination virtual machine. This option allows you to automatically install VMware Tools on the destination VM. It is highly recommended to do so.
- Customize guest preferences for the virtual machine. You can configure IP addresses of virtual adapters, gateway and DNS settings, set the time zone and add the VM to a domain or workgroup.
- Remove System Restore checkpoints on destination. Deleting Windows system restore checkpoints makes the P2V conversion process faster and the destination VM uses less disk space on a datastore.
- Reconfigure destination virtual machine. This option makes the VM bootable in the VMware environment after P2V conversion.
- Throttling. You can control CPU usage and network bandwidth to avoid CPU and network overloading. Throttling allows you to perform your usual tasks during the conversion process.
- Summary. Check your settings and, if everything is correct, click Finish to start the conversion.
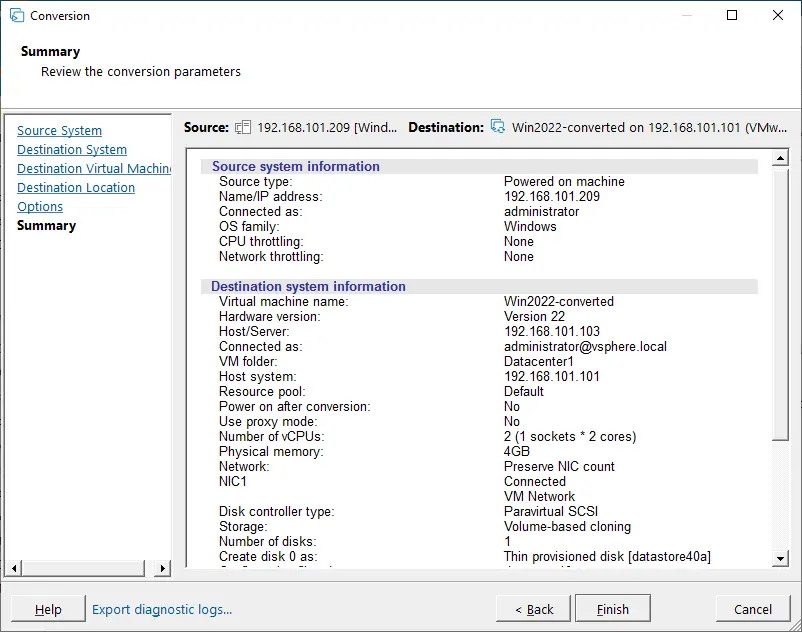
Wait until the conversion process is fully completed. The time needed for the conversion depends on the amount of data stored on the source machine’s disks and the network speed.
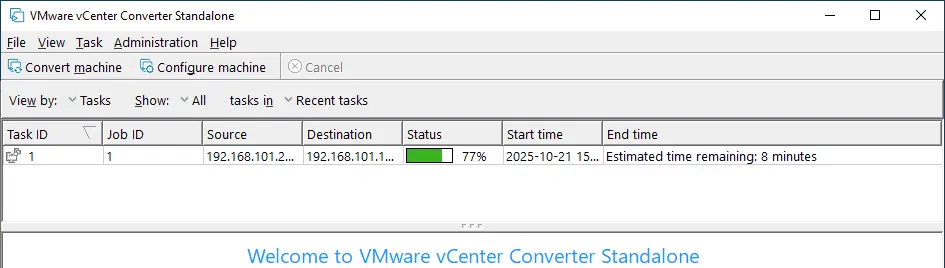
Now that a Windows machine is converted, power on the destination VM (if you have not selected to power on the VM automatically during the job creation process). In this example, we installed VMware Tools on the destination virtual machine automatically. In the screenshot below, you can view the interface of VMware vSphere HTML5 Client, where you can see the status (Upgrade is in progress) of VMware Tools after powering on the VM. The VM will reboot automatically after finishing installing VMware Tools.
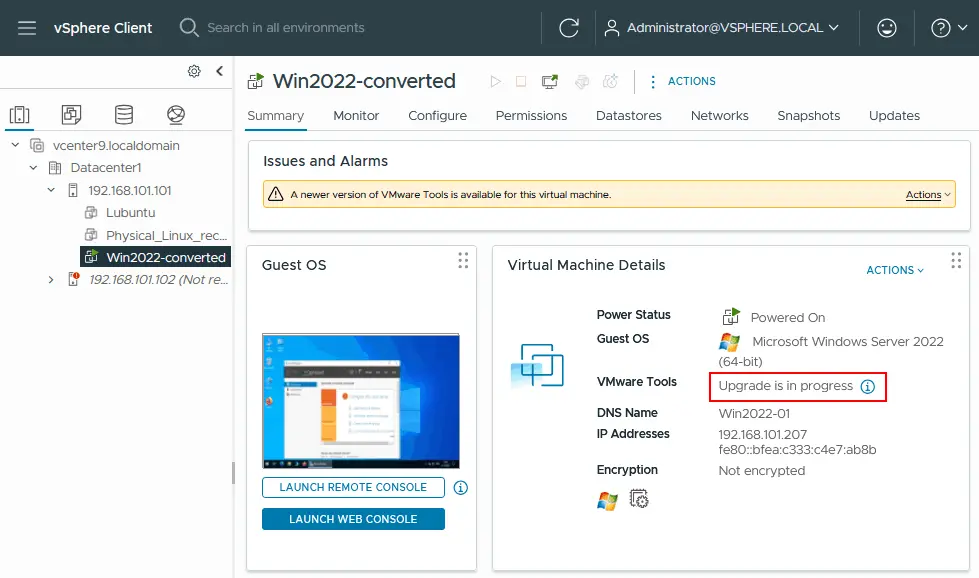
VMware Tools have been installed successfully. It is recommended to remove all vendor-specific software and drivers previously used on the physical machine.
Similarly, you can perform VMware V2V migration by using VMware Converter to convert a VMware Workstation VM to a VMware ESXi VM.
V2V Migration with VMware Converter
Let’s find out how to perform V2V migration with VMware Converter and convert a VM running on VMware Workstation to a VM running on ESXi and vice versa. In this example, VMware Tools are installed on the source VMware VM.
If the Workstation VM is running on VMware Workstation, VMware Player or VMware Fusion that is installed on a remote machine running Linux or macOS, you can copy that VM to a shared folder (or share the VM folder) and use the VMware Converter installed on your local Windows machine to perform V2V conversion. You can convert a VM, even if the remote physical machine running the hypervisor has Linux or macOS installed as the host operating system.
NOTE: Read this blog post to learn how to convert a Hyper-V VM running Linux to a VMware VM.
Converting a VMware Workstation VM to a VMware ESXi VM
Configuring V2V migration for VMware VMs is similar to the P2V migration explained above.
Run VMware Converter as an administrator and click Convert machine. The Conversion Wizard opens.
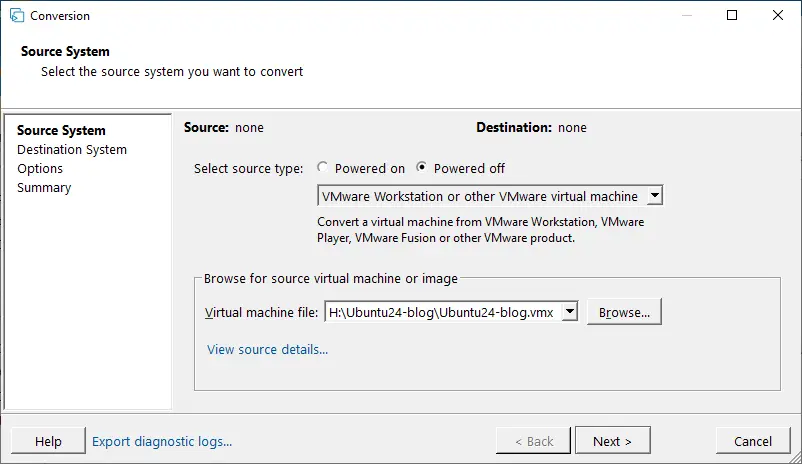
- Source System. You should click Powered off and select VMware Workstation or other VMware virtual machine in the drop-down menu. Then, browse the virtual machine configuration file (the VMX file). You can view source details if needed. At each step, click Next to proceed.
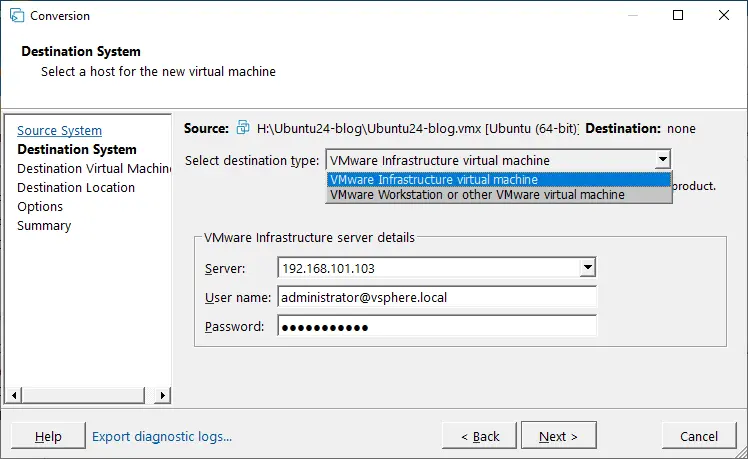
- Destination System. Since the destination VM is expected to run on an ESXi host, select VMware Infrastructure virtual machine as the destination type. Then, enter the IP address/hostname of the ESXi server if you are using a standalone ESXi host, or the IP address of vCenter Server if the ESXi host is managed by vCenter. After that, enter the username and password of the administrative account used to manage that server.
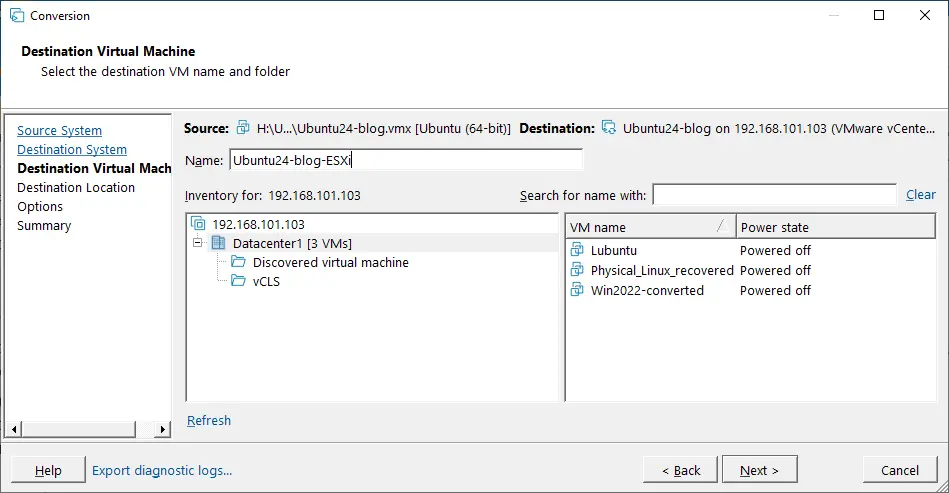
- Destination Virtual Machine. Select the destination VM name and folder.
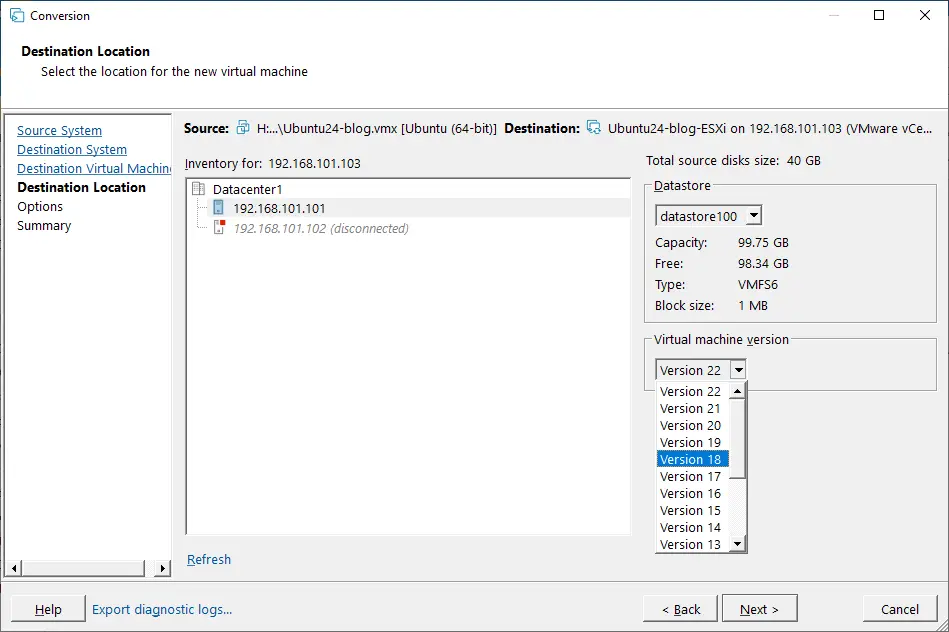
- Destination Location. Choose the ESXi host that belongs to the datacenter selected in the previous step. Next, select the datastore to store VM files and choose the virtual machine version.
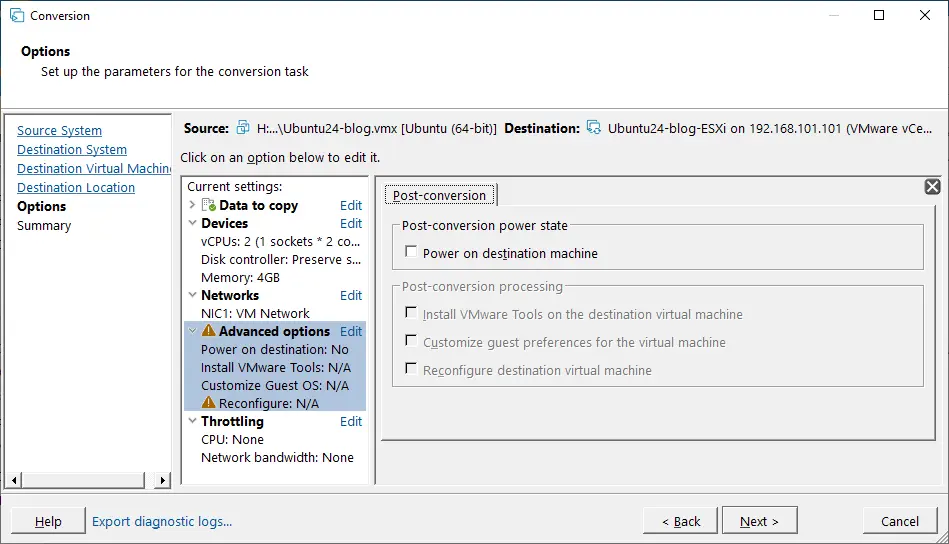
- Options. Set up the necessary parameters for the conversion task. In the Advanced section, you can see the yellow warning icon because the Reconfigure destination virtual machine option is inactive. You can proceed.
- Summary. Check the settings of your V2V conversion job and hit Finish to run the job. Wait until the VMware Converter finishes converting the VM.
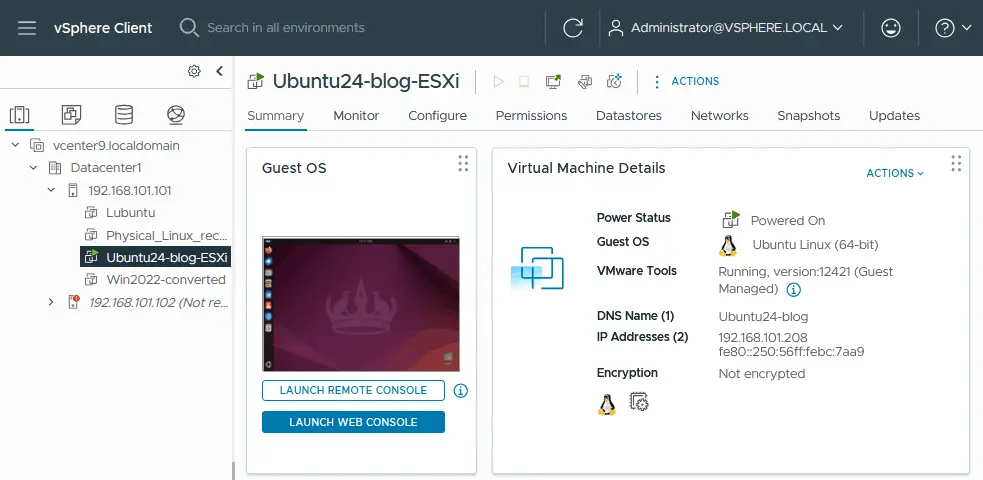
Once the VM is migrated to the ESXi host managed by vCenter, open VMware vSphere Client and start the VM. Check the status of VMware Tools and verify whether all necessary services inside the VM are working correctly.
Converting an ESXi VM to a VMware Workstation VM
Let’s review the workflow of converting a VMware ESXi VM to a VMware Workstation VM.
Run VMware vCenter Converter as an administrator on a Windows machine. Click Convert machine to open the wizard.
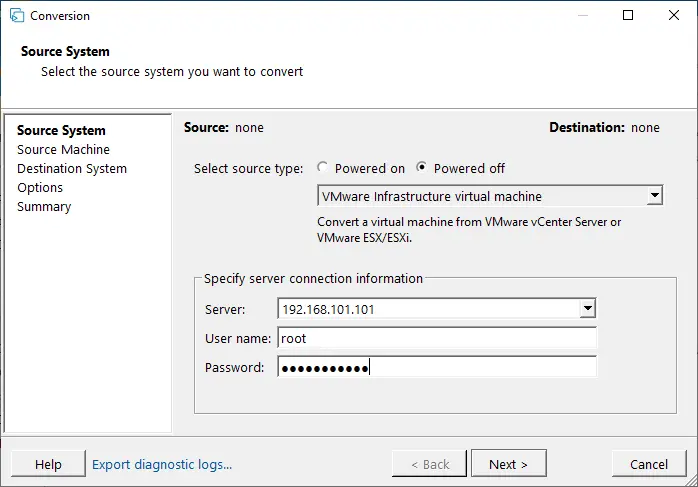
- Source System. Select source type: Powered Off; VMware Infrastructure virtual machine. Next, enter the IP address or hostname of the ESXi host (or vCenter) with the VM from which you would like to convert. Enter the appropriate ESXi host credentials with administrative privileges. Hit Next at each step of the wizard to continue.
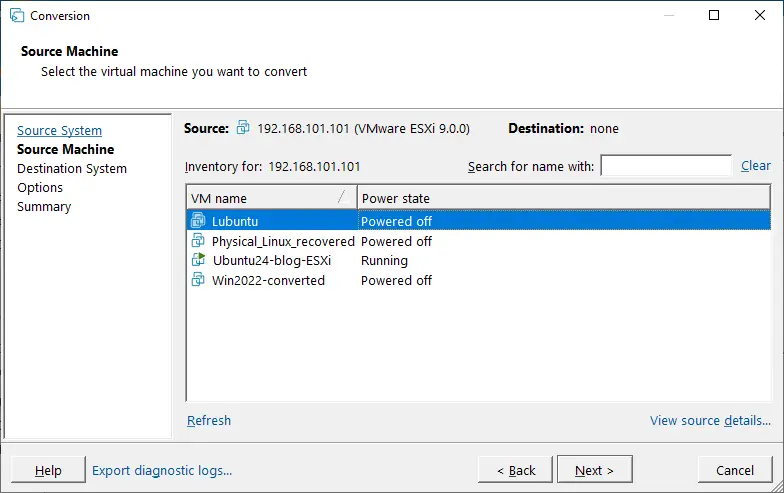
- Source machine. Select the source virtual machine residing on the ESXi host. The virtual machine must be powered off. You can view source details if needed.
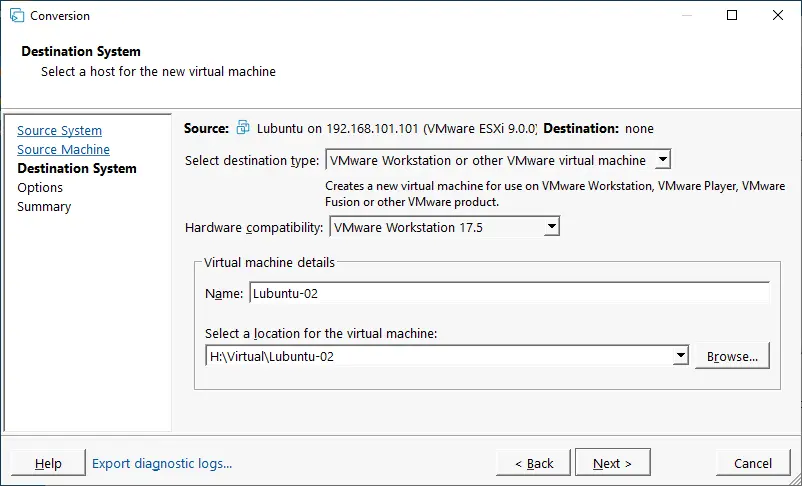
- Destination System. As we are converting an ESXi VM to a VMware Workstation VM, select VMware Workstation or other VMware virtual machine as the destination type. Then, choose the version of VMware Workstation or VMware Fusion, set the VM name and select a location for the virtual machine.
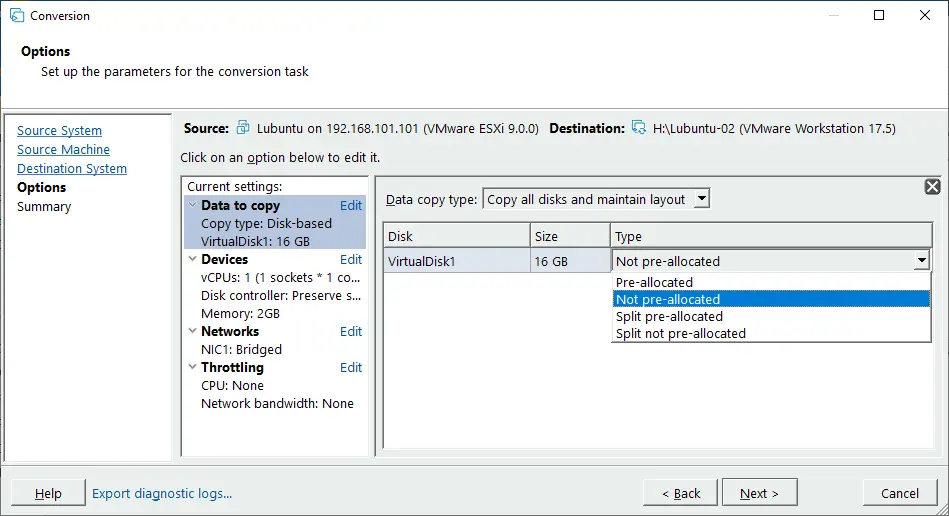
- Options. You can set up the necessary parameters of the conversion task. When you select the data to copy, the disk type names are different compared to VMware ESXi VMs. If you would like the VM to use a dynamically expanding virtual disk similar to a thin-provisioned disk, select Not pre-allocated. If your file system doesn’t support files larger than 4 GB, select a split disk. In the network settings, you can choose the network to which the virtual NIC (network interface controller) of the VM must be connected (VMnet0, VMnet1, VMnet8, etc.).
- Summary. Check the V2V conversion job settings and, if everything is correct, click Finish to run the job in VMware Converter. Wait until the conversion job finishes.
Once done, you should open the VM in VMware Workstation/Player/Fusion manually (File > Open and select the VM location you set as the destination during the conversion job).
How to Convert a VirtualBox VM to a VMware VM
If you need to perform V2V migration from VirtualBox to VMware Workstation or VMware ESXi, you can use a variety of different methods: Converting virtual disks, exporting to an OVF template, etc.
Follow the steps below:
- Convert a VirtualBox virtual disk to a VMware virtual disk (vdi to vmdk).
VBoxManage clonehd VirtualDisk.vdi VirtualDisk-tmp.vmdk --format vmdk - Upload the file to the datastore connected to the ESXi host by using an SFTP client such as WinSCP
- Convert the uploaded VMware Workstation .vmdk virtual disk file to the VMware ESXi format (.vmdk and -flat.vmdk files) by using vmkfstools.
vmkfstools -i VirtualDisk-tmp.vmdk -d thin VirtualDisk.vmdk - Create the new VM and select the existing virtual disk.
When converting virtual machines, follow the VMware V2V migration best practices.
Conclusion
VMware vCenter Converter remains a practical tool for handling both P2V and V2V migrations in VMware-based environments. By following a structured approach and validating compatibility beforehand, administrators can reduce downtime and ensure workload consistency after migration. Whether you are performing a P2V VMware converter step-by-step process or planning a broader virtualization project, careful preparation is key to success.