How to Instantly Recover a Hyper-V Virtual Machine from a Backup with Flash VM Boot
Instant VM recovery in Hyper-V solves a common problem: when a business-critical Hyper-V VM goes down, a full restore can take hours, which is often longer than your recovery time objective allows. Flash VM Boot instead boots the VM directly from its backup in seconds, so services come back almost immediately while the full recovery happens later or not at all. This guide covers how to instantly recover a Hyper-V VM with NAKIVO Backup & Replication using Flash VM Boot, how to use the recovered VM, and how to make it permanent.
Key Takeaways
- Flash VM Boot starts a Hyper-V VM directly from its backup in seconds, restoring service without a full restore first.
- The backup stays untouched: while the recovered VM runs, changes are held in a temporary write cache in the backup repository.
- Because disks are served from backup storage over iSCSI, the flash-booted VM has lower input/output performance, so treat it as temporary.
- To make the VM permanent, power it off first: Hyper-V does not support live migration for flash-booted VMs.
- Flash VM Boot needs no add-on and no separate license, only the Hyper-V-side iSCSI prerequisites below, and the same engine powers VM verification and safe patch testing.
What Is Instant VM Recovery in Hyper-V?
Instant VM recovery runs a VM using data read straight from a backup, without first copying all of that data back to a production host. In NAKIVO Backup & Replication, the feature is called Flash VM Boot (shown in the product as Flash boot). It requires no add-on component and no separate license, only the Hyper-V-side iSCSI prerequisites listed below.
How Instant VM Recovery Works
When you run a Flash VM Boot job, the Director creates a diskless shell VM on the target host, the Transporter exposes the VM disks in the backup repository as iSCSI targets, and the Director then mounts those disks to the new VM. For Hyper-V VMs, everything the VM writes while it runs goes into a disk-based write cache in the backup repository, so the backup itself is never modified, and those changes are discarded when you stop the job.
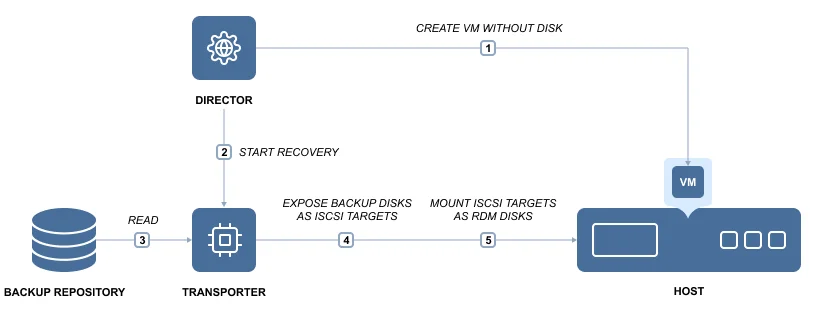
Because the disks are served from backup storage over iSCSI, a flash-booted VM has lower input/output performance than a VM on production storage. That makes it ideal for restoring service fast or for testing, and it is why you migrate it to production storage when you want it to be permanent and at full performance.
Why Use Instant VM Recovery in Hyper-V?
Use Flash VM Boot to restore a failed VM in seconds during an outage, to spin up a temporary copy for testing updates or patches before going live, or to verify that a backup boots and its applications run. For a normal, full-performance restore with no time pressure, use full VM recovery instead. This makes Flash VM Boot a practical part of a Hyper-V disaster recovery plan.
Instant VM Recovery vs Traditional VM Recovery in Hyper-V
Traditional Hyper-V recovery copies the entire VM from the backup repository back to a production host before you can power it on. For a large VM, that transfer can take hours, and the service stays down the whole time. Instant VM recovery reverses the order: the VM boots first, directly from the backup, and its data moves to production later, if at all.
The trade-off is performance. A traditionally recovered VM runs on production storage at full speed from the moment it starts. By contrast, a flash-booted VM reads its disks from the backup repository over iSCSI and therefore runs more slowly. Use traditional recovery when you have time and need full performance immediately; use instant recovery when every minute of downtime counts and you can migrate to production storage afterward.
|
Instant VM recovery (Flash VM Boot) |
Traditional full VM recovery |
|
|
Time to service |
Seconds: the VM boots straight from the backup |
Hours for a large VM: all data is copied first |
|
Where the disks live |
Backup repository, served over iSCSI |
Production storage |
|
Performance |
Lower input/output performance |
Full performance from the moment it starts |
|
Data movement |
Later, or not at all |
Before the VM can power on |
|
Best for |
Outages, patch testing, backup verification |
Planned restores with no time pressure |
Prerequisites for Performing Instant VM Recovery in Hyper-V
- A working backup of the VM with at least one recovery point.
- The target Hyper-V host added to the NAKIVO Backup & Replication Inventory.
- Enough compute and network capacity on the target host to run the recovered VM.
- The Microsoft iSCSI Initiator service enabled and running on the target Hyper-V host.
- The iSCSI disk is offline on the target Hyper-V host. Windows brings newly connected iSCSI disks online automatically, so set the SAN policy in DiskPart to keep new disks offline:
san policy=OfflineAll
How to Perform Instant VM Recovery on Hyper-V
Step 1. Open the Instant VM Recovery Wizard
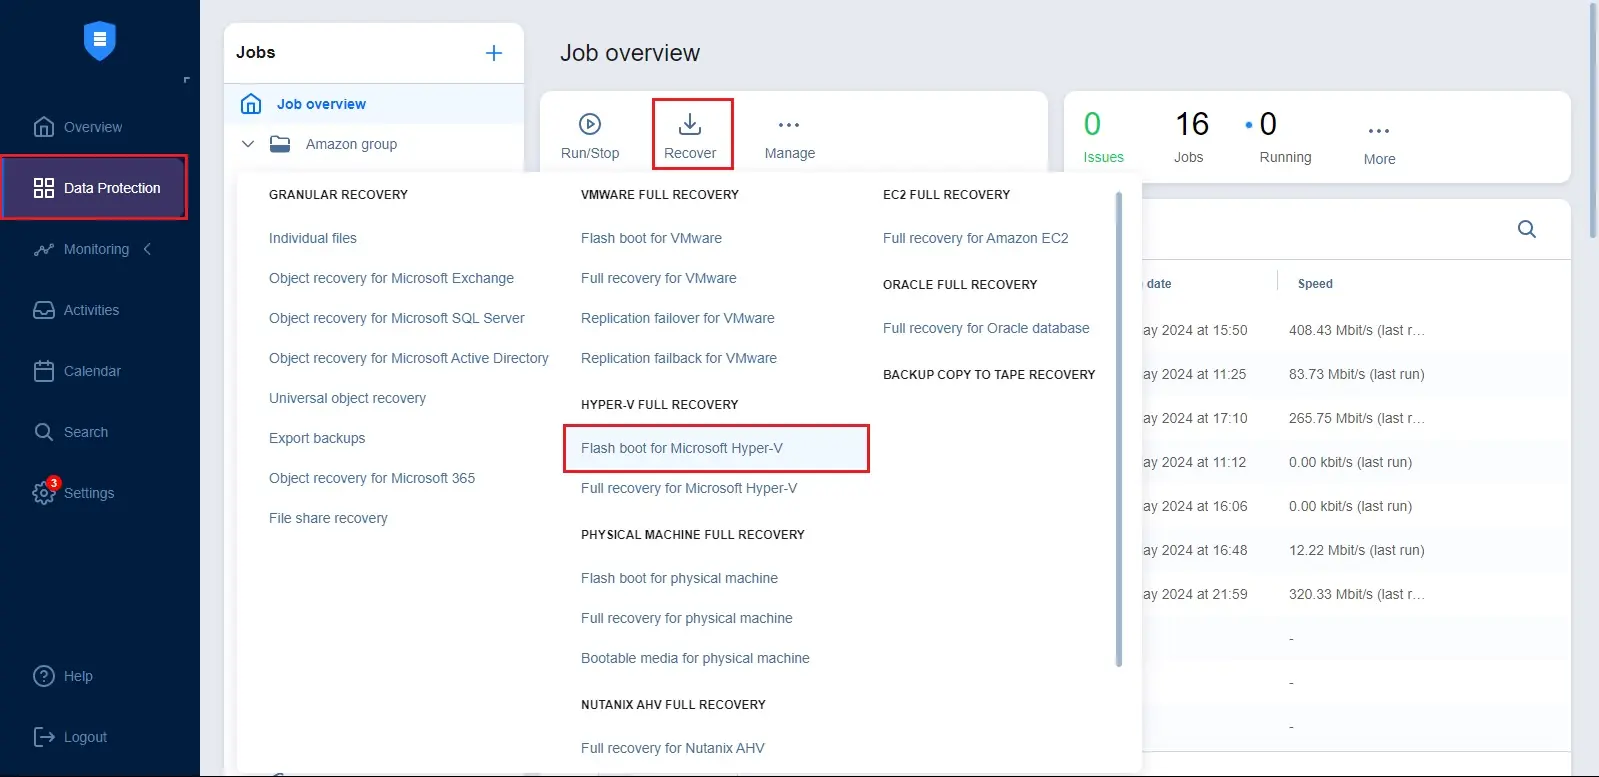
To open the New Flash Boot Job Wizard, go to the NAKIVO Backup & Replication web interface, open the backup or backup job that contains the VM, then select Recover > Flash boot for Microsoft Hyper-V.
Step 2. Select the Backup and Recovery Point
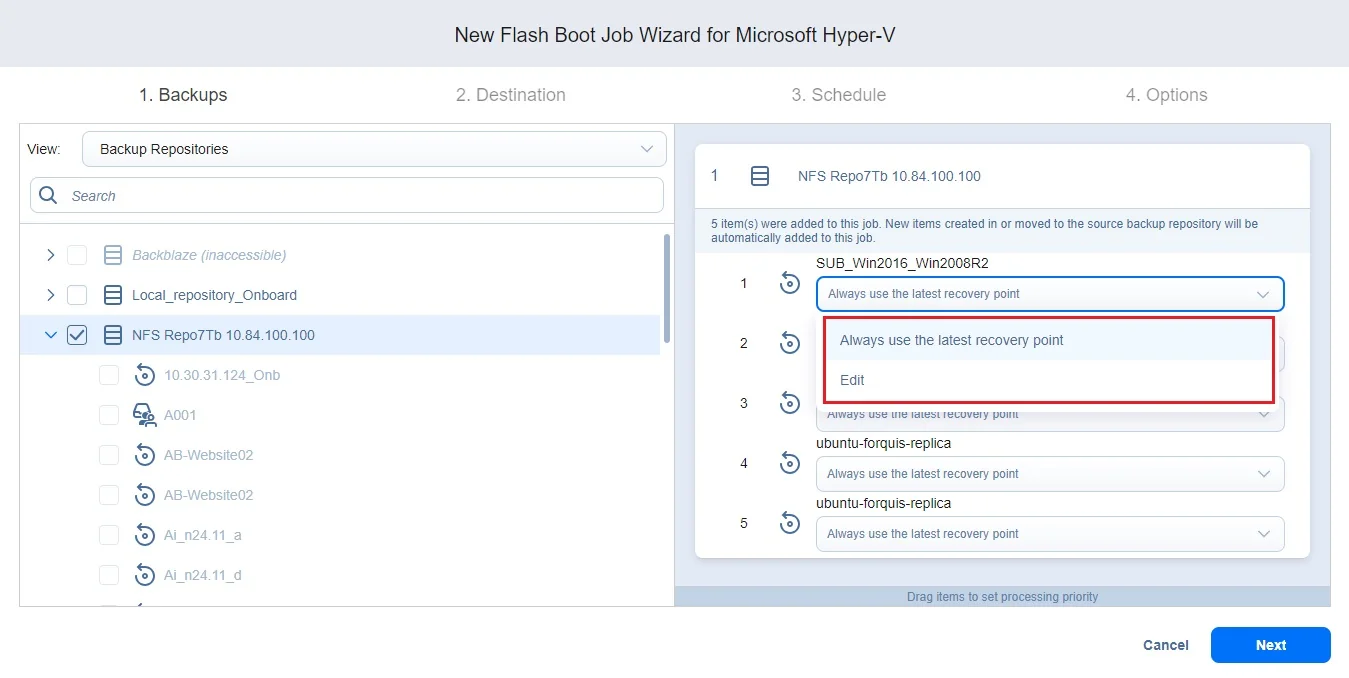
Select the VM to recover and the recovery point (the latest point is selected by default). Click Next.
Step 3. Configure Instant VM Recovery Settings
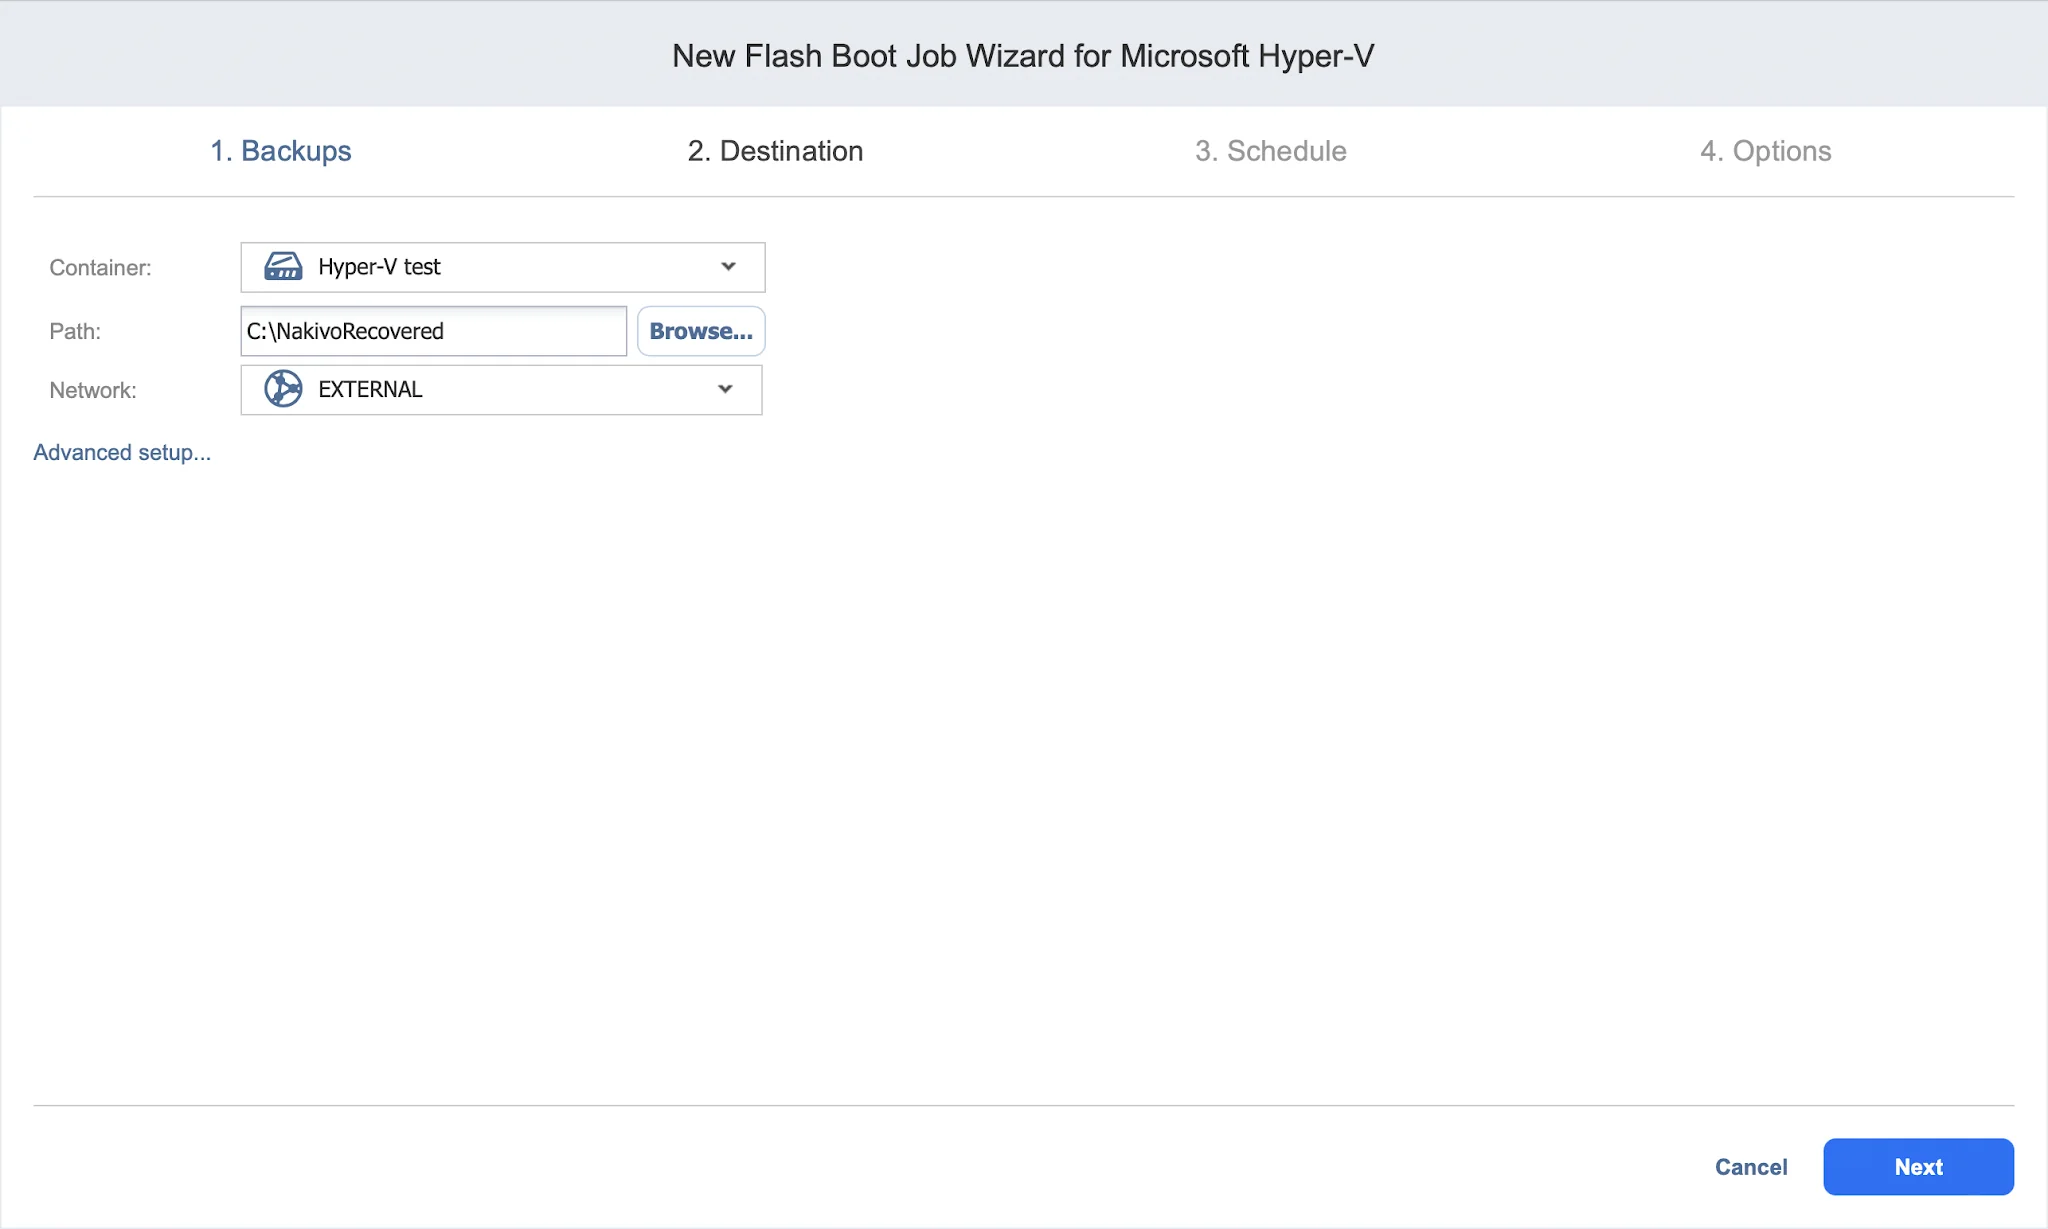
- Destination. Choose the Target container (the Hyper-V host), the Path (the volume), and the Network to assign to the recovered VM. Click Next.
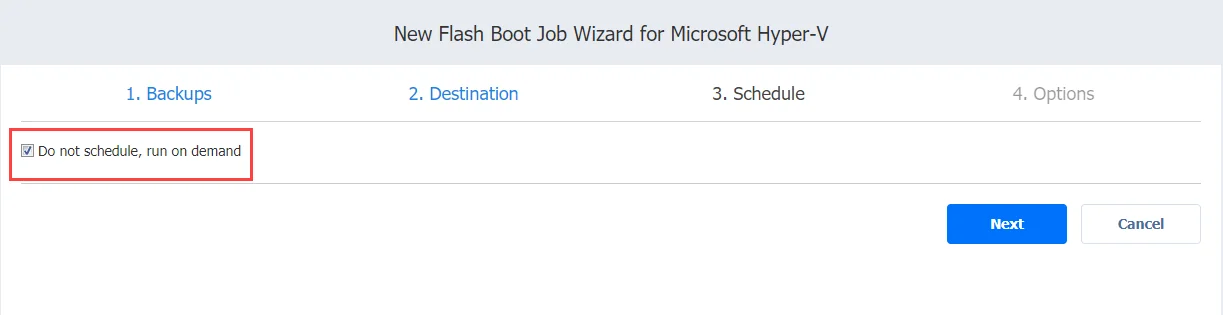
- Schedule. For a one-time recovery during an outage, choose Do not schedule, run on demand. Click Next.
- Options. Keep the default Append “-recovered” in the end naming so the recovered VM never overwrites the production VM, then set the MAC address and the power state. Optionally enable VM verification and malware detection here as well. Click Finish.
Step 4. Start Instant VM Recovery
Run the job. Within seconds, the VM boots and appears in Hyper-V as running, served directly from the backup repository.
Step 5. Verify the Recovered Hyper-V Virtual Machine
Verify the VM is reachable and its application responds. At this point, the service is restored, even though the VM is still running from the backup.
Using the Flash-Booted Hyper-V VM
While it runs, a flash-booted VM is a real, usable VM. Use it to restore service immediately, to test system updates and application patches safely, or to confirm a backup is valid. Remember the input/output performance caveat above, so treat it as temporary until you either make it permanent or discard it.
Make the Recovered Hyper-V VM Permanent
If you want to keep the recovered VM in production, migrate it off backup storage onto production storage so it runs at full performance and no longer depends on the backup repository.
Hyper-V does not support live migration for flash-booted VMs, so the recovered VM must be powered off before you migrate it. To make it permanent:
- In Hyper-V Manager, shut down the recovered VM.
- Open the VM settings, select the hard drive, and note the physical disk it booted from (shown as Disk N).
- In the Media section, choose Virtual hard disk and click New to open the New Virtual Hard Disk wizard.
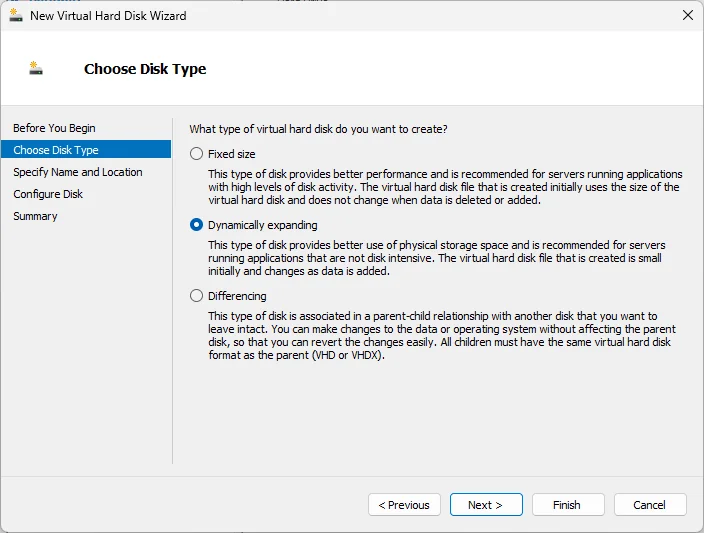
- Create a VHDX disk, set it to dynamically expanding, and give it a name and location.
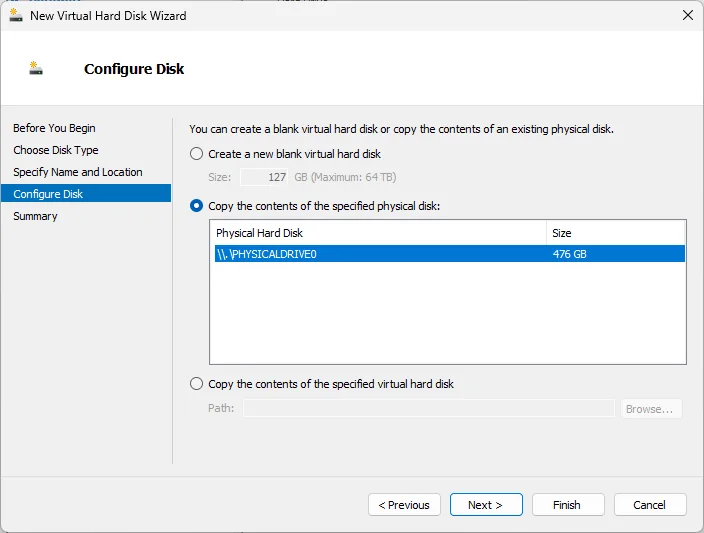
- On the Configure Disk step, select Copy the contents of the specified physical disk and choose the disk you noted earlier.
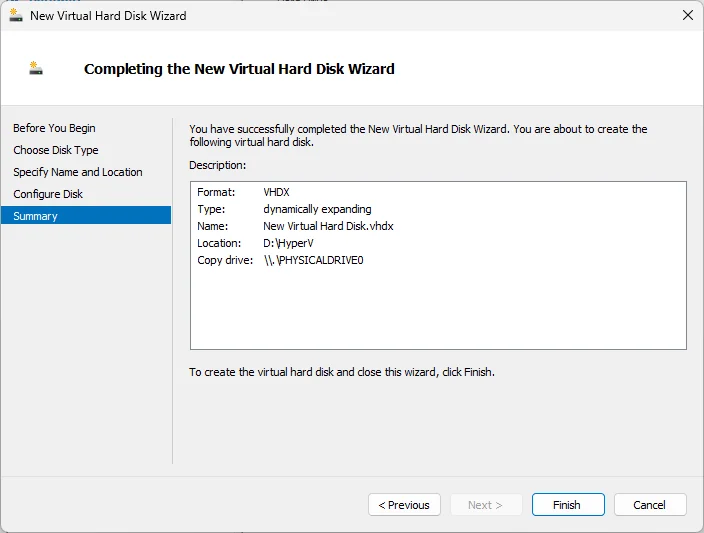
- Finish the wizard to build the new disk on production storage. The VM is now ready to run independently of the backup repository.
Alternatively, within a Hyper-V cluster, you can move the powered-off VM to another host:
- In Hyper-V Manager, right-click the recovered VM and select Move.
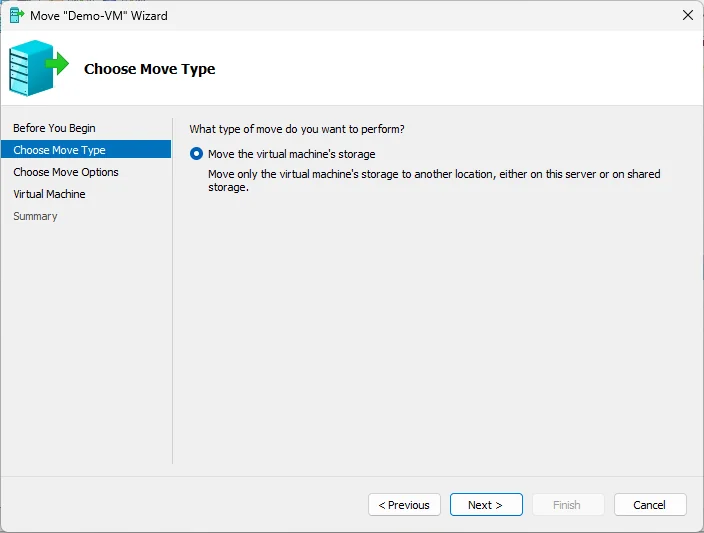
- In the Move Wizard, choose to move the virtual machine, then select the destination host.
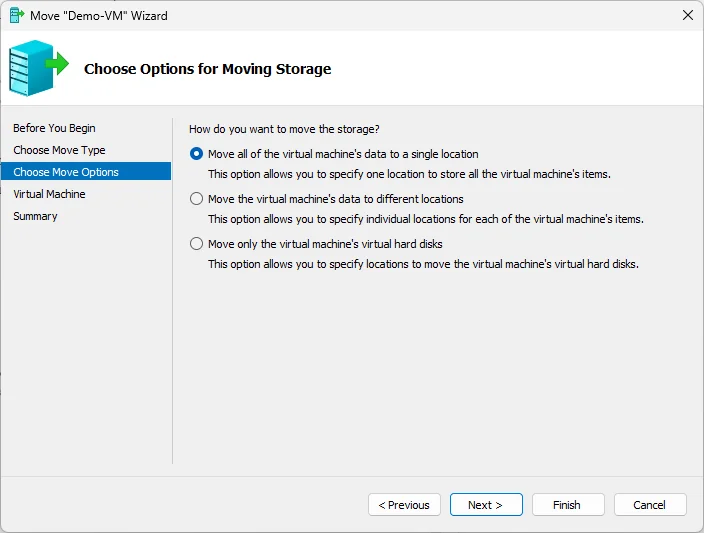
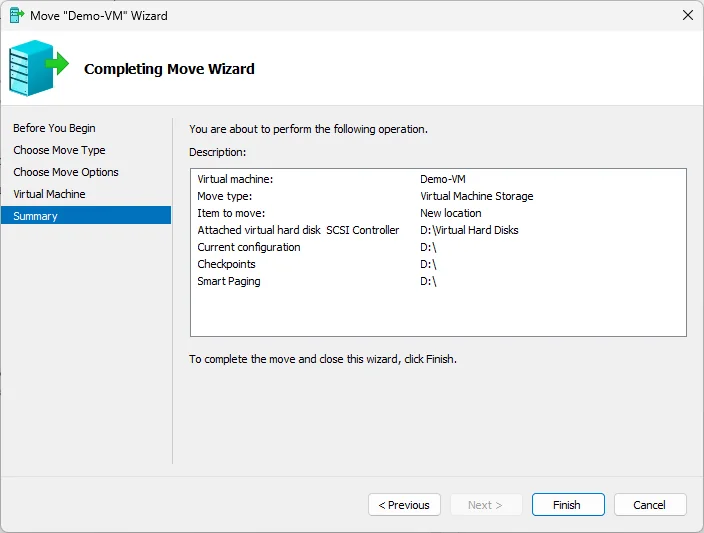
- Choose to move the VM’s data to a single location, specify that location on the destination host, and finish the wizard.
Migration between standalone Hyper-V hosts is not supported, and pass-through disks cannot be migrated directly. For a pass-through disk, create a new virtual disk and transfer the data instead. On Hyper-V 2019, adding a new VHDX may fail with a “Failed to convert the virtual disk” error, which the NAKIVO Knowledge Base documents together with its workaround.
After the recovered VM has been migrated to production storage, return to the Flash VM Boot job and click Discard VMs. NAKIVO Backup & Replication detects that the VM was migrated and leaves it in place, so nothing is lost.
Discard the Recovered VM
If you only needed the VM temporarily, for testing or verification, click Discard VMs in the Flash VM Boot job. NAKIVO Backup & Replication powers off the recovered VM, removes it, and cancels any changes made while it was running. The source VM and the backup are left untouched.
Best Practices and Troubleshooting for Instant VM Recovery
Best Practices for Instant VM Recovery
- Test your backups regularly. Enable VM verification (screenshot or boot verification) on backup jobs so NAKIVO Backup & Replication flash-boots each backup automatically and confirms the OS starts.
- Keep flash-booted VMs temporary. Because they run from backup storage, migrate them to production or discard them rather than leaving them running long term.
- Scan before you go live. Turn on malware detection for the Flash Boot job to check the recovery point for ransomware, and recover suspicious VMs to an isolated network.
- Keep recovered VMs clearly labeled. Leave the default
-recoveredsuffix in place so a recovered VM never overwrites the production VM.
Common Instant VM Recovery Issues and Solutions
- Flash Boot Recovery is not supported for backups created from 4K native (4Kn) disks; check the source disk type if a job will not start.
- Each Microsoft iSCSI Target Server allows up to 256 iSCSI target instances (VM disks) to be flash-booted at once, so split large recoveries if you reach the limit.
- If the iSCSI port on the Transporter assigned to the backup repository is already occupied by another service, configure data routing so that a proxy Transporter forwards the iSCSI target to the target host.
- If the job cannot attach the disks, check that the Microsoft iSCSI Initiator service is running on the target host and that the iSCSI disk is offline, as described in the prerequisites.
- If a job still fails, check the backup repository, the Transporter, and the target host, which are the usual sources of Flash VM Boot errors.
Other Recovery Options in NAKIVO Backup & Replication
Flash VM Boot is one of several recovery paths. For a standard restore, use full VM recovery, for individual files, use file-level recovery, and for application items such as mailboxes or database objects, use object recovery. For continuous protection with the tightest recovery objectives, consider VM replication. All of these fit into a broader Hyper-V backup and recovery strategy.
FAQ
What is the difference between Instant VM Recovery and Full VM Recovery?
Instant VM recovery (Flash VM Boot) boots the VM directly from its backup in seconds, so it runs from the backup repository while you decide what to do next. Full VM recovery copies the entire VM back to production storage first, which takes longer but delivers full performance immediately.
Can I perform Instant VM Recovery in a Hyper-V Failover Cluster?
Yes. You can flash-boot a VM onto a host in the cluster. Keep in mind that when you later make the VM permanent, moving it with Hyper-V's Move feature is supported only within a cluster; moving a flash-booted VM between standalone hosts is not supported.
How do I make Instant VM Recovery permanent?
Shut the recovered VM down, then create a new VHDX and copy the booted disk's contents to production storage, or use Move within a Hyper-V cluster. Afterward, click Discard VMs in the Flash Boot job; NAKIVO Backup & Replication recognizes the migration and keeps the VM in place.
How long does Instant VM Recovery take?
The VM boots within seconds because no data is copied upfront; it runs straight from the backup repository over iSCSI. How quickly it reaches full performance depends on how long the later migration to production storage takes.
What Are the Prerequisites for Instant VM Recovery in Hyper-V?
You need a working backup with at least one recovery point, the target Hyper-V host added to the NAKIVO Backup & Replication Inventory, and enough compute and network capacity on that host. Make sure the iSCSI disk is offline on the Hyper-V host before you start.
Does Instant VM Recovery Affect the Original Backup?
No. The backup is never modified. Changes made while the VM runs are held in a temporary write cache in the backup repository and are discarded when you stop the job.