Ransomware Detection for Backups
Ransomware rarely announces itself the moment it lands. While the payload waits, backup jobs keep running and copy whatever is on disk, malicious code included. Once the attack begins, encrypted files can follow it into the backup repository. Jobs report success and recovery points look complete, yet the infection is preserved.
Ransomware detection for backups looks for that infection in stored backup data, so a compromised recovery point can be flagged before anyone restores it. NAKIVO Backup & Replication mounts recovery points on a dedicated Scan Server, runs supported antivirus software against their contents and records the outcome as a ransomware scan status. Read this post to learn how backup ransomware detection works, how to run scans on demand or automatically and what the feature requires.
Key Takeaways
- Ransomware detection for backups inspects recovery points that are already stored in a repository, independently of any recovery operation.
- NAKIVO Backup & Replication performs the scan with third-party antivirus software installed on a separate machine called a Scan Server.
- Every recovery point carries one of four ransomware scan statuses: Infected, No Threats Detected, Clean or Not Scanned.
- Scans run on demand, after backup and backup copy jobs or on a weekly or daily schedule.
- An infected recovery point keeps that status until a person reviews it and marks it as clean.
What Is Ransomware Detection for Backups?
Ransomware detection for backups is a security control applied to backup data rather than to production workloads. Instead of watching a live file system, it opens the data that has already been written to the backup repository and looks for malicious content inside it.
The distinction matters for two reasons. First, backup repositories hold the earlier versions of a workload, so the last uninfected copy of the data usually lives there. Second, bringing data back only helps if it is free of malware. Restoring an infected recovery point returns the environment to the same compromised state, often without anyone noticing until encryption starts again.
In NAKIVO Backup & Replication, ransomware detection in backup data combines a Scan Server that hosts the antivirus engine with scan sessions that define what to scan and when. Results are recorded as a status on each recovery point and shown across the interface.
How NAKIVO Detects Ransomware in Backups
Scanning backup data with antivirus software
NAKIVO Backup & Replication does not implement its own malware engine. It delegates detection to supported antivirus software that you install and maintain on the Scan Server. During a scan session, the NAKIVO solution connects to the Scan Server, presents the contents of the selected recovery point to it and runs the antivirus engine against the mounted data. Detection therefore reflects the signature database of the engine you chose, and it applies to backup data at rest rather than to an attack in progress.
Running the scan on a dedicated Scan Server
A Scan Server is a physical or virtual machine that you own, running Windows or Linux, with supported antivirus software already installed. You register it in Settings > Ransomware > Scan Servers, and NAKIVO Backup & Replication uses it for every ransomware scan.
Keeping the scan on a separate machine has a practical benefit: The antivirus engine works on the mounted recovery point rather than on live systems, so the scanning load stays off production workloads. Because the Scan Server and its antivirus are yours, no backup data leaves your environment. You can register several Scan Servers and let NAKIVO Backup & Replication pick one automatically. In that case, the NAKIVO solution prioritizes Linux-based servers with the highest number of available concurrent scan tasks and the lowest ping time to the repository that holds most of the selected recovery points.
Choosing what to scan
A scan session covers a scope that you define. You can point it at an entire backup repository, a single backup or individual recovery points and then narrow it further with one of the following options:
- Scan all unscanned recovery points: Covers every recovery point in supported repositories that has never been scanned.
- Scan recovery points created in range: Limits the scan to recovery points created between two dates you pick.
- Scan selected recovery point(s): Covers one or more recovery points that you select manually.
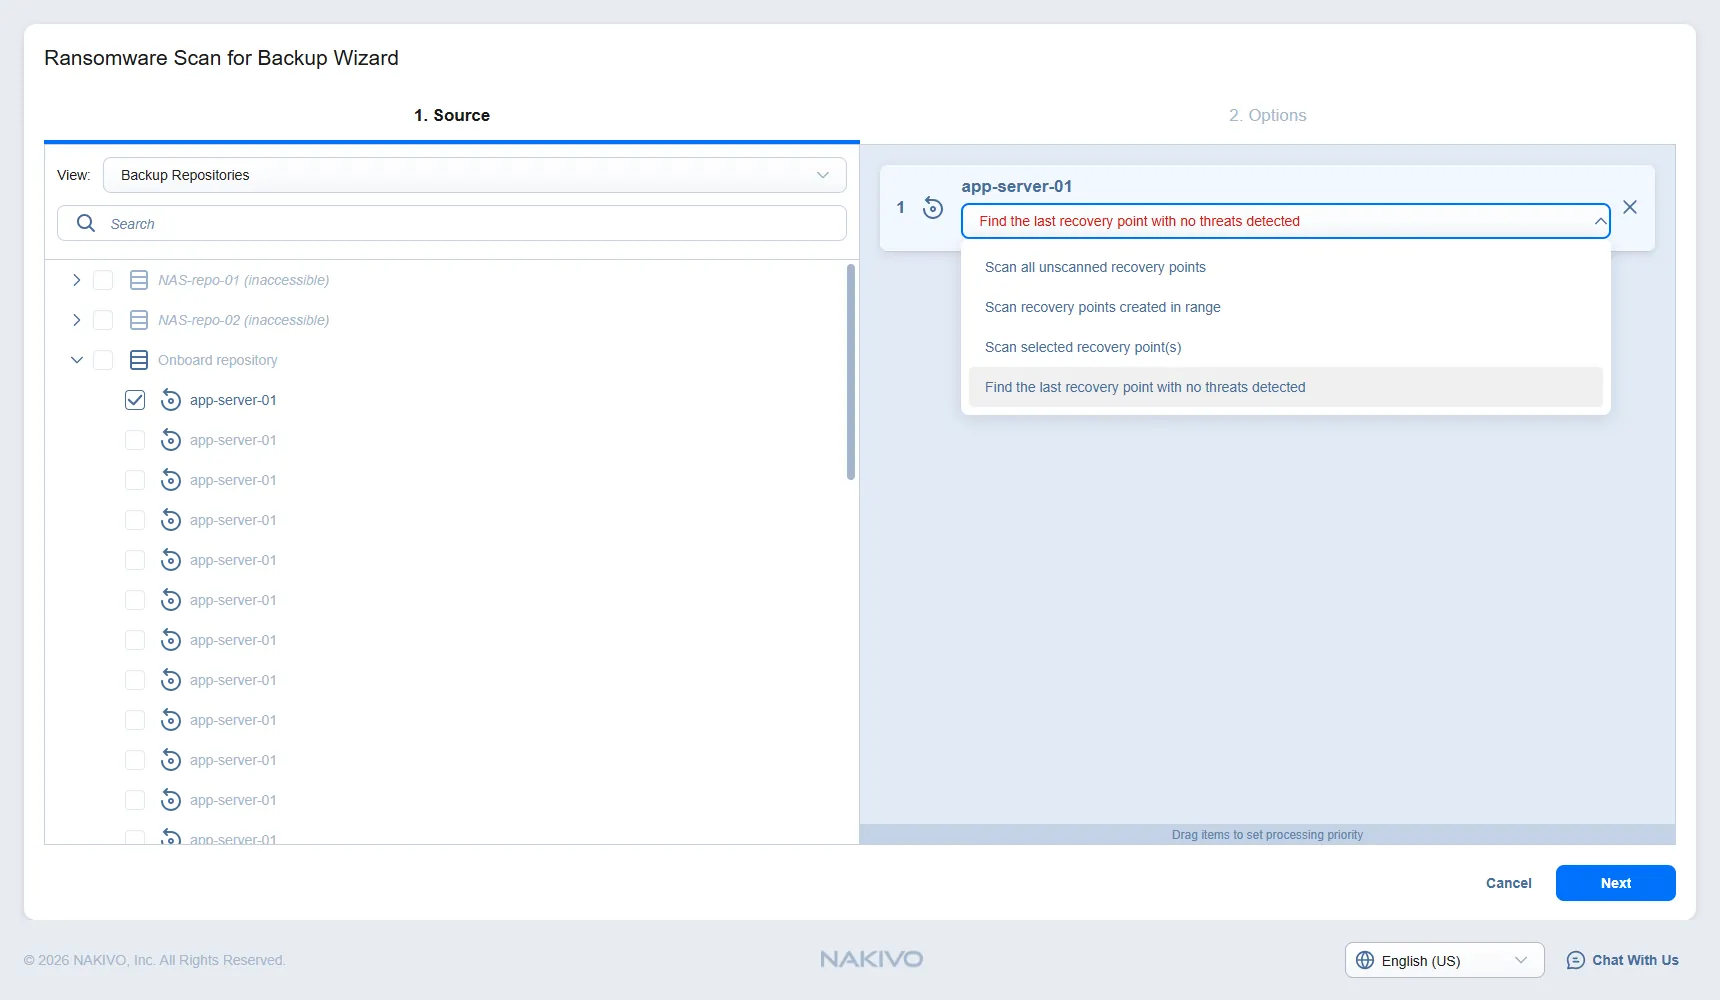
- Find the last recovery point with no threats detected: Scans the recovery points of a single backup object from newest to oldest and stops at the first one with the No Threats Detected or Clean status. If none qualify, the session fails, and every recovery point it scanned is marked Infected.
The last option matters most during an incident. When a workload is already encrypted and nobody knows when the compromise started, it identifies the most recent recovery point with no threats detected, without you having to test candidates one by one.
Choosing when to scan
Ransomware scanning runs in three modes:
- On demand: You can start a scan from the Ransomware Scan for Backup wizard at any time.
- After a job: With Scan after backup selected, new recovery points created by a backup or backup copy job are scanned as soon as the job completes. The scan is skipped if the job fails or produces no new recovery point. Backup copies of scanned recovery points inherit their status instead of being scanned again.
- On a schedule: Scans run weekly or daily, at a start time and time zone you define.
Automated scans follow either the job or the calendar, not both, and on-demand scans stay available either way.
Scans that cover all unscanned recovery points or a date range proceed from the newest recovery points to the oldest, so the data most likely to be restored is assessed first.
How to Detect Ransomware in Backups with NAKIVO
Step 1: Prepare a Scan Server
- Install one of the supported antivirus products on a Windows or Linux machine that meets the Scan Server requirements listed later in this post.
- In NAKIVO Backup & Replication, go to Settings > Ransomware > Scan Servers and click +. The New Scan Server dialog opens.
- Type a display name, select Microsoft Windows or Linux as the platform and enter the machine’s host name or IP address.
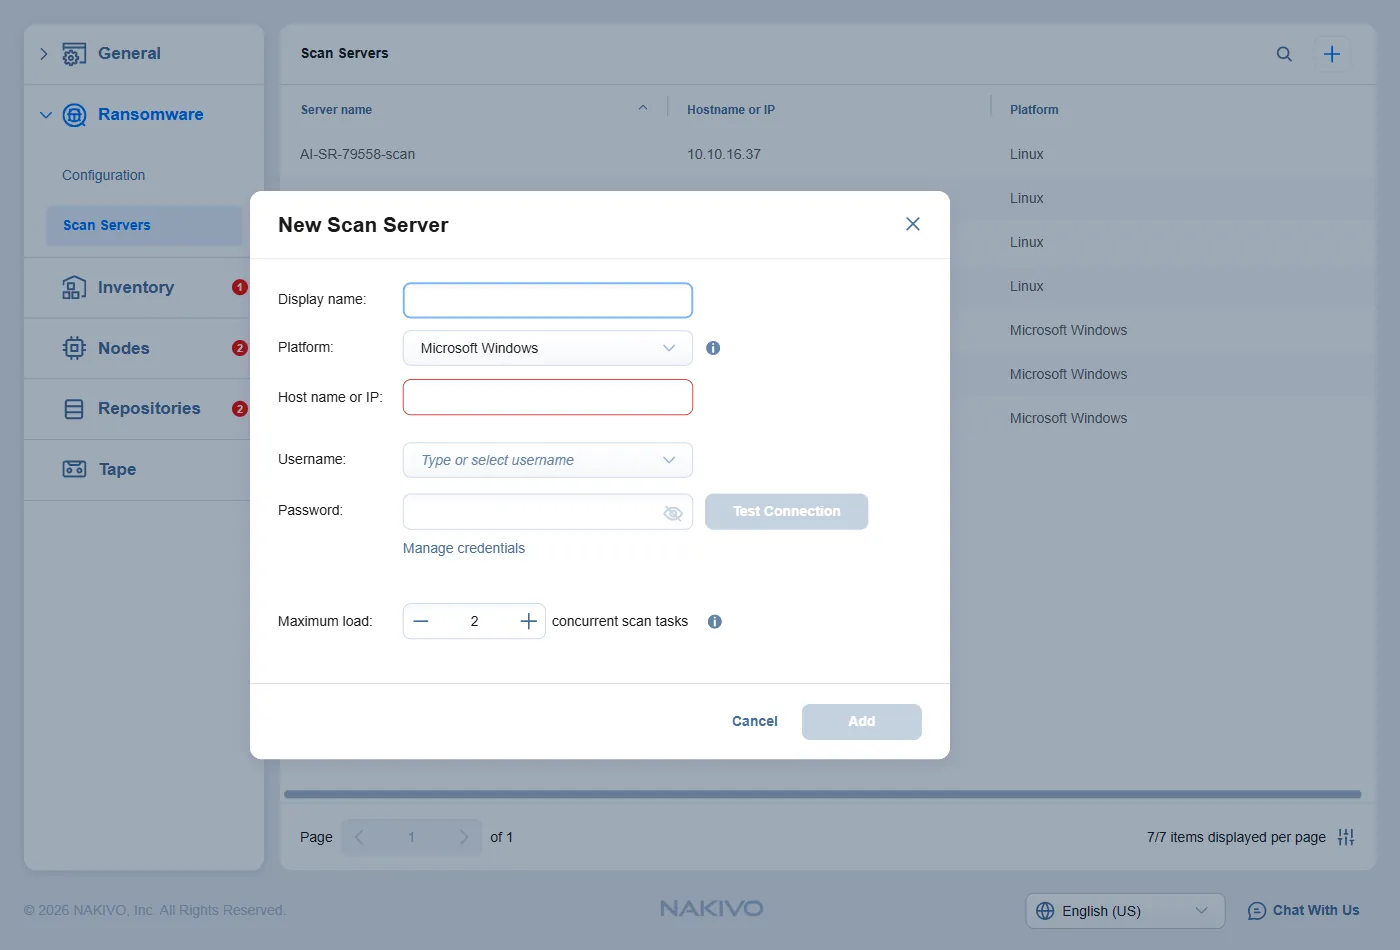
- Enter the credentials for the machine:
- Microsoft Windows: Fill in the username and password.
- Linux: Select a credentials type. With Password, fill in the username and password. With Private key, select saved credentials in the Credentials dropdown.
- For a Linux Scan Server, set the Secure Shell (SSH) port. The default is 22. To register a NAKIVO virtual appliance deployed as a Transporter, enter 2221, the port the appliance listens on. The field doesn’t prefill it.
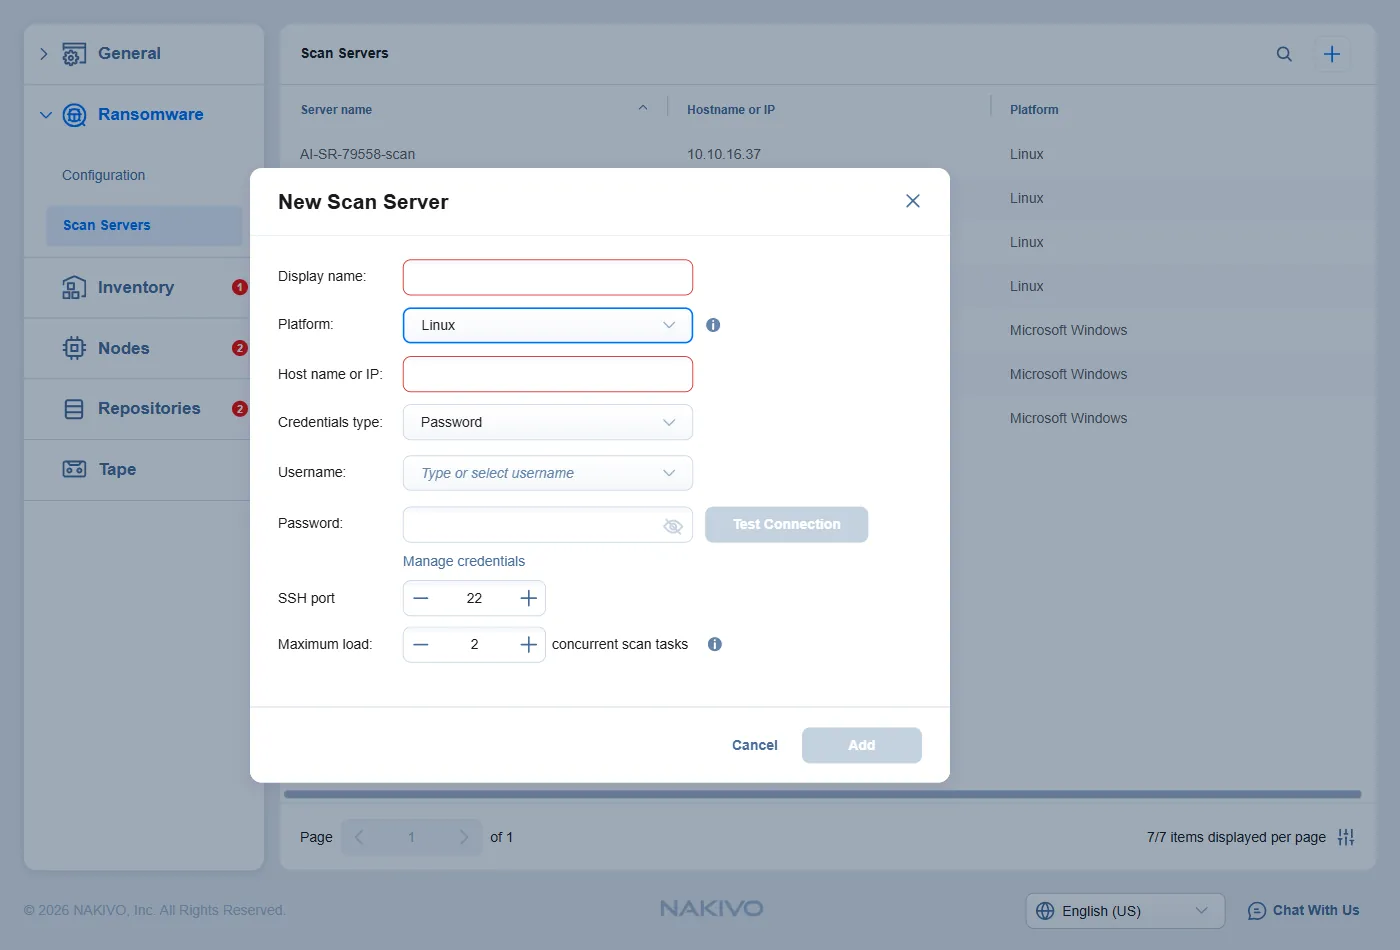
- Click Test Connection. NAKIVO Backup & Replication verifies that the machine is reachable and that supported antivirus software is present. A failure message names the reason, for example, an active firewall, a closed SSH port, an expired password, a Linux user outside the sudo group, the wrong platform, a non-English operating system or missing antivirus software.
- Set the maximum load, the number of concurrent scan tasks the server can run, from 1 to 10. The default is 2.
- Click Add. The new server appears in the Scan Servers list with its host name and platform.
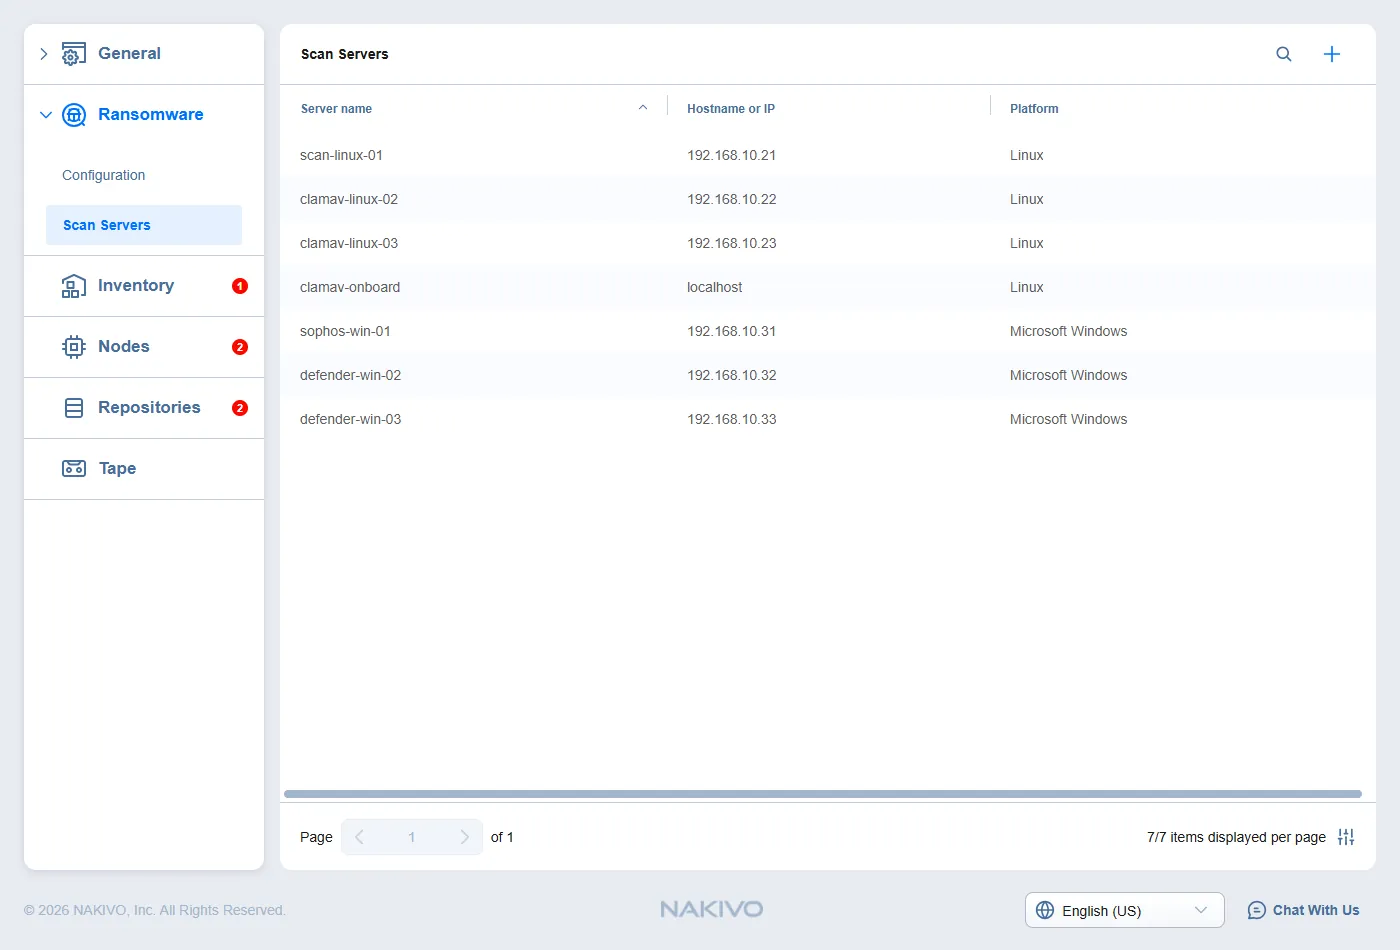
Until at least one Scan Server exists, the Scan for ransomware option stays disabled everywhere in the interface.
Step 2: Create a backup scan session
Open the Ransomware Scan for Backup wizard from the object you want to scan:
- Repositories tab or Repository details page: Click Manage (…) next to a repository and select Scan for ransomware. The repository and all its backups are preselected.
- Backups table or Backup details page: Click Manage (…) next to a backup and select Scan for ransomware. The backup and all its recovery points are preselected.
- Recovery points table: Click Manage (…) next to a recovery point and select Scan for ransomware.
- Data Security dashboard: Click Scan, or open the Threats tab and click Scan.
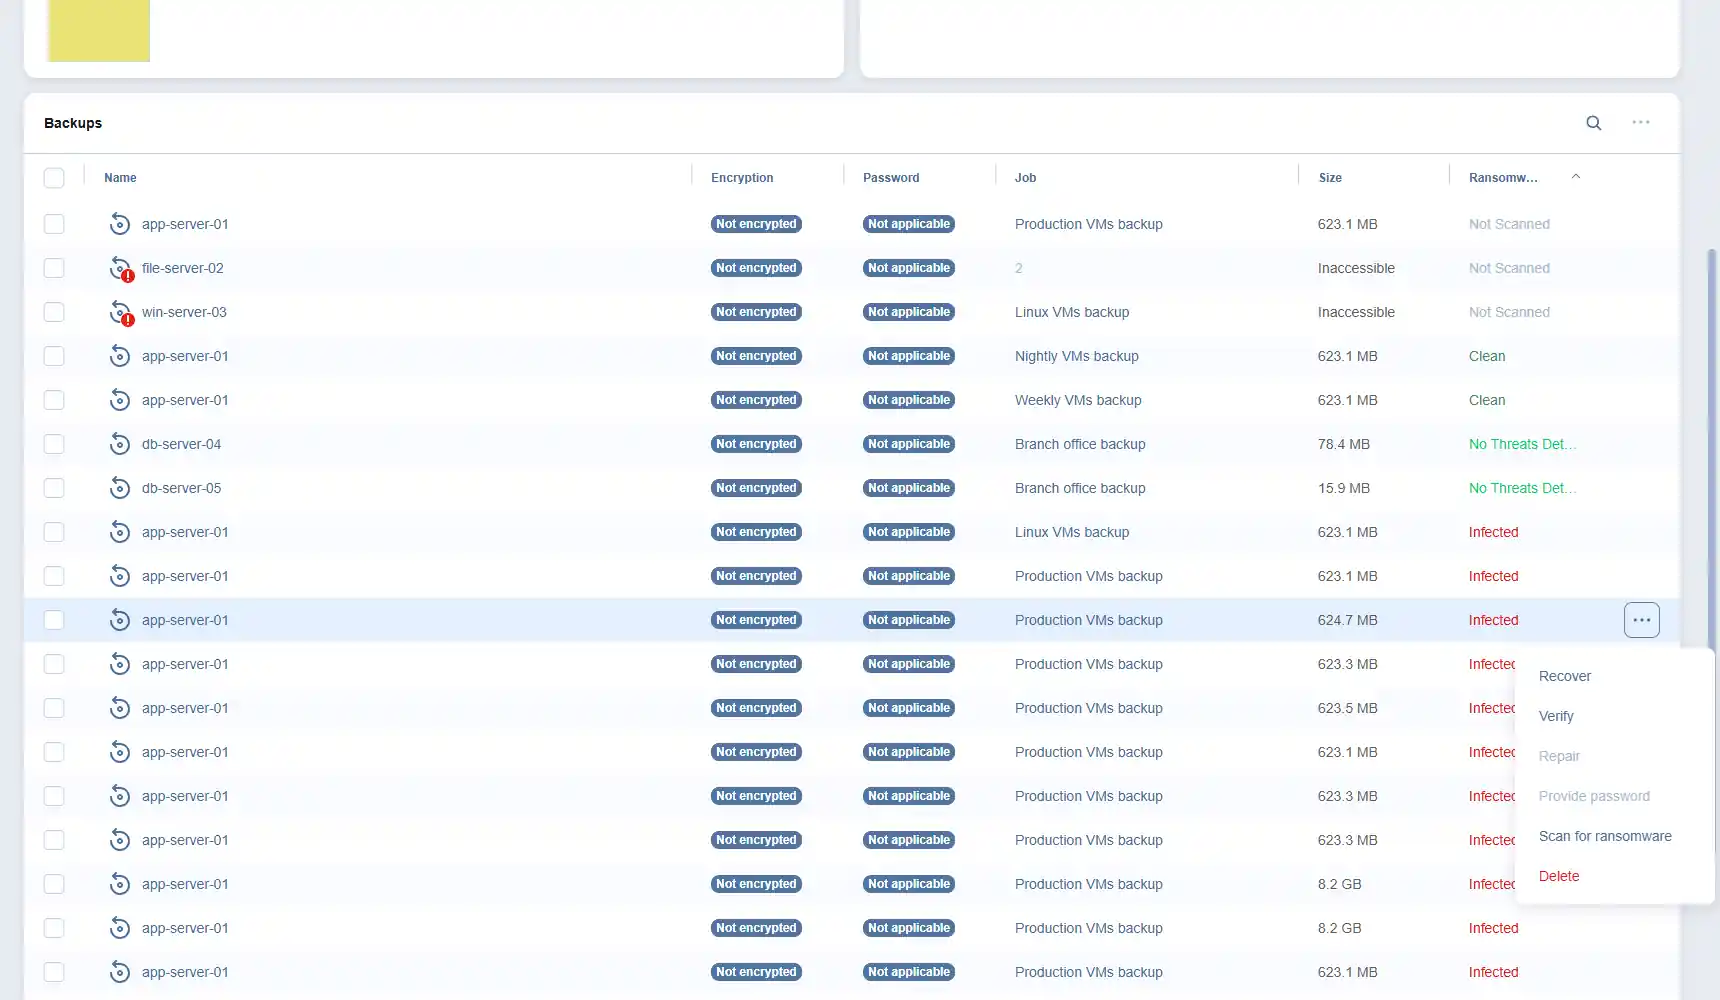
Step 3: Select recovery points to scan
In the Source step, select the backup repositories or backup objects in the left pane, then pick the scope in the dropdown under each item on the right: Scan all unscanned recovery points, Scan recovery points created in range, Scan selected recovery point(s) or Find the last recovery point with no threats detected.
Scan selected recovery point(s) opens the Select Recovery Points dialog, where you check individual recovery points and click Apply.
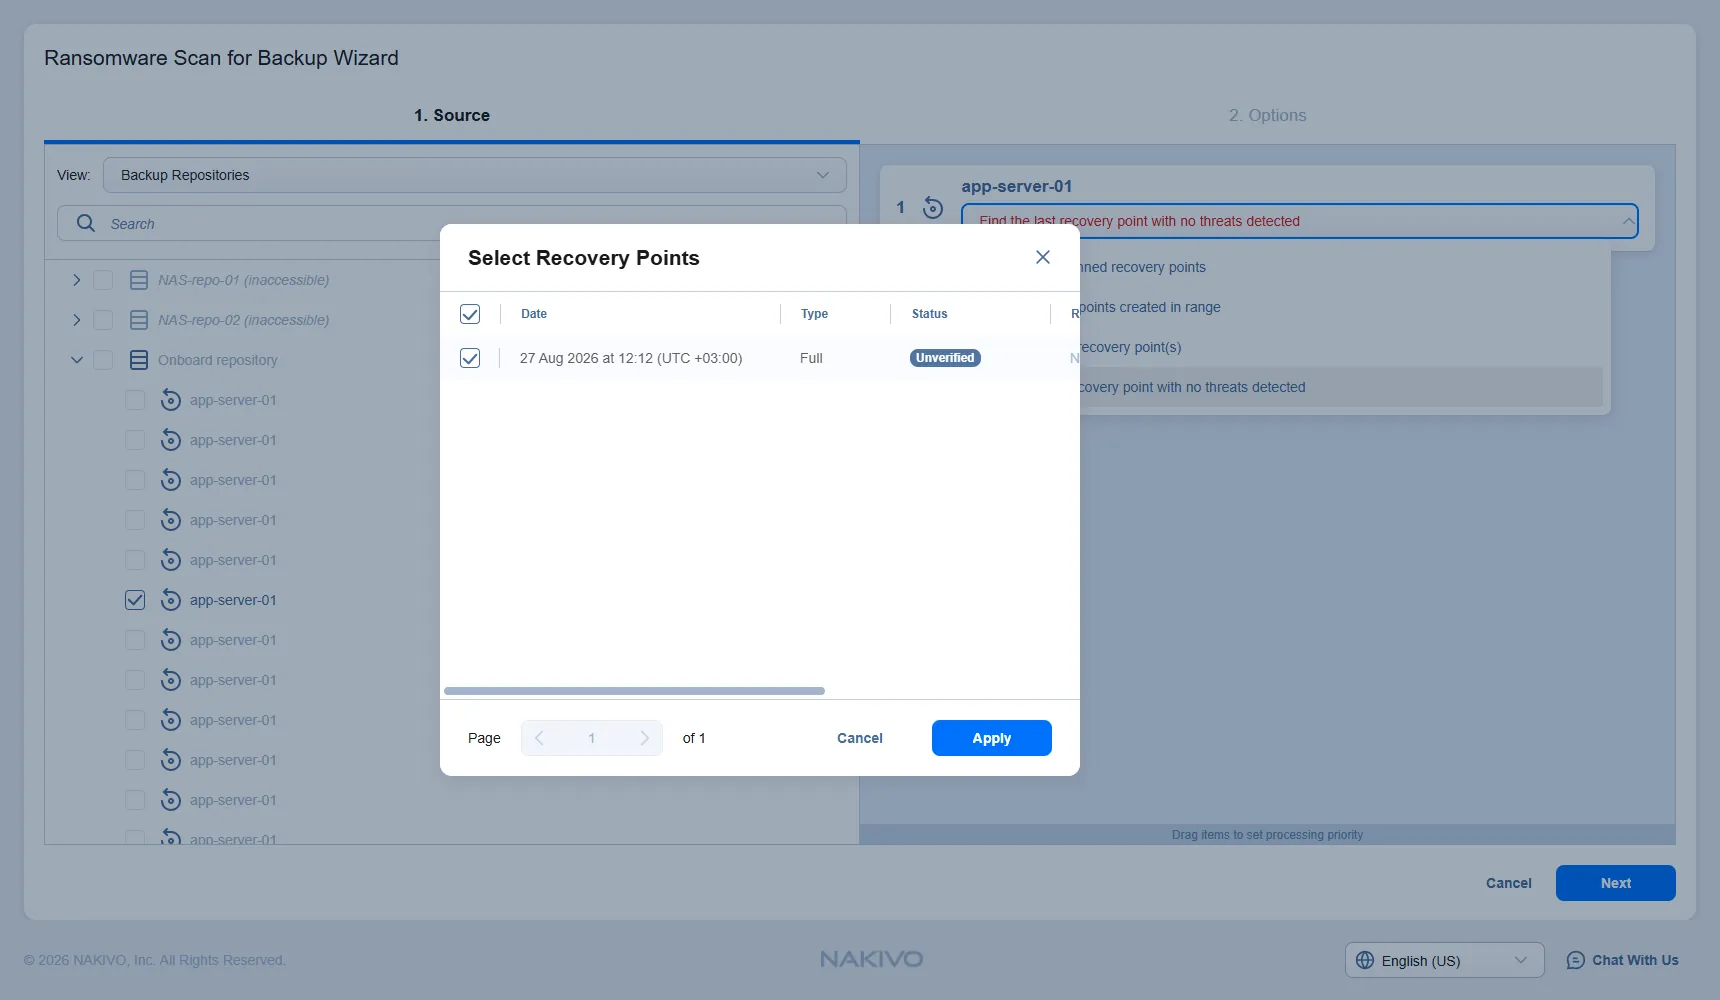
The Ransomware scan column shows the current status of every recovery point, so you can see what has already been assessed before you commit to a scope. Recovery points that are corrupted, inaccessible, pending removal or already being scanned are displayed in red and cannot be selected.
Step 4: Run the antivirus scan
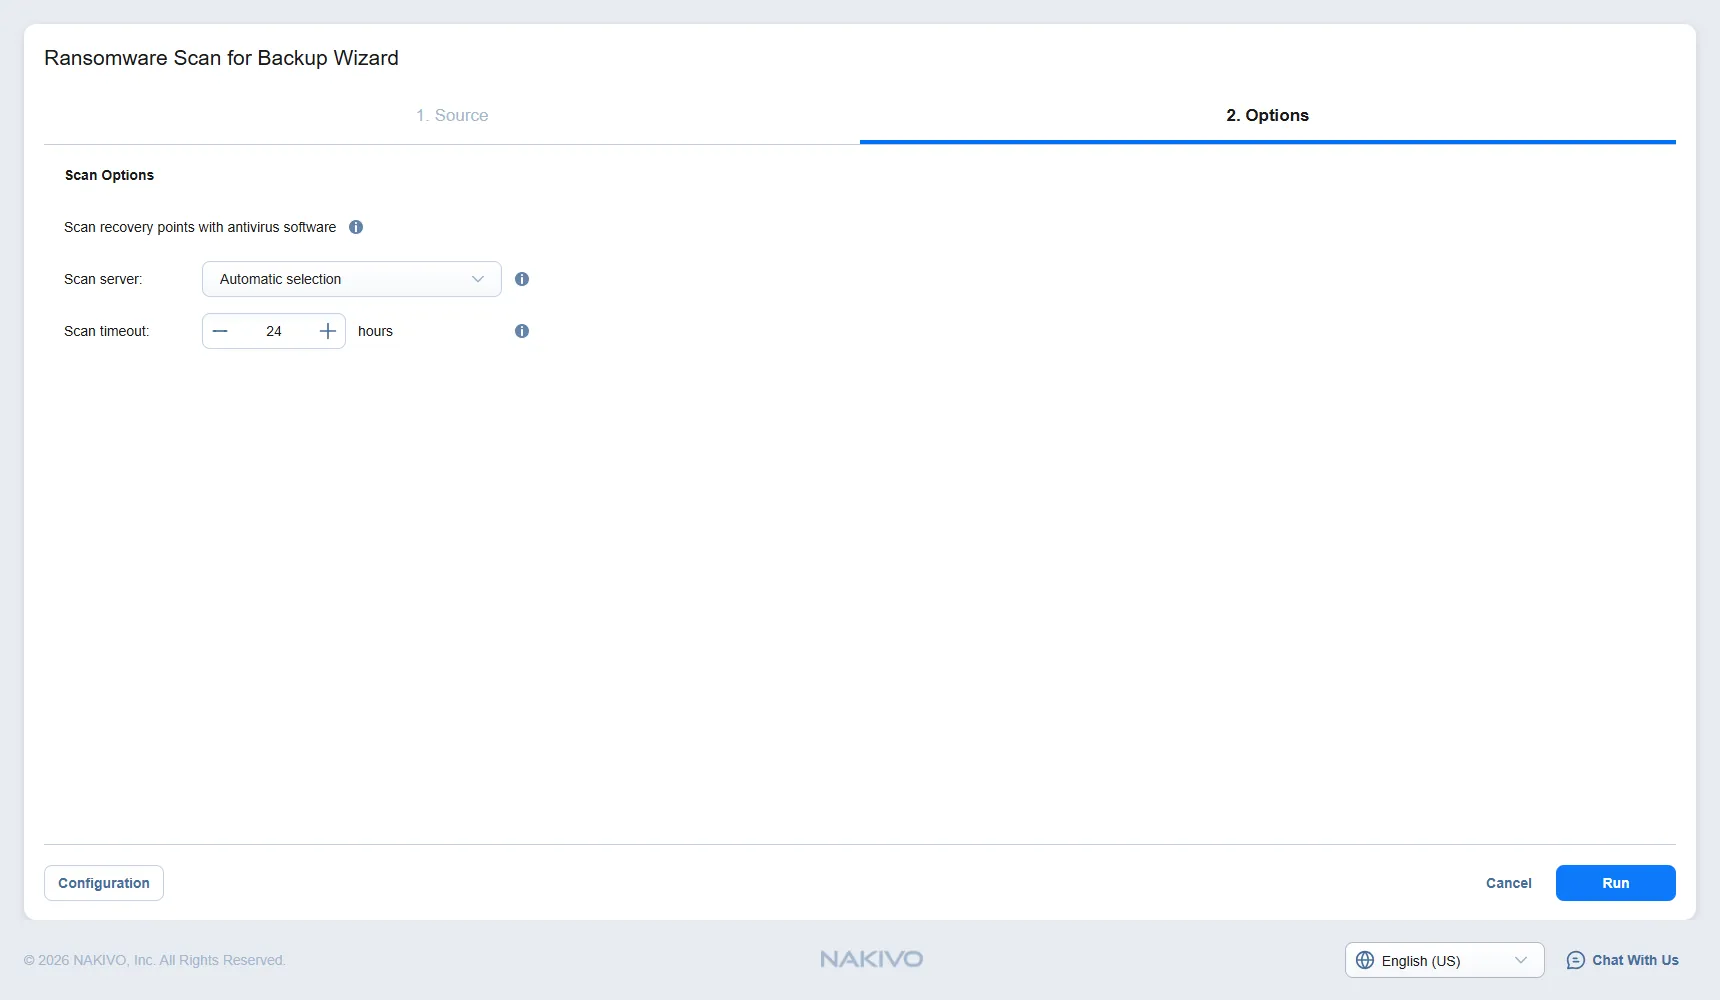
The Options step sets which Scan Server runs the analysis. Select a specific server, or leave Automatic selection so the NAKIVO solution chooses the most suitable one. Set the scan timeout in hours, then click Run.
The default timeout is 24 hours, and the supported range is 1 to 72 hours. A scan that exceeds its timeout fails. You can follow progress in the Activities dashboard while the session runs.
Step 5: Review detected ransomware threats
Open Data Security > Threats. The dashboard aggregates the results of every scan session:
- The summary bar shows the count of issues (ransomware alarms and notifications) and of recovery points in each status: Infected, No Threats Detected, Clean and Not Scanned.
- The Scan Status and Threats Summary widgets break recovery points down by status and refresh every 10 seconds.
- The Geo Map widget places repositories that have a location assigned on a world map and colors each point red when at least one infected recovery point sits there, so you can see which site is affected and report it to auditors or regulators.
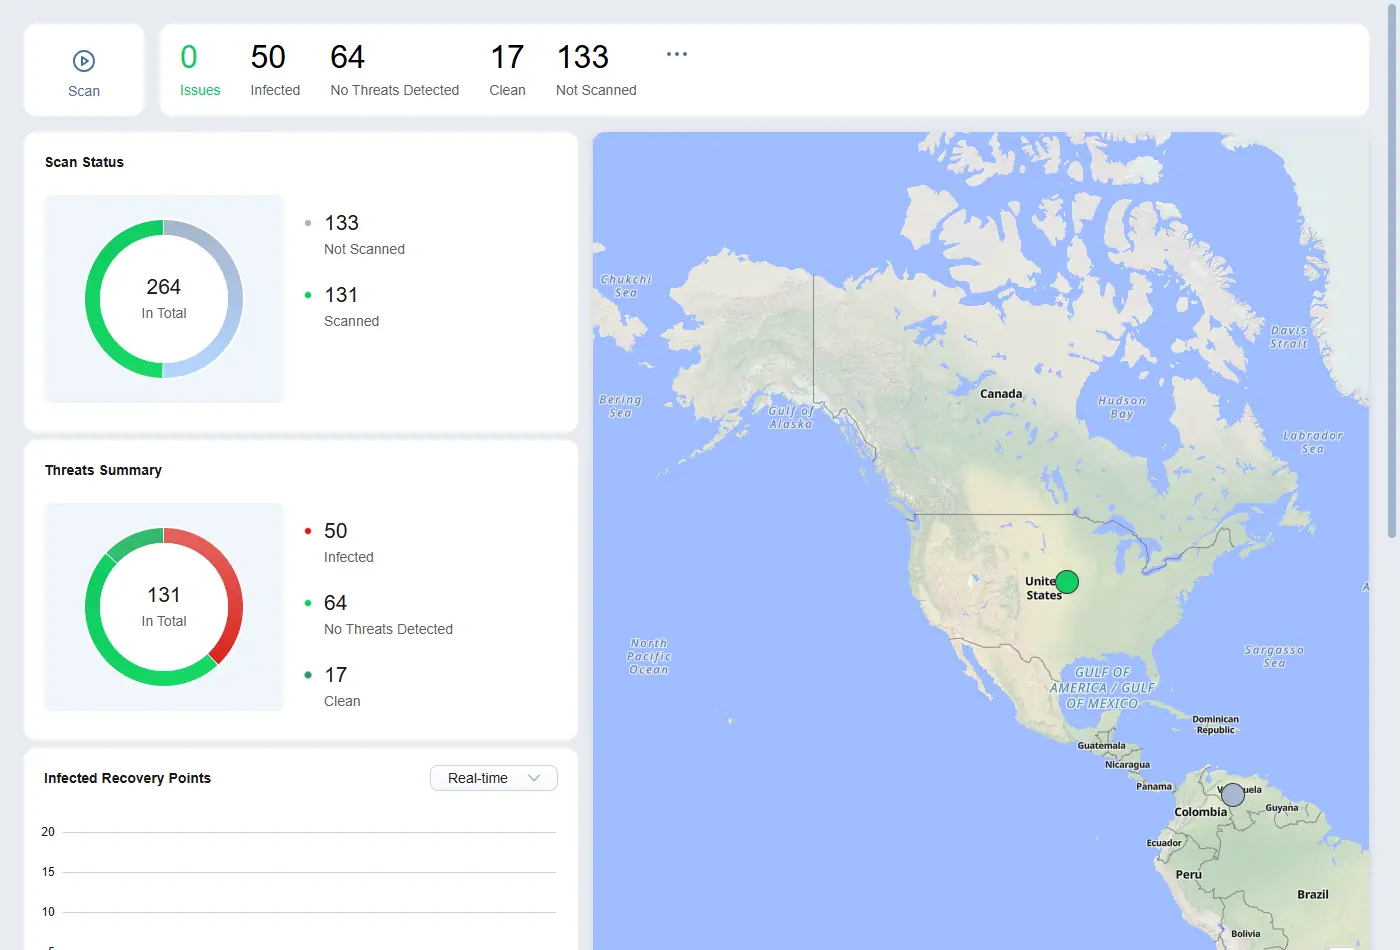
Further down the dashboard, two widgets focus on infected recovery points:
- The Infected Recovery Points widget plots their number over a time range, in real time or across the last month or year.
- The Threats widget lists them in a table you can search, sort and filter by Scan Method, Location and Detection Date.
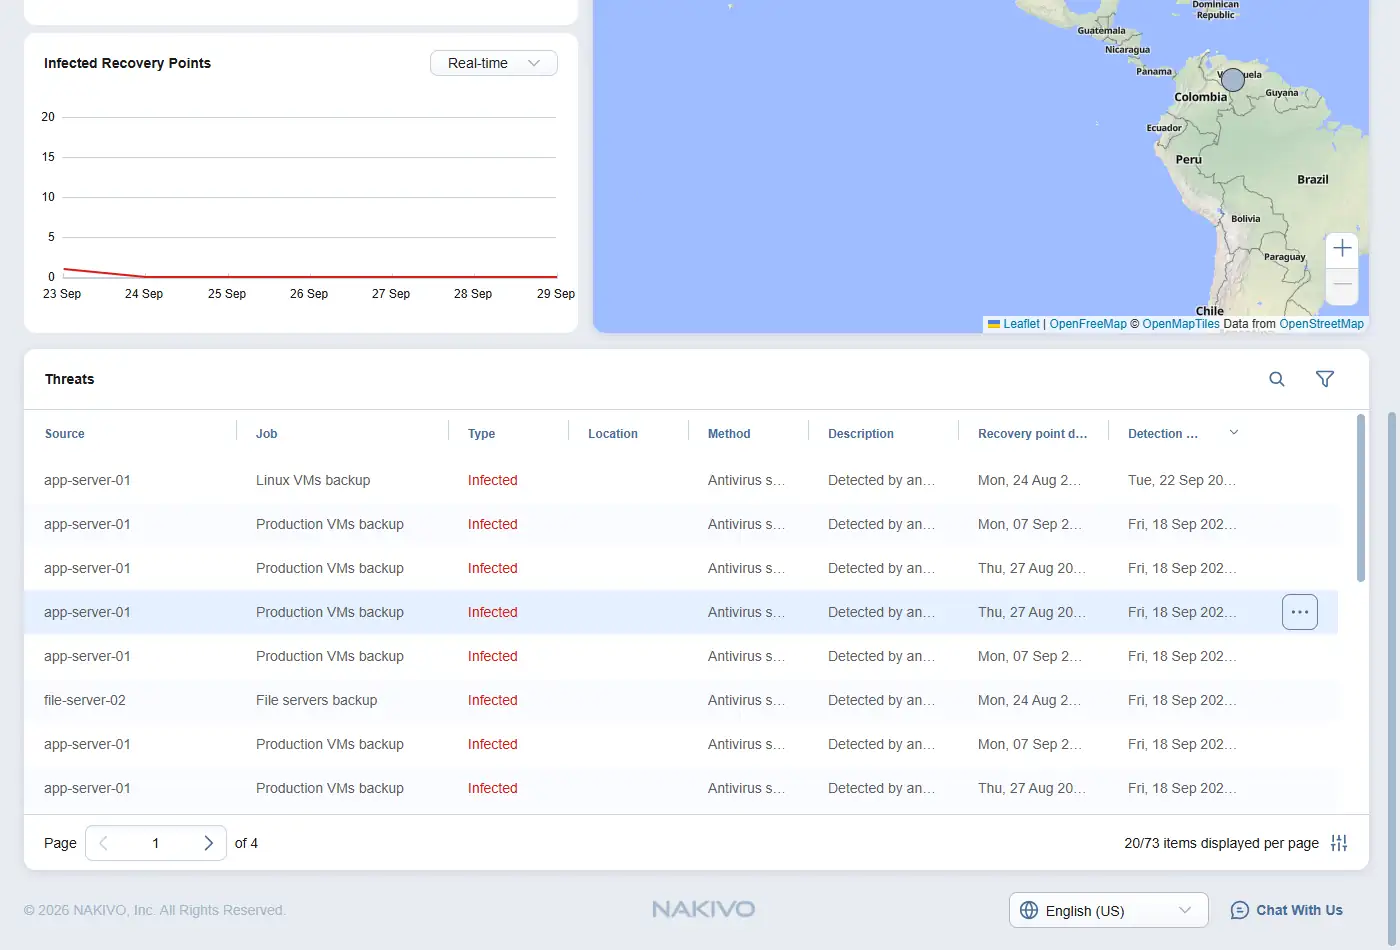
To read what the antivirus engine reported, hover over a threat, click Manage (…) and select View ransomware scan logs. They list the infected file paths behind the verdict and are available for one recovery point at a time.
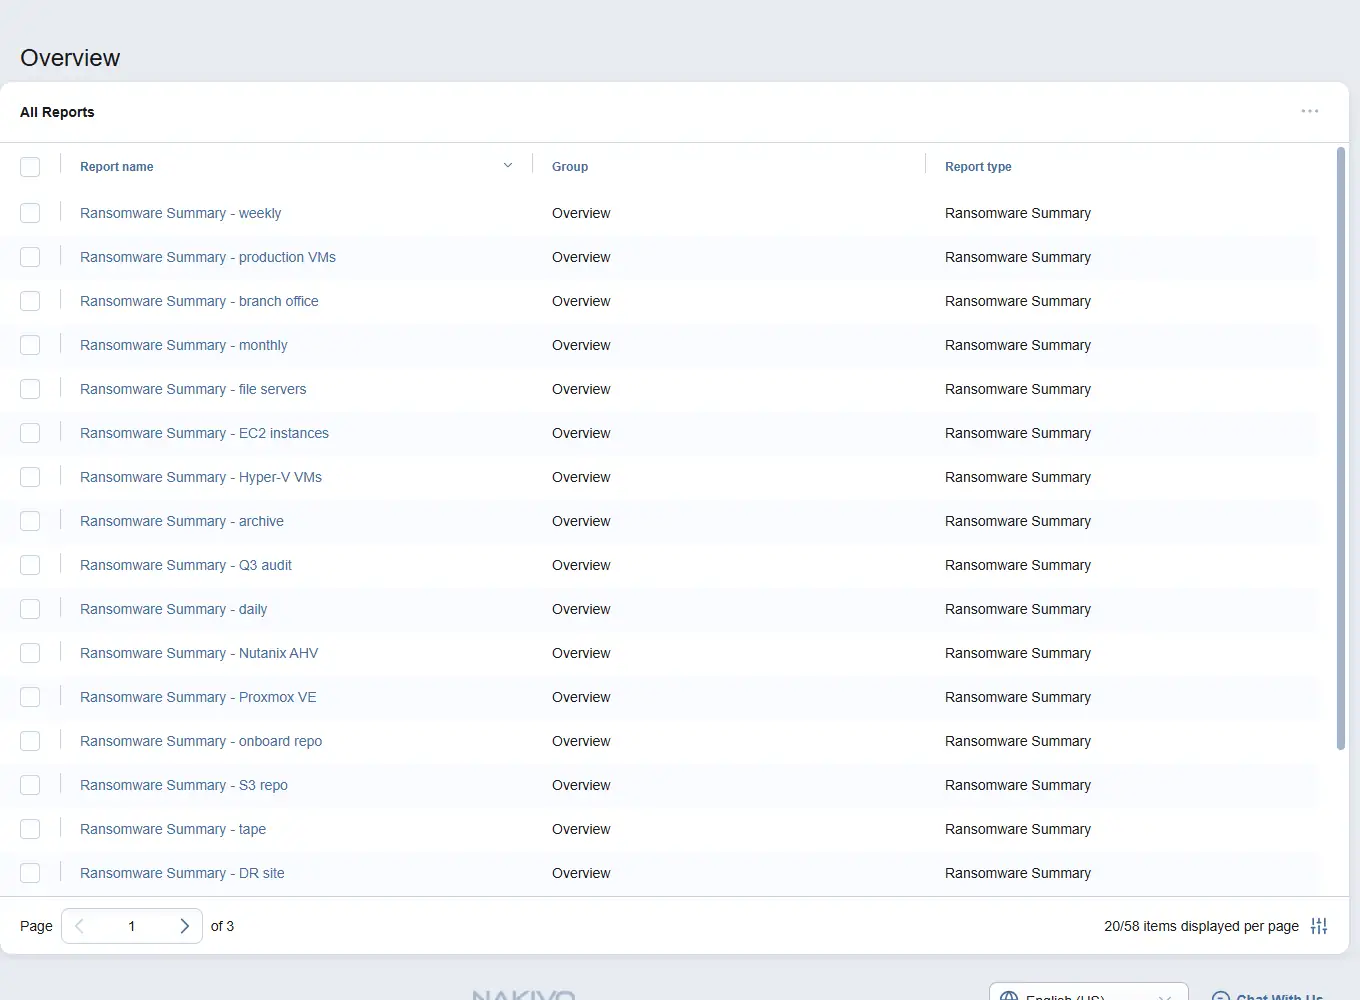
Under Data Security > Reports, you can also generate a Ransomware Summary report on demand or on a schedule. It covers scan results, highlights threats and lists affected backups.
How to Automate Ransomware Scanning for Backups
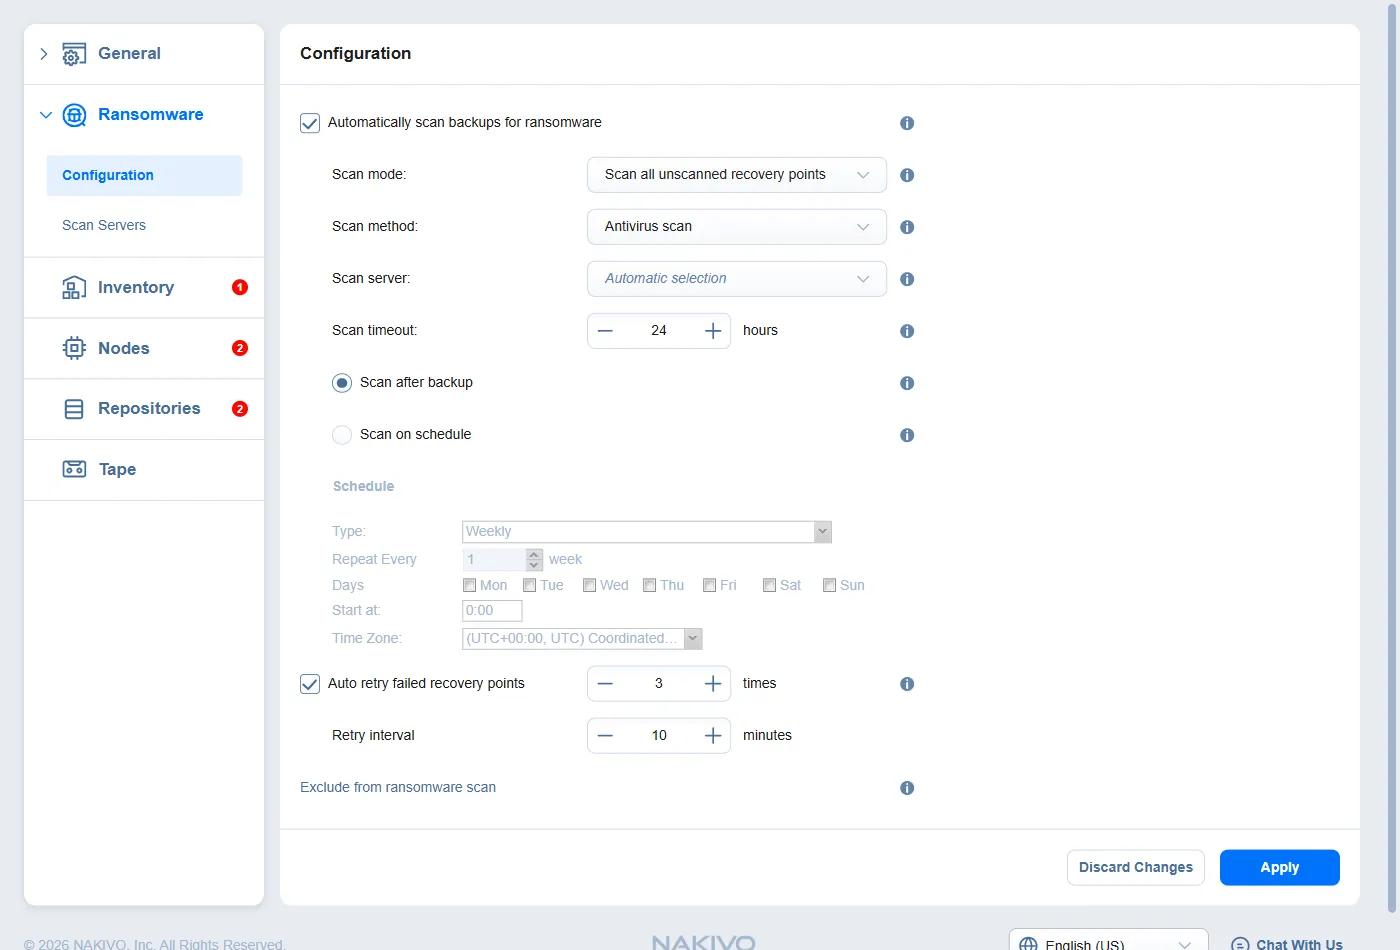
Manual scans are useful during an investigation, but continuous coverage comes from the configuration page. Go to Settings > Ransomware > Configuration and select Automatically scan backups for ransomware, then set the following options:
- Scan mode: Scan all unscanned recovery points or Scan recovery points created in range.
- Scan method: Antivirus scan, which is the only method v11.3 offers.
- Scan server: A specific Scan Server or Automatic selection.
- Scan timeout: 24 hours by default, in a range of 1 to 72 hours.
- Scan after backup or Scan on schedule: Pick one of the two. Scan after backup covers the new recovery points produced by each completed backup or backup copy job, while Scan on schedule runs automated scans Weekly or Daily, with the days, start time and time zone you choose.
- Auto retry failed recovery points: Retries each failed scan 3 times by default, 10 minutes apart. You can set 2 to 10 retries and a Retry interval of 1 to 60 minutes.
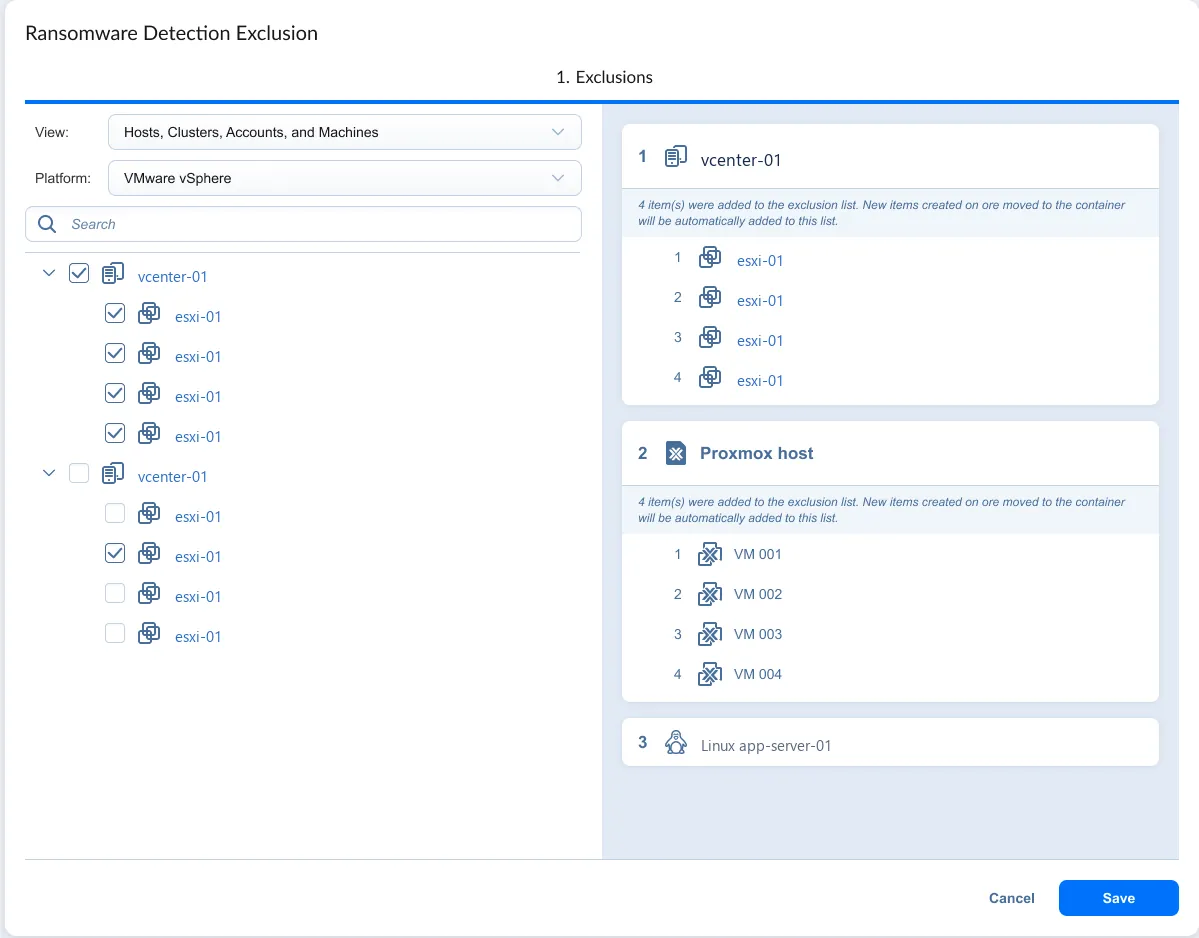
- Exclude from ransomware scan: Opens the Ransomware Detection Exclusion wizard, where you remove hosts, clusters, accounts, machines or whole backup repositories from automated scans.
Click Apply to save the configuration.
Excluded items are skipped only by automated sessions, so you can still scan them manually at any time. Selecting a container, such as a host or a cluster, also covers items that are added to it or moved into it later.
In the Ransomware Detection Exclusion wizard, select items in the inventory on the left to add them to the exclusion list on the right, then click Save.
Ransomware Detection Results and Threat Statuses
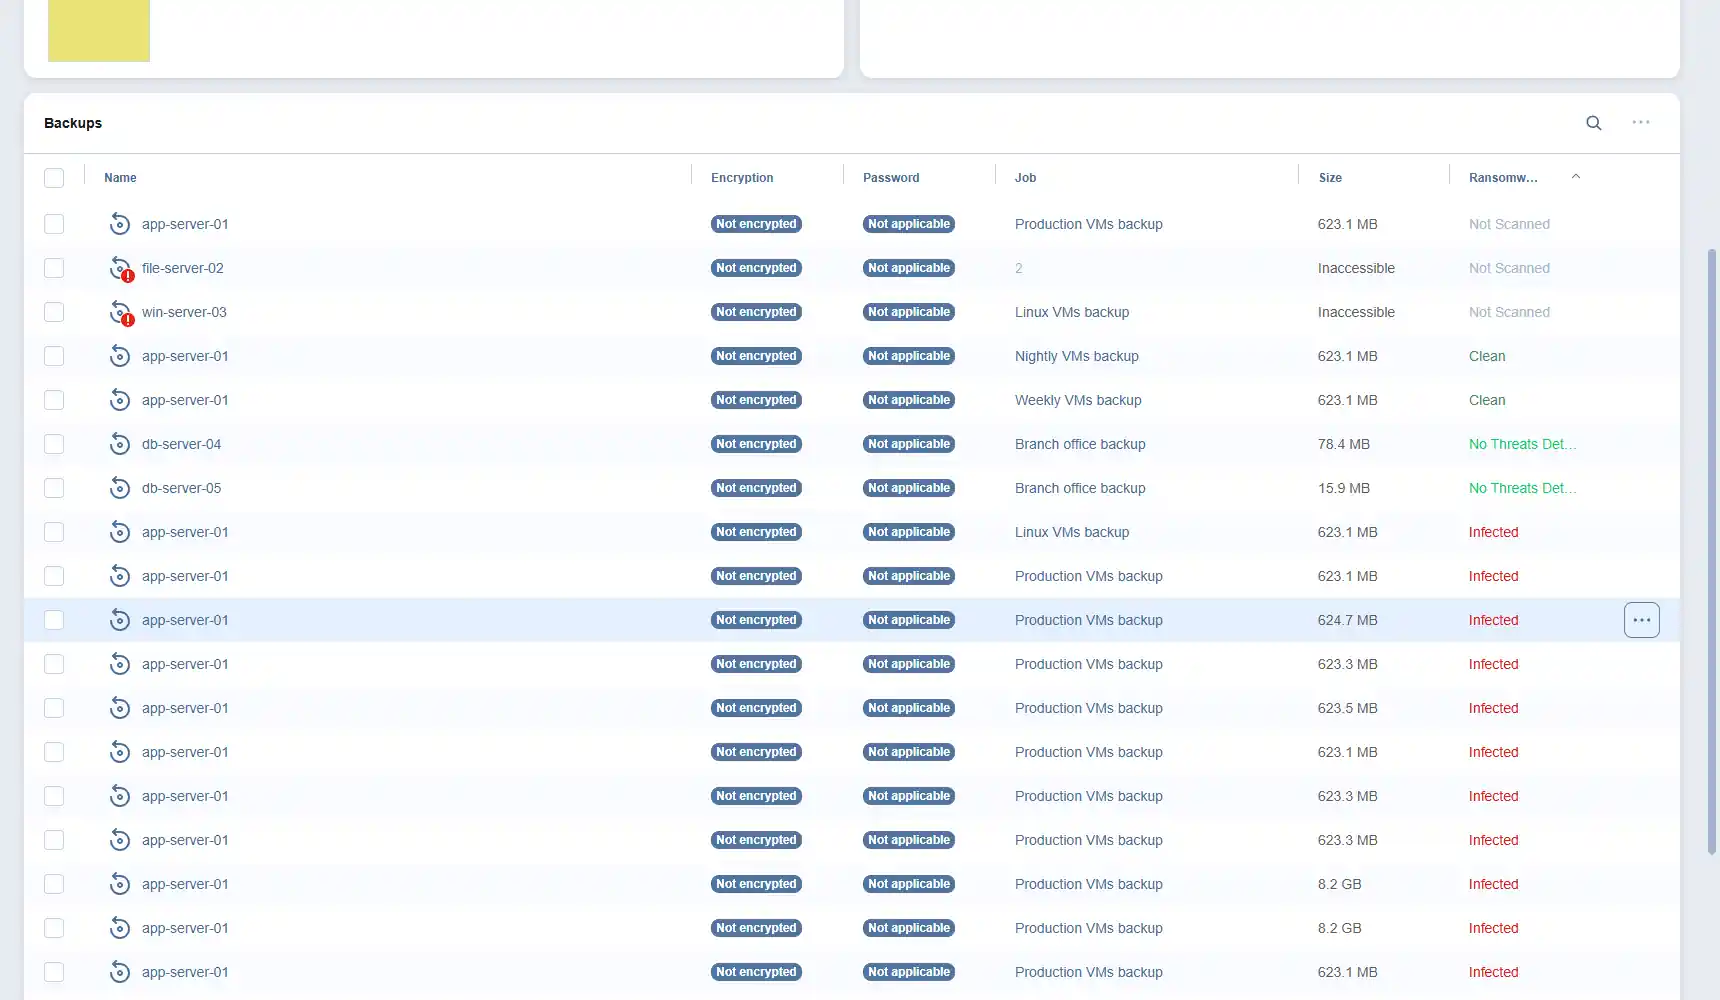
Every recovery point carries exactly one ransomware scan status, and the same four values appear across the interface: On the Threats dashboard, the Repositories tab, backup and recovery point tables, global search, the job dashboard and the Ransomware Summary report. A backup shows the worst status among its recovery points.
Infected
The antivirus scan detected a threat in the recovery point. The status is shown in red. It does not clear itself when a later scan finds nothing, so a detected threat stays visible until someone reviews it. The recovery point also raises an alarm, which you can dismiss without clearing the status. A backup is marked Infected as soon as at least one of its recovery points has this status.
No Threats Detected
The recovery point was scanned and the antivirus engine reported nothing. The status is shown in green.
Clean
A user reviewed the recovery point and marked it as clean. The status is shown in dark green.
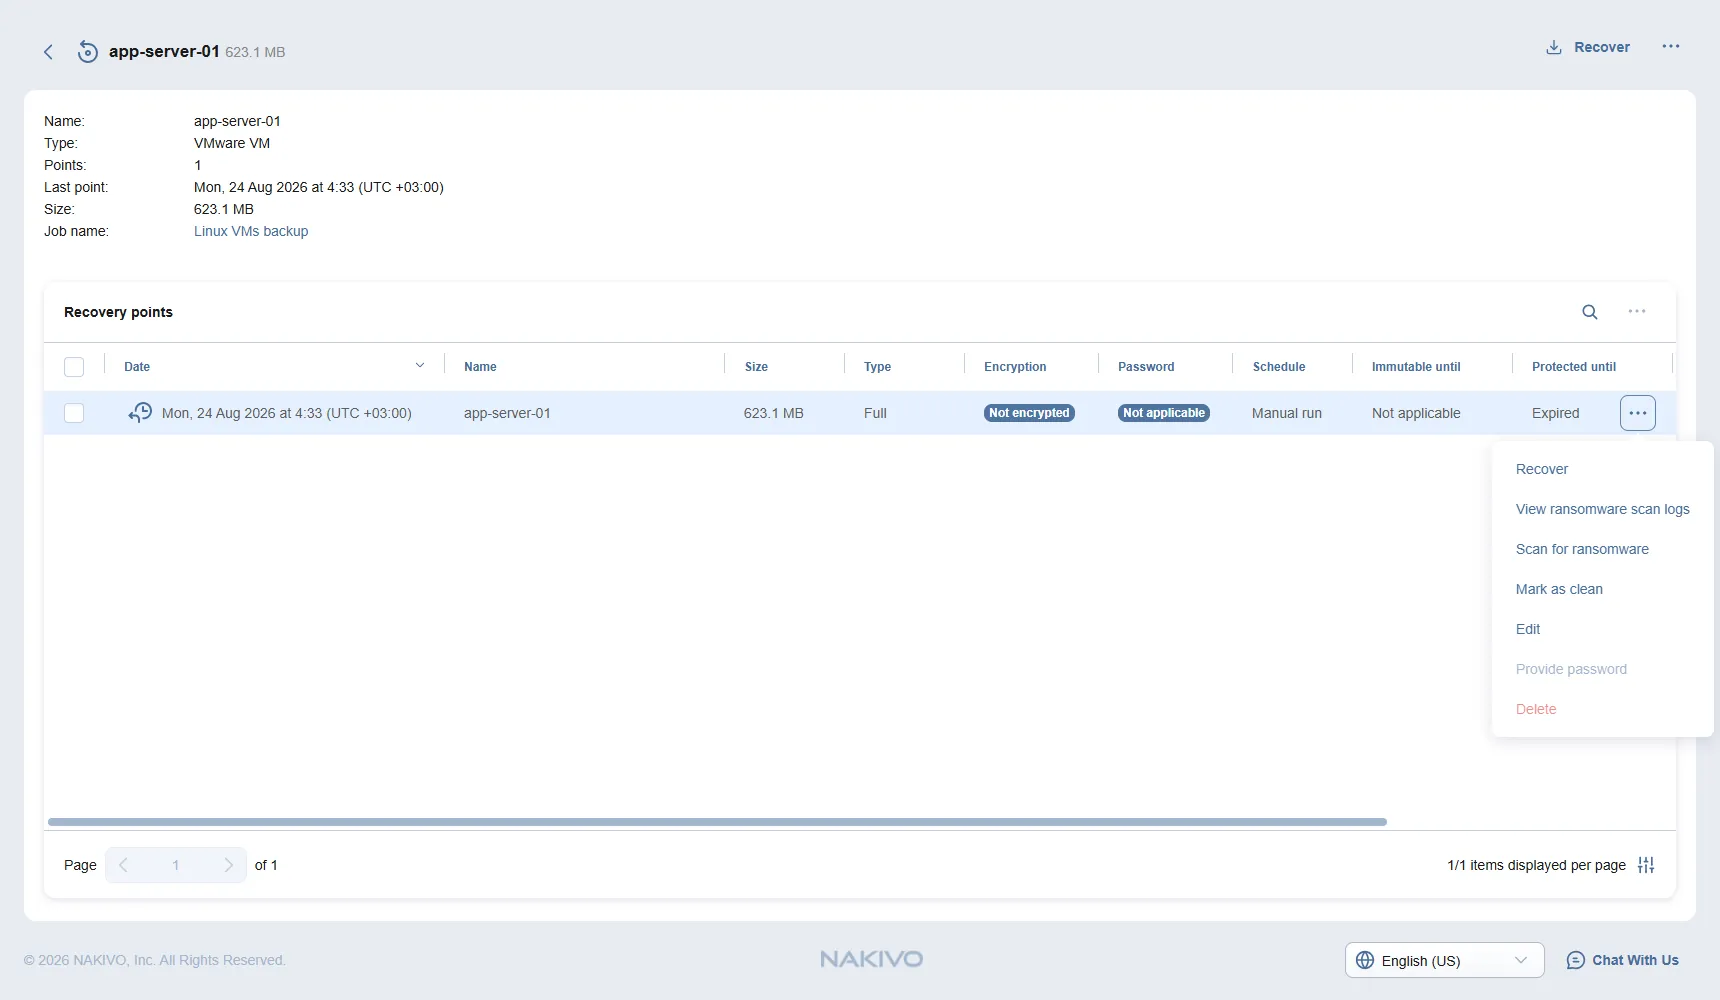
To set it, click Manage (…) next to the recovery point and select Mark as clean.
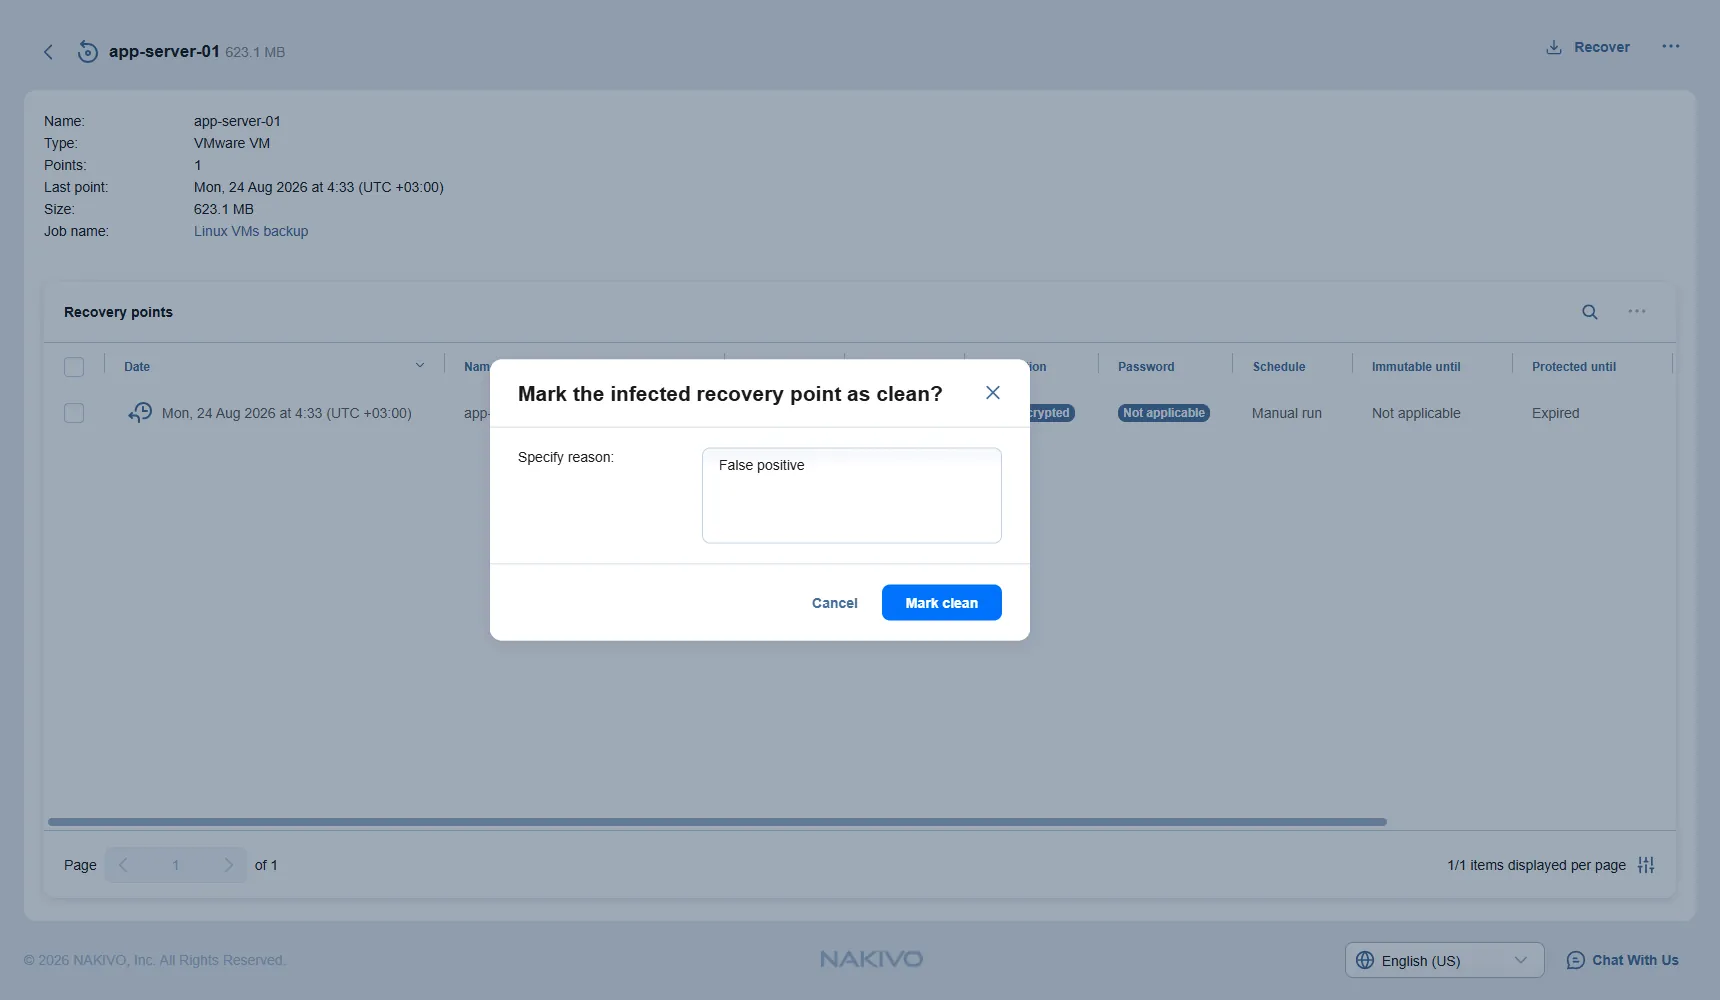
In the Mark the infected recovery point as clean? dialog, the Specify reason field holds up to 100 characters and is prefilled with False positive. Edit the reason if needed and click Mark clean.
Not Scanned
The recovery point has never been scanned. The status is shown in gray. A backup is Not Scanned when none of its recovery points have been scanned. If a backup mixes No Threats Detected and Not Scanned recovery points, its status follows the last recovery point.
Backup Ransomware Detection Requirements and Supported Environments
Supported backup types and environments
Ransomware detection for backups is available for NAKIVO Backup & Replication instances installed on Linux and Windows, and it supports backups of:
- VMware vSphere (ESXi) and VMware Cloud Director virtual machines (VMs)
- Microsoft Hyper-V VMs
- Nutanix AHV VMs
- Proxmox VE VMs
- Amazon EC2 instances
- Physical machines running Windows and Linux
Scan sessions cover backups and recovery points stored in stream and forever incremental repositories, including the Onboard repository, Common Internet File System (CIFS) and Network File System (NFS) shares, a local folder, Amazon S3, Amazon EC2, Wasabi, Azure Blob Storage, Backblaze B2 and generic S3-compatible storage. Repositories on HPE StoreOnce Catalyst, Dell EMC Data Domain Boost and NEC HYDRAstor deduplication appliances are supported, as is a federated repository.
Scan Server requirements
- One of the antivirus products listed below is installed in a supported version.
- Internet Small Computer Systems Interface (iSCSI) is available and running.
- On Windows, Server Message Block (SMB) is enabled.
- On Linux, the SSH service is running and its port is reachable from the Director machine. With the Password credentials type, the SSH configuration must also allow password authentication.
- On Linux, the account used to register the server is in the sudo group.
- Transmission Control Protocol (TCP) port 9445 is not blocked.
- On Linux, SELinux is disabled and the NTFS-3G and LVM2 packages are enabled, with LVM2 updated to the latest version.
- Both the operating system and the antivirus software run in English. Localized versions are not supported.
- No more than 500 Scan Servers are registered.
Supported antivirus software
Windows Scan Servers:
- Microsoft Defender Antivirus: Antimalware Client version 4.10.14393 or higher with engine version 1.1.12805 or higher
- ESET NOD32 Antivirus version 14.2.24 or higher
- Sophos Intercept X version 2.0.20 or higher
Linux Scan Servers:
- ClamAV version 0.99.0 or higher
- Sophos Server Workload Protection version 1.1.8 or higher
Each engine must support the command-line scan syntax that NAKIVO Backup & Replication calls. Antivirus software on a Windows Scan Server cannot scan Linux backups. Malware may also go undetected if the engine’s real-time protection is enabled during the scan. Scans cannot run at all if an endpoint tool, such as Cortex XDR, switches Microsoft Defender to passive mode.
Supported NAKIVO editions
Starting with v11.3, ransomware detection is included in the Enterprise Essentials, Enterprise, Enterprise Plus, MSP Enterprise and MSP Enterprise Plus editions of NAKIVO Backup & Replication, with perpetual and subscription licenses. Scanning consumes no additional licensed items.
Ransomware detection limitations
- Detection relies on antivirus signatures only. It finds known malware inside stored backup data, not novel threats or behavioral indicators, and it does not observe an attack while it happens.
- Reporting limitations of the antivirus engine, such as missing Unicode characters in alert text, are outside the control of NAKIVO Backup & Replication.
- Dedicated checks for encrypted files, ransom notes, file activity and suspicious file names or extensions are not part of v11.3.
- The following backups cannot be scanned: Oracle databases, Microsoft 365 accounts, file shares, file-level backups of physical machines, VMware Cloud Director vApps, IBM AIX servers and HPE Morpheus Software – VM essentials VMs.
- A Windows Scan Server can mount up to 26 partitions at a time, one per available drive letter.
- The Scan Status, Threats Summary and Threats widgets do not reflect inaccessible, detached or under-maintenance repositories.
- If a repository is detached from one tenant and attached to another, scan statuses are retained, but the scan history logs stay inaccessible until the recovery points are rescanned.
Building Ransomware Resilience with NAKIVO Backup & Replication
Detection is one layer of ransomware protection for backups, not the whole of it. It tells you which recovery points carry no detected threats, information that is often missing at the worst possible moment, but it works best alongside controls that limit an attacker’s access to the backups themselves. NAKIVO Backup & Replication pairs backup ransomware detection with the following protections:
- Immutable recovery points stored under a write-once-read-many (WORM) model in Linux-based local repositories, public clouds, S3-compatible storage, NEC HYDRAstor and Dell EMC Data Domain systems, where they cannot be modified or deleted for the period you set
- Air-gapped copies on tape, detachable network-attached storage (NAS) devices, USB drives and other offline storage
- Two-factor authentication and role-based access control that limit who can reach backup data and the web interface
Used together, these controls help keep a recoverable copy available and let you check it for known threats before recovery starts.
Conclusion
Backups are only worth what you can restore from them, yet whether that data is free of malware is often assumed rather than checked. Ransomware detection for backups replaces that assumption with evidence by scanning stored recovery points with supported antivirus software and attaching a visible status to each one. In NAKIVO Backup & Replication, you register a Scan Server, choose when scans run and review the results on the Threats dashboard. When an incident does happen, the option to find the last recovery point with no threats detected turns a slow, manual search into a single scan.
FAQ
What is ransomware detection for backups?
Ransomware detection for backups is the scanning of backup data at rest for malicious content, so infected recovery points can be identified before they are restored. Unlike endpoint protection, which watches production systems, it inspects the copies kept in the backup repository. In NAKIVO Backup & Replication, each scanned recovery point receives a status that shows whether a threat was found.
How does NAKIVO detect ransomware in backups?
NAKIVO Backup & Replication presents the contents of a recovery point to supported antivirus software running on a dedicated Scan Server and records the engine’s verdict as a ransomware scan status. The scan runs independently of recovery, so you can start it at any time. Detection depends on the signature database of the antivirus engine you install on the Scan Server.
Can NAKIVO scan backups for ransomware?
Yes. NAKIVO Backup & Replication can scan an entire backup repository, a single backup or individual recovery points. Scans run on demand from the Ransomware Scan for Backup wizard. Automated scans follow each backup or backup copy job, or a weekly or daily schedule. Results appear as ransomware scan statuses on each recovery point and on the Threats dashboard.
What backup environments does NAKIVO ransomware detection support?
NAKIVO ransomware detection supports backups of VMware vSphere, VMware Cloud Director, Microsoft Hyper-V, Nutanix AHV and Proxmox VE VMs, Amazon EC2 instances and Windows and Linux physical machines. These backups can sit in local, network share, cloud, deduplication appliance or federated repositories. Oracle database, Microsoft 365, file share, file-level, vApp, IBM AIX and HPE Morpheus backups are not supported.
Can ransomware detection identify encrypted files in backups?
No. Ransomware detection in v11.3 does not check for encrypted files. It relies on the antivirus engine on the Scan Server, so it finds what that engine’s signatures recognize rather than measuring how random the data looks. A recovery point is marked Infected when the engine identifies known malware, and encryption by legitimate tools is not treated as a threat.
Does NAKIVO detect ransom notes and suspicious file extensions?
Not as dedicated checks. NAKIVO Backup & Replication passes the mounted recovery point to the antivirus engine on the Scan Server and reports what it returns, so coverage follows the signature database you keep updated. Checks for ransom notes, file activity and suspicious file names or extensions are not part of ransomware detection for backups in v11.3.