How to Run Linux on Hyper-V?
Running Linux on Hyper-V allows you to combine the stability of Microsoft’s virtualization platform with the versatility of open-source operating systems. Whether you’re exploring Linux for education, testing or production environments, Hyper-V provides a reliable way to deploy and manage virtual machines efficiently.
Among the many supported distributions, Ubuntu Linux stands out for its simplicity and broad compatibility. With proper configuration, you can achieve excellent performance and integration between Linux and Windows. Read this blog post to learn how to install, configure and optimize Linux on Hyper-V step by step.

Reasons to Run Linux on Hyper-V
The popularity of Linux is growing and this operating system is time-tested. Let’s have a look at the most common reasons to install Linux on Hyper-V:
- You need to test a particular Linux distribution in your Hyper-V virtual environment. For example, a new Linux version has recently been released and you want to test it before installing it on physical servers.
- You want to run containers. Linux offers excellent container support, which may be a compelling reason to install Linux as a virtual machine on Hyper-V.
- Testing multi-platform software or software that provides similar functionality. This is a great option when developers make their applications compatible with multiple operating systems, such as Windows, Linux and Solaris (for example, Oracle Database). You can install the appropriate software on Linux to test it. If the experiment is successful, you can install Linux and the supported software in your production environment.
- Licensing. This point is related to the previous one. Contrary to Windows, Linux is free. You must pay for each Windows instance installed on a Hyper-V VM that exceeds the number of Windows licenses included in your edition. This does not apply to the Datacenter Edition license.
- Linux requires fewer hardware resources than Windows. Windows is a resource-intensive operating system, whereas Linux is lightweight.
- Linux is secure. Windows systems are generally vulnerable to a variety of harmful viruses, whereas Linux is somewhat safer, especially if the system is configured correctly. Most viruses are developed for Windows. In most cases, you need to go to great lengths to execute a virus on Linux. Additionally, multiple Linux distributions are commonly used, making it more difficult for a virus to spread.
- A Linux shell, such as bash, is essential for automating tasks. You can use regular expressions, scripts, and other tools to manage Linux effectively. Most vulnerabilities are quickly fixed.
- You want to learn Linux to migrate from Windows to Linux.
You can use converters to convert your physical servers to Hyper-V VMs in two steps. First, VMware vCenter Converter converts a physical machine into a VMware VM, and then Microsoft Virtual Machine Converter converts the VMware VM into a Hyper-V VM.
Before You Begin
You can select any Linux distribution you like and install it by using the explained logic. One of the main differences between different Linux families is the different package managers you’re required to use. Package managers are intended to install, configure, upgrade and delete programs on Linux systems.
Package managers help to resolve tasks such as:
- Downloading packages. The packages are automatically downloaded from the most suitable software repository when you enter the command to install a particular package or application. They include metadata such as the software version, the architecture for which the package is built, checksums and other necessary packages to work properly.
- Resolving dependencies. When you install software, it may require its own specific packages, including libraries. Finding, downloading and installing all this manually consumes a lot of time and effort. Package managers inform you about dependencies and suggest installing the necessary packages automatically.
- Quality control. Software packages stored in authorized software repositories are tested to ensure high quality, stability and the absence of bugs.
- The standard of file locations is respected. Linux contains a large number of files and directories. Sometimes, different Linux distributions use different paths for storing files, as well as using different configuration file names. Package managers allow you to follow the standards and store files in the required locations for each Linux distribution.
Before selecting a Linux distribution to install on Hyper-V, you can familiarize yourself with the Linux package managers. Some of the most popular Linux distributions and package managers are listed in the table below.
|
Linux distributions |
Package managers used |
|
Debian, Ubuntu, Kubuntu, Xubuntu, Lubuntu, Mint |
APT (Advanced Packaging Tool), DPKG (Debian Package Management System) |
|
OpenSUSE, SLES (SUSE Linux Enterprise Server) |
Zypper, YaST |
|
Red Hat, CentOS, Fedora |
RPM (Red Hat Package Manager), YUM (Yellowdog Updater Modified) |
|
Gentoo |
Portage |
As previously mentioned, the installation of Ubuntu Linux on Hyper-V will be demonstrated. If you don’t need the graphical user interface (GUI), you can install Ubuntu Server. Let’s download the ISO image of Ubuntu 24 LTS from the official website.
Creating a New Hyper-V VM
First, make sure that the Hyper-V role (feature) is enabled on your Windows machine (go to Control Panel > Programs and Features > Turn Windows features on or off and verify whether the check box near the Hyper-V string is ticked). Read how to install Hyper-V on Windows in detail.
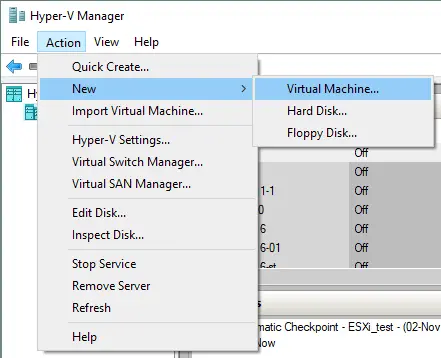
To create a new virtual machine, open Hyper-V Manager and click Action > New > Virtual Machine. The New Virtual Machine Wizard should appear.
- Before You Begin. There is nothing to configure at this step. Click Next.
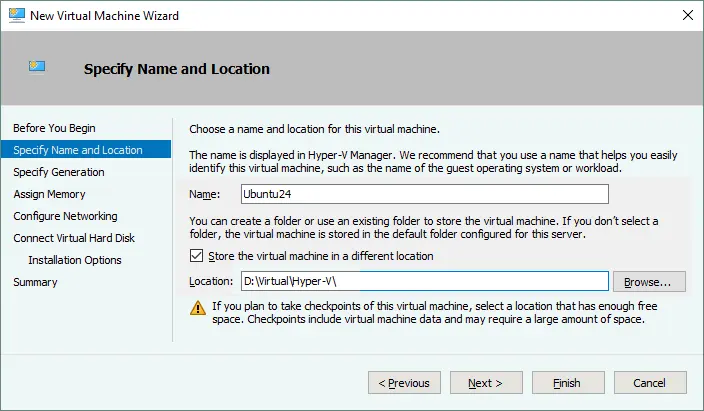
- Specify Name and Location. Enter your VM name, for example, Ubuntu24 and select the folder where you will store the new VM. Try to use volumes that are different from your system volume C: . In this case, a directory on disk D: is used (D:\Virtual\Hyper-V). You can enter the path manually or select the location by clicking Browse. Click Next when done.
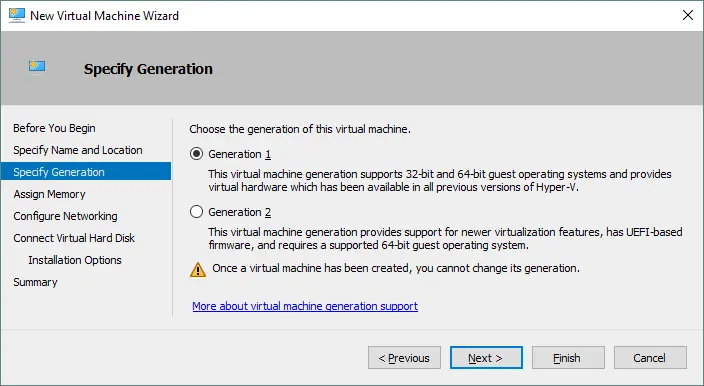
- Specify Generation. Choose the generation of this virtual machine – Generation 1 or Generation 2. Generation 1 is selected in this example due to better compatibility. Generation 1 uses BIOS and Generation 2 uses UEFI for VM boot (you should disable Secure Boot in VM settings for Linux if you use Generation 2 and UEFI). Click Next to continue.
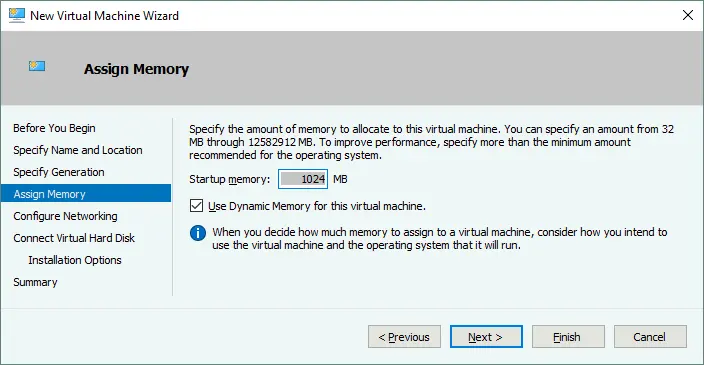
- Assign Memory. Specify at least 1 GB of memory for your Ubuntu Linux machine with a GUI. You can edit memory settings after VM creation. Tick the Use Dynamic Memory for this virtual machine checkbox to use your hardware memory resources more efficiently. Click Next.
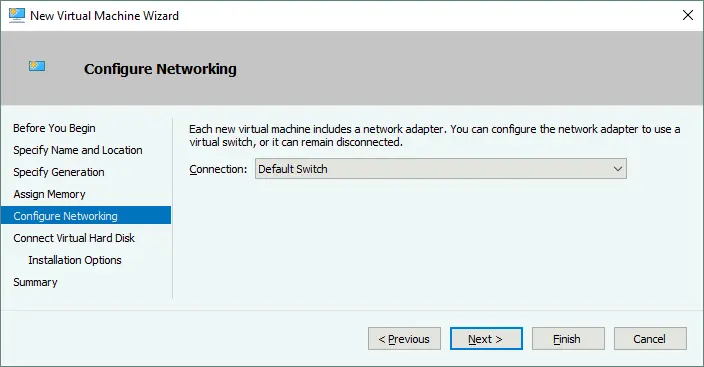
- Configure Networking. Select the virtual switch to which the virtual network adapter of your VM will be connected. The Default Switch is used in this case. Later, you can create and configure other virtual switches and connect your VM to the appropriate networks. Click Next.
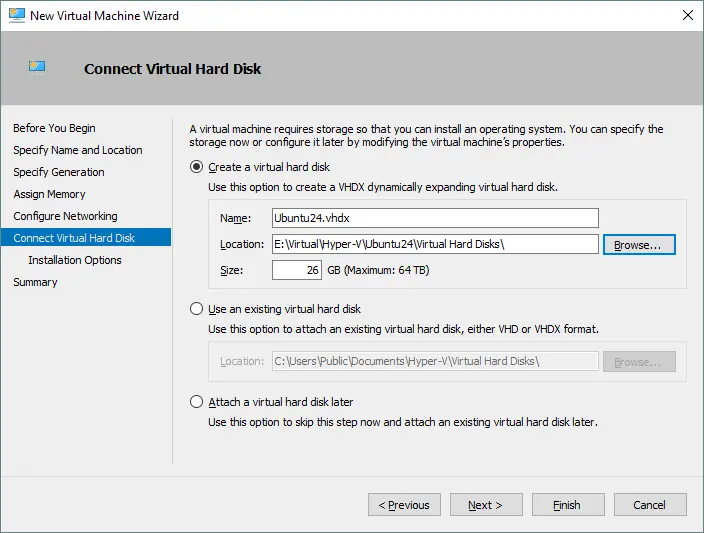
- Connect Virtual Hard Disk. Select the Create a virtual hard disk option. A dynamic VHDX virtual disk is created by default. Enter the virtual disk name (for example, Ubuntu24.vhdx), select the location and set the size of the virtual disk (at least 16 GB). Click Next.
- Installation options. Select Install an operating system from a bootable CD/DVD-ROM. Select Image file (.iso) and browse the ISO installation image of Ubuntu 24 that you previously downloaded. Once done, click Next.

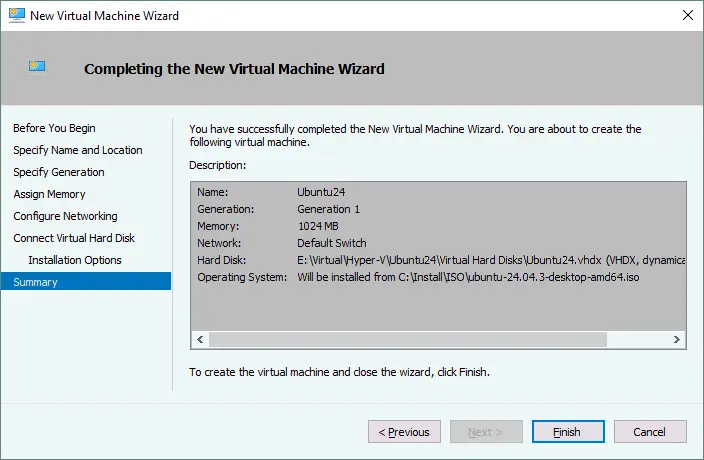
- Summary. Check your settings in the installation summary and click Finish to create the new virtual machine.
Set the Static MAC Address
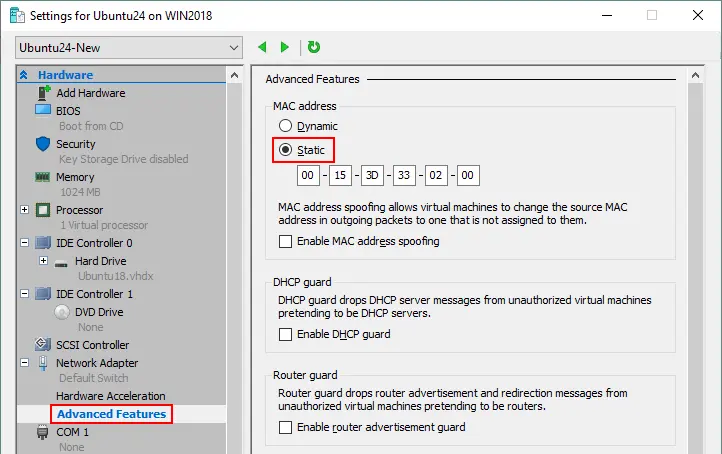
Now that your new empty VM has been created, you can edit the different VM settings, such as the MAC address. It is better to use a static MAC address for Linux running on Hyper-V, especially if your Linux VM needs to be migrated between Hyper-V hosts.
- Right-click your VM name and click Settings.
- In the Settings window, select your network adapter and expand the network adapter options by clicking the + icon.
- Click Advanced Features and select a static MAC address.
- Click OK to save changes.
Installing Ubuntu Linux on the VM
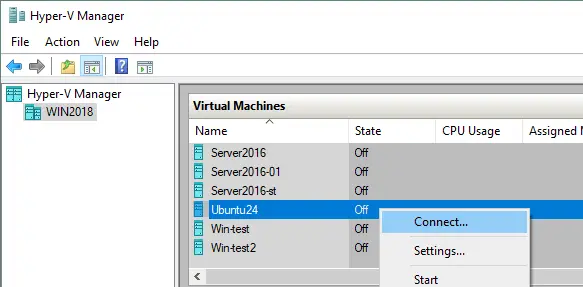
In Hyper-V Manager, select your Ubuntu virtual machine, right-click the VM name, and then select Connect from the context menu to open VMConnect. Alternatively, you can click Action > Connect in the menu bar of the Hyper-V Manager Window after selecting the VM.
In the VMConnect window, click the Start button to power on the VM.
The virtual machine should be loaded from the ISO image. Then you can see the graphical user interface of the Ubuntu installer. The installer provides multiple configuration steps in the wizard mode.
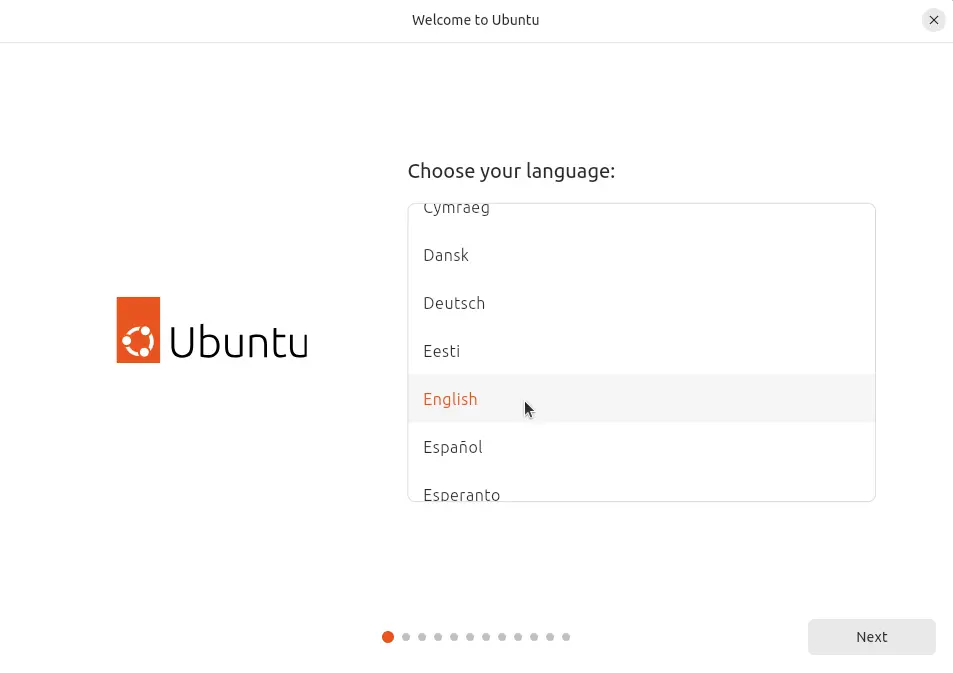
- Welcome. On this screen, you can view the Ubuntu interface. Click Install Ubuntu.

- Choose your language. First, select the language of the user interface. Click Next to continue.
- Accessibility in Ubuntu. You can customize Ubuntu to meet your needs before setting it up. You can change them later in System Settings. Proceed to the next step.
- Keyboard layout. Select your keyboard layout (for example, English US) and click Next.
- Connect to the internet. Select Use wired connection and click Next.
- Installing updates. The installer recommends updating Ubuntu to the latest version for improved reliability and additional features. You can do this during installation by clicking Update now or skip this step and install updates later.
- What do you want to do with Ubuntu? Select Install Ubuntu.
- Type of installation. How would you like to install Ubuntu? Select the Interactive installation option and continue.
- Applications to install. What apps would you like to install first? Select Default selection (just the essentials, web browser and basic utilities) or Extended selection (an offline-friendly selection of office tools, utilities and web browser) depending on your needs.
- Optimise your computer. Optionally, you can install recommended proprietary software by selecting the appropriate checkboxes:
- Install third-party software for graphics and Wi-Fi hardware (including, but not limited to, NVIDIA drivers and similar).
- Download and install support for additional media formats (including, but not limited to, MP3, MP4, MOV and similar).
- Disk setup. Select how you want to install Ubuntu. You should prepare a disk, create a new partition scheme and format the partitions. There are two options:
- Erase disk and install Ubuntu – the installer automatically creates the partition layout on the disk. This option can be used to automatically partition disks. If you are installing Ubuntu Linux for the first time, you can select this option.
- Manual installation – you create the partition layout manually for a high level of customization. By selecting this option, you can manually create partitions of the necessary size and mount them to the appropriate directories. Skilled users widely utilize this option.
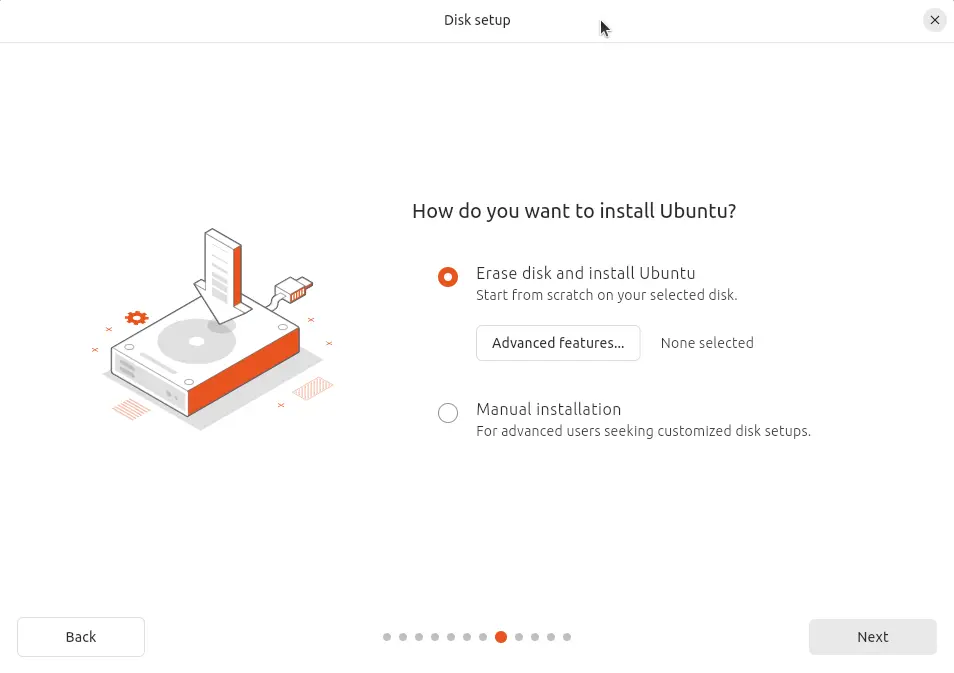
The advanced features include:
- Encrypt the new Ubuntu installation for security. This option will not be enabled in the current example.
- Use LVM with the new Ubuntu installation. LVM is the Logical Volume Manager that allows you to use an abstraction layer and create a volume group by using two logical or physical disks (or two virtual disks in the case of Linux on Hyper-V). Moreover, if you have no free space available on your volume, you can add another disk to the volume group and extend its size. This approach adds more flexibility, which can be useful for file servers, database servers and other similar applications. LVM allows you to resize volume groups and perform other operations on the fly without powering off your Linux machine.
If you select manual installation, be aware of the Linux disk partitioning principles and standards.
In Linux, disk partitions are not named using disk letters, such as C: or D:, as they are in Windows. In Linux, disks are named /dev/sda, /dev/sdb, /dev/sdc, etc. If the disk is named /dev/sda and has three partitions, the partition names should be /dev/sda1, /dev/sda2 and /dev/sda3. sda means SATA Disk.
Disk partitions are mounted to directories that are called mount points. The main directory of the Linux file system is the root directory, which is denoted by the forward slash (/) symbol. The recommendations for creating the partitioning scheme manually for Linux are displayed in the table below. You can use a similar partition scheme when you install Linux on Hyper-V.
Mount point
Disk partition
Recommended size
Comment
/boot
/dev/sda1
500 MB – 1 GB
Contains the boot loader, such as GRUB
/
/dev/sda2
at least 12-20 GB
The most important partition that is required
/home
/dev/sda3
Used to separate user files and system files
swap
/dev/sda4
4-8 GB, depending on the amount of RAM
The swap partition used for the same purpose as the Windows swap file
/var/log/
/dev/sdb1
Creating a separate partition for storing logs is not necessary, but is recommended for servers. If you have applications that intensively write log files, your disk may become full. The operating system and applications can crash as a result.
Note that you can create only 4 partitions if the Master Boot Record (MBR) partitioning scheme is used. GPT (GUID Partition Table) allows you to create more than 4 partitions. If you selected the Generation 2 VM in Hyper-V, the UEFI boot partition (mounted as /boot/efi) is required.
Click Next to continue.
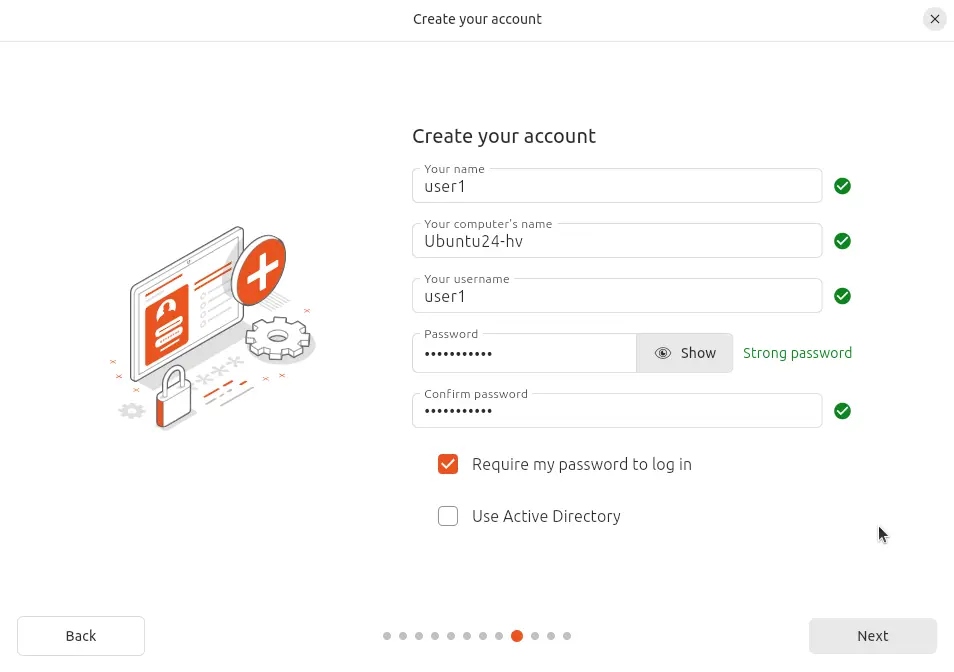
- Create your account. Enter your name, your computer’s name (a hostname for your VM in this case), pick a username and define the password. Confirm your password. You can select the appropriate option to log in automatically if needed. A password is required to log in by default. This is the most secure option and the one that is recommended. Click Next to continue.
- Select your time zone. Select your geographical location and time zone. Software repositories located in your region should be used for better availability and downloading speed. Click Continue.

- Ready to install. Review the summary of your chosen settings and click Install.
Wait until the installation process is complete.
- Installation Complete. You need to restart the computer to use the new installation. Click Restart Now.
After restarting the Hyper-V Linux virtual machine, you can see the login screen. Select your username and enter your password to log in. Check the What’s New window that shows the new features of the new version of Ubuntu Linux that you have already installed on Hyper-V.
Configuring Linux on Hyper-V
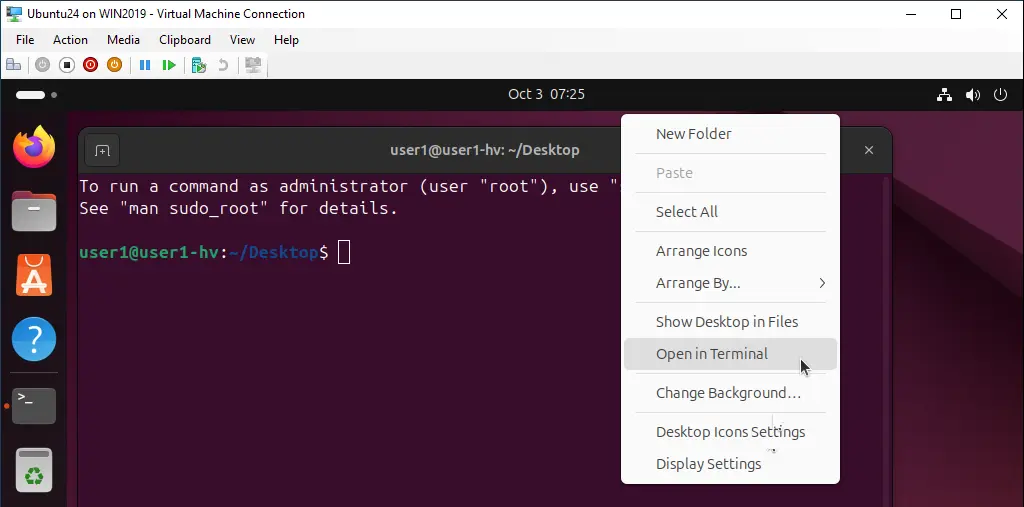
After installing Linux on a Hyper-V VM, it is recommended to configure Ubuntu for optimal usage. The majority of settings can be configured in the Linux console (Terminal). To open the Terminal, click the nine dots in the bottom left corner (Show Applications) and in the menu that appears, click the Terminal icon. Another way to open Terminal is to right-click the desktop and select Open Terminal from the context menu, or press the Ctrl+Alt+T hotkey combination.
Now you see the terminal window of Ubuntu Linux. Note that commands and file names in Linux are case sensitive. ReadMe.txt and readme.txt are different file names in Linux, unlike Windows.
Checking the network settings
- Install the net-tools to be able to check network configuration by using the command:
sudo apt-get install net-toolsWhere
sudoallows you to execute the command as a root user (substitute user do). - Type
ifconfigto check the network configuration of your Ubuntu instance running on a Hyper-V VM.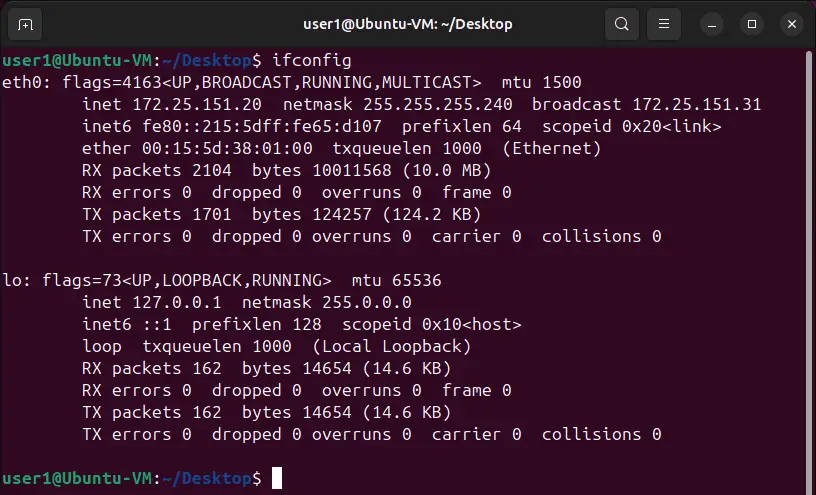
A default virtual DHCP server connected to the default virtual switch has distributed the IP configuration for the virtual network adapter of the current Ubuntu Linux VM running on Hyper-V. The name of the virtual Ethernet adapter in Linux is eth0. The obtained IP address is 172.25.151.20, the netmask is 255.255.255.240 and the default gateway is 172.25.151.31 in this case.
Changing the network settings manually
Obtaining your IP address via DHCP is convenient, but if you plan to use your Linux running on Hyper-V as a server, you should configure the network settings manually. Moreover, if you wish to clone your Linux VM used as a server, changing the IP address and machine name is essential. You may also have to change the IP addresses on your Linux VM after reconfiguring your Hyper-V virtual switch or after connecting a virtual network adapter to another virtual switch.
Changing system settings, such as network settings, requires root privileges. Type sudo -i to have root rights in the console (you should enter your password) during the session (press Ctrl+D to exit the root mode when needed). You may notice that the $ character is changed to the # character in the command line prompt. Enter a new IP address, then reload the network interface:
ifconfig eth0 172.25.151.21 netmask 255.255.255.240
ifconfig eth0 down
ifconfig eth0 up
The settings are applied until you restart the machine.
To set up a static IP address permanently, use the netplan configuration, which is used to configure networks in Ubuntu Linux since version 17. In earlier versions of Ubuntu and in some other Linux distributions, you can edit your IP address configuration by editing the /etc/network/interfaces config file.
- Edit the .yaml file with
vimby using the command:vim /etc/netplan/01-network-manager-all.yamlThe file contains the following configuration in this case:
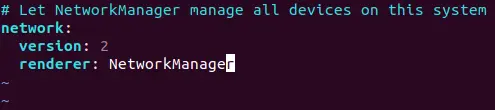
You can change the IP address, net mask, gateway and DNS servers by editing this file. You should preserve the file structure, including the number of space characters.
Note: A network mask can be written as the number of bits.
255.255.255.0 is equivalent to 11111111.11111111.11111111.00000000 and represents a 24-bit mask (24 ones in the decimal format, as shown).
255.255.255.240 is equivalent to 11111111.11111111.11111111.11110000 and is a 28-bit mask (28 ones in the decimal format are present).
An IP address and a net mask consist of 4 octets. Each octet (8 bits) can be transformed to the decimal format (see the table below).
1
1
1
1
1
1
1
1
1+1+1+1+1+1+1+1=8
128
64
32
16
8
4
2
1
128+64+32+16+8+4+2+1=255
You can use the table below to convert network masks from one format to another for networks that can be classified as Class C networks. The maximum number of hosts that can be connected to the network is shown in the right column.
Bits
Net mask
Hosts
/30
255.255.255.252
2
/29
255.255.255.248
6
/28
255.255.255.240
14
/27
255.255.255.224
30
/26
255.255.255.192
62
/25
255.255.255.128
126
/24
255.255.255.0
254
By applying the above-explained logic, you can also manually transform any mask from one format to another. If you want to calculate the maximum number of hosts that can be connected to a network, use the formula: 2(32-m) – 2, where m is the number of bits used for a net mask.
Don’t forget that at least one IP address must be used as the default gateway to enable a connection to other networks.
- Change the renderer from NetworkManager to networkd and edit your Ubuntu network configuration similarly as shown in the image below. Be attentive when adding space characters to preserve the configuration format.
- Press Esc to exit from the editing mode to the navigation mode in vim. Type
:wqand press Enter to write changes and quit the text editor.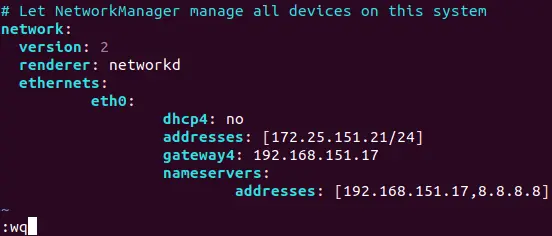
Note. If you have more than one network adapter (for example, eth0 and eth1), add a similar eth1: block to your network configuration .yaml file under the eth0: block.
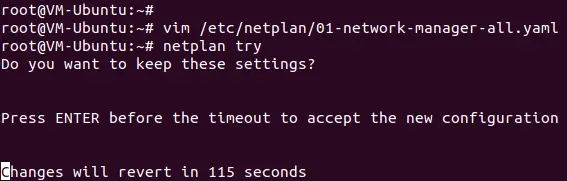
- Check whether your configuration file format is correct after editing with the command:
netplan try
If everything is correct, press Enter to keep these settings.
How to change a hostname in Ubuntu
- Let’s check the current hostname before changing it.
hostnamectl - As you can see in the screenshot below, the current hostname of the Linux machine is Ubuntu-VM. Set the new hostname (VM-Ubuntu):
hostnamectl set-hostname VM-Ubuntu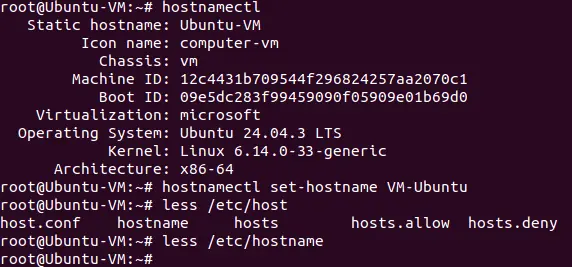
- Make sure that the hostname is now changed in the /etc/hostname file.
less /etc/hostname - You should also edit the hostname in the /etc/hosts file.
vim /etc/hostsvim is a powerful console text editor that has no analogs in Windows PowerShell. By default, you are in the navigation mode. You can navigate by pressing h (left), L (right), j (down), k (up) or arrow keys. Press a to enter the editing mode to append any characters after the cursor. Press i if you want to insert a character instead of an existing character highlighted by a cursor. Change the Ubuntu-VM to VM-Ubuntu, press Esc to exit from editing mode to navigation mode.
- Type
:wqto write changes to the file and quit. - Use the
init 6command to restart your Linux machine in order to ensure that changes are applied.
Configuring the SSH server on Ubuntu Linux
For greater convenience, you should enable remote access via SSH. The SSH Server is used to access the Linux console remotely via the encrypted SSH (secure shell) protocol. To do this, you should install the SSH server on your Ubuntu VM running on Hyper-V and the SSH client on your Windows machine, which is used as the Hyper-V host.
- Open Terminal on your Ubuntu machine and run the command as the root user:
apt-get install -y openssh-server - The configuration of the SSH server is stored in the sshd_config file. Edit this file to enable the SSH connection with the needed settings.
vim /etc/ssh/sshd_config - Uncomment this line (delete the # character):
PasswordAuthentication yes - Save the file and exit.
- Restart the SSH server daemon (service).
service ssh stopservice ssh startor
service ssh restart - Download the SSH client (for example, PuTTY) for your Windows machine. Open PuTTY on your Windows machine, enter the IP address of your Ubuntu VM running on Hyper-V and click Open.
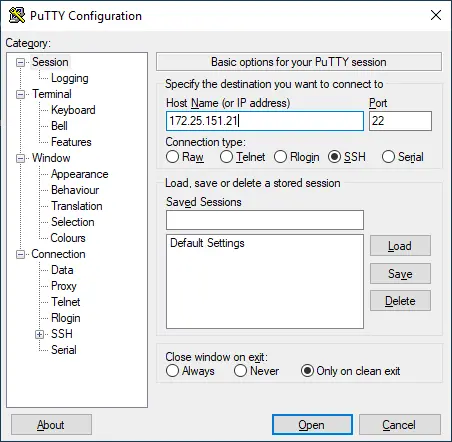
- Enter your username and password. Now you can access the Ubuntu console remotely.
Transferring files between Linux VM and Windows host machines
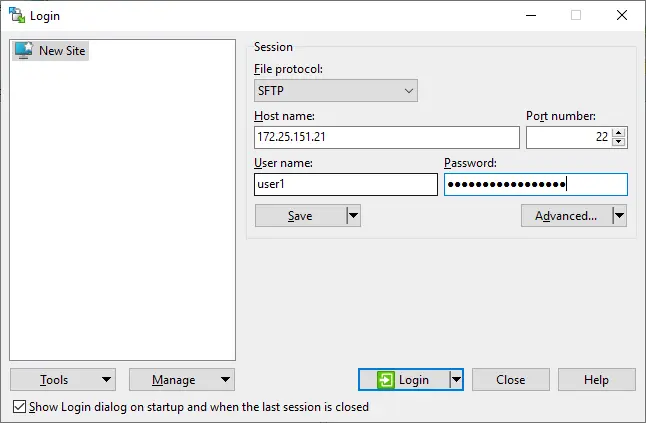
Now that you have configured the SSH server, you can transfer files from your Ubuntu VM to your Hyper-V host and vice versa using an SFTP (Secure File Transfer Protocol) client, such as WinSCP. WinSCP uses SSH for secure connections and can also use SCP (Secure Copy Protocol) for file transferring.
- Run WinSCP on your Windows machine. Select SFTP as the file protocol, enter your Linux host name or IP address, username and password. Then click Login.
- After logging in, you can see a window with two panels: The first panel displays files on the Windows machine and the second panel displays files on the Linux machine. Go to the designated directories on the source and destination machines, select files and directories. Drag and drop the selected objects between panels to copy them.

How to install Hyper-V Integration Services on Linux
Hyper-V Linux Integration Services have been built in Ubuntu since version 12.04. If your Linux distribution doesn’t include Hyper-V Integration Services, you can download them from Microsoft’s website.
- You can check which Integration Services are enabled for your Ubuntu VM running on Hyper-V in PowerShell. Type the following command on the Hyper-V host:
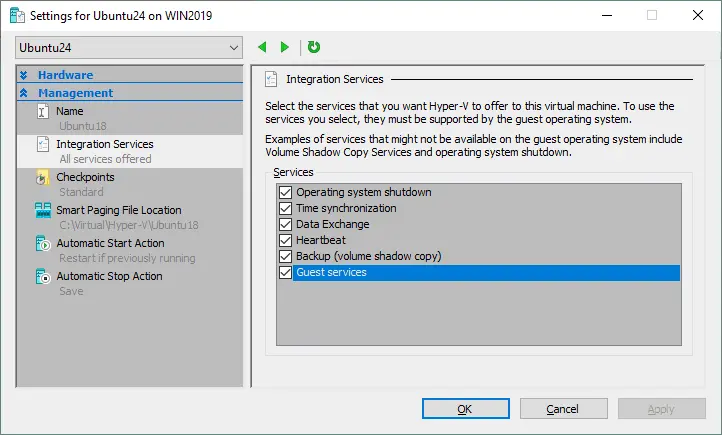
get-vmintegrationservice -VMName "Ubuntu24"You can also select the services you want Hyper-V to offer to this VM in the GUI. Open Hyper-V Manager, right-click your VM name and click Settings.
In the Settings window, select Integration Services in the left pane and tick the check boxes next to the services that are required (Guest services must be enabled in this example). Click OK to save changes.
- You can now re-check the enabled services in PowerShell (see the screenshot below):
get-vmintegrationservice -VMName "Ubuntu24"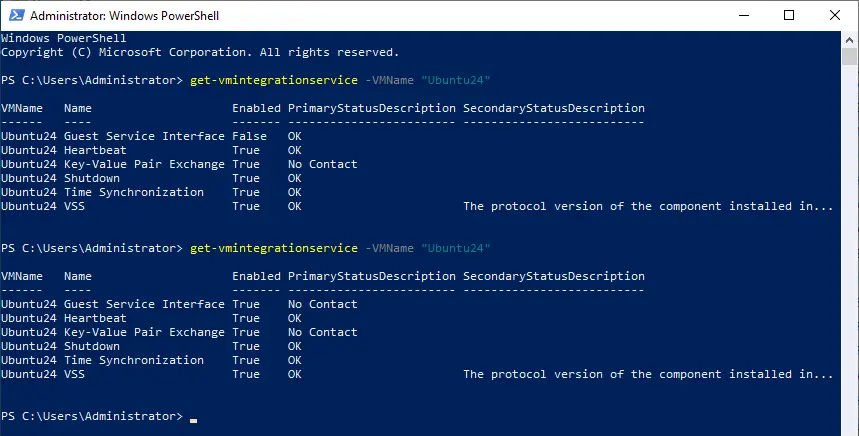
- You must activate Hyper-V Integration Services after installing them on your Ubuntu Linux. The
/etc/initramfs-tools/modulesfile contains a list of modules that you want to include in your initramfs.The initramfs is the initial RAM file system intended to mount the root filesystem (/). As a result, the initial root file system and init daemon (the first process that must run in Linux) can reside in kernel memory cache (not on a ramdisk, as with the initrd file system that acts as a block device of a fixed size and consumes more memory for caching). initrd was replaced by initramfs after Linux kernel 2.6 due to its advantages, such as flexibility, efficiency and simplicity. The initramfs is a complete set of directories that you can see on your root filesystem and is gzipped into a cpio archive.
- The Linux kernel can be monolithic and modular. In most cases, the module kernel is used. Let’s enable loading of the necessary modules:
vim /etc/initramfs-tools/modules - Edit the file and add these strings to enable loading of the appropriate modules:
hv_vmbus
hv_storvsc
hv_blkvsc
hv_netvsc
- Update initramfs:
update-initramfs -u - Restart your Hyper-V VM running Ubuntu:
init 6 - Verify that the modules related to Hyper-V for your Linux kernel are loaded:
lsmod | grep hv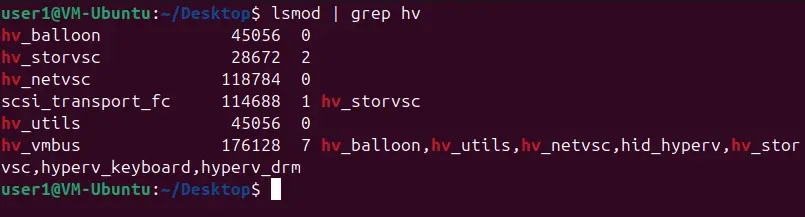
Tuning Linux Disk Optimizer
Linux has an I/O scheduler mode that optimizes disk I/O (input/output) by default, which is especially useful for magnetic (spinning) hard disk drives. Hyper-V has its own mechanism for optimizing the I/O performance of virtual disks.
Using two disk optimizers is not necessary and you can disable the built-in Linux disk optimizer. The Linux kernel allows you to use different I/O schedulers, each of which uses different algorithms. In this case, the NOOP scheduler must be used. NOOP is the simplest I/O scheduler that uses the First In First Out (FIFO) concept for the queue.
- To edit the I/O scheduler used by the Linux kernel, edit the grub configuration file with the command:
vim /etc/default/grub - Find the GRUB_CMDLINE_LINUX_DEFAULT string. In this case, this line looks as follows:
GRUB_CMDLINE_LINUX_DEFAULT=\"quiet splash\" - Edit this string as shown below:
GRUB_CMDLINE_LINUX_DEFAULT=\"elevator=noop\" - Save changes to this GRUB configuration file.
- Update the GRUB bootloader configuration:
update-grub2 - Reboot your Ubuntu Hyper-V VM:
init 6
Conclusion
Running Linux on Hyper-V is a practical way to combine the strengths of Windows and open-source environments. Once your Ubuntu Linux virtual machine is installed and configured, you can enjoy a flexible, secure and efficient setup for testing or production workloads. Regular updates and integration services ensure smooth operation and improved performance over time. With the proper configuration, Hyper-V delivers a seamless Linux experience on Windows systems.